Registering and managing your water carrier service in Hinekōrako
Guidance to help you register your water carrier service and manage information about your service in Hinekōrako – our self-service portal.
Information on this page is for water carrier services ('water tankers') only. Separate Hinekōrako user guidance exists for temporary drinking water supplies for planned events and for other types of drinking water supply that need to register with us.
If you transport drinking water, the carrier service will need to be registered as a drinking water supply before you start operating.
Begin the registration process by filling in the application to register a water carrier service form.
If you have your own water source that you use to fill your tankers, that will also need to be registered as a separate drinking water supply. You can register your water carrier supply by filling in the application to register a water supply form.
For more information on water carriers head to the water carrier page.
Key steps in the registration process
- Once we’ve processed your application form(s), we’ll email you instructions on how to log into Hinekōrako and add information.
- You’ll then need to add further details about your water carrier service and its supply in Hinekōrako and submit it for registration (see guidance below).
- We’ll email you to confirm when your registration is approved. The email will show the date when your registration needs to be renewed and outline your key responsibilities.
- Once the registration is completed, details of your supply are included on the public register of drinking water suppliesoutbound. You can request to withhold information from the public register under certain circumstances (see guidance further down this page).
Once your water supply is registered:
- You’ll need to renew your registration for each supply every 5 years, confirming that all your details and your drinking water safety plan are still current.
- If any information about your supply changes, you’ll need to let us know immediately by updating the relevant registration record.
Timeframe for processing your application to register
We’re required to process your registration within 20 working days of you submitting the application, unless we consider your application is incomplete or needs amending.
Where we require further information, the timeframe is put on hold until we receive the requested information.
We will advise you of the annual renewal date for the registered supply.
Roles and responsibilities
When you register your water carrier service in Hinekōrako, you’ll be asked to identify a supply owner, supply operator, overall supply contact and registration contact.
Each water supply can have multiple contacts and each contact can have more than one role (e.g. a contact may also be an owner and operator of the supply).
Supply owner
There must be at least one owner for a supply. An owner can be an individual (and listed as a contact) or an organisation. Where multiple owner-organisations are identified for a supply, you’ll need to list a key contact for each owner-organisation. These are the people we’ll contact if there are issues with the water supply. The supply owner is published on the public register of drinking water supplies.
More information on the meaning of 'owner' - the person(s) with effective control of the water supply
Section 12 of the Water Services Act 2021outbound defines owner as the person who has effective control of the drinking water supply. A person may be an individual or an organisation or corporate body that is a legal entity.
To help determine who has effective control, consider whether the person:
- owns the drinking water infrastructure (treatment plants, pipes, etc)
- owns or has long-term control of the land on which the drinking water infrastructure is based
- directs or has control over decisions about the funding or maintenance of the drinking water infrastructure, or collects fees, levies or other charges from consumers in relation to the infrastructure
- controls how the management of the supply is resourced (e.g. has the power to subcontract work).
No single factor has a higher priority than others. It is necessary to consider all the relevant factors and make a case-by-case assessment of who has effective control of your drinking water supply.
Note: Individuals or organisations that operate the supply can be different to the individuals or organisations listed as the owners.
The type of entity helps determine who has effective control
Types of legal entity include companies, government organisations, Māori incorporations, incorporated societies and charitable trust boards,. The entity may determine who has effective control.
- The entity may have direct control over 1 – 4 above. While an entity may seek input from others, the investment and decision-making rests with the entity. They generally own the infrastructure. If they do not own the land, the entity will have the right to use the land on which the supply infrastructure is based.
- Examples of drinking water supply owners in this category include councils, government agencies, airports, community water supplies, camping grounds and education facilities.
- These entities will be listed as the owner in the registration record.
Examples of trusts include marae, iwi, hapū trusts, family/whānau trusts and community organisation trusts.
- The named trustees are the owners of any assets on behalf of the beneficiaries of the trust. This may include the drinking water supply infrastructure and land on which the drinking water supply is based.
- Are decisions on funding or maintenance, collection of fees, or control of how the supply is resourced made by all trustees (i.e. a collective decision) or by specific trustees?
-
-
If a collective decision, all trustees should be listed as owners in the registration record.
-
If by specific trustees, only these trustees should be listed as owners in the registration record.
-
-
If the land on which the drinking water infrastructure is based is owned by an individual who is not in the trust but contributes actively to decisions about the location of, or access to, the infrastructure, consider including them as an owner in the registration record.
-
The trust cannot be named as an owner as it is not a legal entity.
Are you an individual supplying water to consumers in other buildings on your property or to other properties?
- If you're the sole decision-maker on investment and maintenance issues, collection of fees or how the management of the supply is resourced, you're the owner who should be listed in the registration record.
- If you've paid for and installed the infrastructure that other buildings and properties can connect to, you're the owner who should be listed in the registration record.
- If some individuals pay a fee for access to the water supply but have no input into decision-making, they shouldn't be listed as owners as they don't have effective control over the supply.
Are multiple people involved in your water supply? For example, you might be an unincorporated group (e.g. Blue River Bach Owners) or a group of individuals without any structure. The multiple individuals will be consumers of the supply and/or have components of the supply on one or more parcels of land.
- Are decisions on funding or maintenance, collection of fees or supply control resourcing made by all individuals involved in the supply (i.e. a collective decision) or by specific individuals?
-
-
If a collective decision, all individuals should be listed as owners in the registration record.
-
If by specific individuals, those individuals should be listed as owners in the registration record.
-
-
If the land where the drinking water infrastructure is based is owned by an individual who is not a consumer of the supply but still plays a key role in decisions about location of, or access to, the supply, consider including them as an owner in the registration record.
-
If some individuals pay a fee to access the drinking water supply as consumers but have no input into decision-making, they should not be listed as an owner as they don't have effective control over the supply.
More information on supply owner registration responsibilities
As the owner of the water supply, you're responsible for ensuring the supply is registered. You or your organisation are accountable for ensuring the water supplied is compliant with the drinking water standards.
The Water Services Act 2021outbound defines an owner of a drinking water supply as the person who has the effective control of the drinking water supply. To determine this, you need to consider whether the person:
- owns the drinking water infrastructure (treatment plants, pipes, etc.)
- owns or has long-term control of the land on which the drinking water infrastructure is based
- directs or has control over decisions about the funding or maintenance of the drinking water infrastructure, or collects fees, levies or other charges from consumers in relation to the infrastructure
- controls how the management of the supply is resourced (e.g. has the power to subcontract work).
Identifying the person(s) with effective control of the supply is important. If there's a failing in the duties associated with the supply, the courts may need to decide who the owner is and therefore who is responsible for ensuring the duties were undertaken.
Some supplies will have one clear owner, while others may have multiple owners. More detail on supplies with multiple owners, including examples, is available under the dropdown headings below.
A supply owner may opt to delegate the registration process. However, the owner remains responsible for the accuracy and currency of the registration and associated records in Hinekōrako. You'll also need to provide a registration contact (which can be you) and an overall supply contact (who is listed on the public register of drinking water supplies as the primary contact for consumer enquiries).
More information on managing multiple owner-organisations
Multiple owners may exist for the whole water supply or for components of it (e.g. treatment plants) . When you register, you can record all owners and key contacts and identify the appropriate key contact for each component and the supply as a whole.
Multiple owners might be organisations and/or individuals. For example:
- Several individuals have funded the establishment of a small water supply to provide drinking water for themselves and/or others. All of these individuals have input into investment decisions, maintenance, the appointment of the operator of the supply, etc. In this case, all the individuals should be listed as owners.
- Multiple councils own components of a water supply that they previously managed. The supply is now managed under a single local government arrangement (such as a council-controlled organisation),. Wellington Water and Watercare are examples. All councils must be listed as an owner.
More information on complex ownership of supply components
A water supply can be owned by multiple owners (e.g. a group of owners or businesses). There can also be situations where multiple owners exist for different components of the supply (usually the treatment plants and distribution system of pipes).
This situation is most likely to occur where separate supplies are being operated as an integrated network in a local government environment. Wellington Water is an example of this complex ownership of components of the water supply.
Multiple owners of components may occur for non-council water supplies where smaller suppliers collaborate to run multiple supplies as an integrated supply.
Details of the owners of individual components of the water supply can be recorded in Hinekōrako. This will not identify which components are owned.
The registration contact can upload a separate document outlining the ownership structure on the final page of the registration record.
Supply operator
The supply operator is the organisation or individual who operates the supply or supervises its operation. This contact is published on the public register.
Overall supply contact
An overall contact for the supply is required and this contact is published on the public register as the primary point of contact for consumers. It's up to the owners to agree on the overall supply contact. The overall supply contact will have comprehensive knowledge about the water supply and its operation. For a water supply with multiple owners, this is likely to be the operator or the primary operator.
Registration contact
Each water supply needs to have a registration contact. This person generally creates and maintains the registration record. The registration contact can be the owner, operator, employee, trustee, shareholder, director or agent. This person will be our primary contact if we have any questions or need to clarify registration information. The registration contact and all owners will receive confirmation emails when the supply is registered or if there are any changes to the registration.
Hinekōrako user guides
Getting started – registering a new water carrier service
This guidance will help you understand the processes you'll follow and the supporting information you'll need to complete your water carrier service registration in Hinekōrako.
This guidance is for water carrier services only. Separate Hinekōrako user guides are available for temporary drinking water supplies for planned events and all other types of drinking water supply that need to register with us.
How to load your water carrier service details
The first step is to set up a RealMe® account. You'll use this each time you log in to Hinekōrako.
Establishing a RealMe® account and linking it to Hinekōrako
Download a pdf of this guidance: Establishing a RealMe® account and creating a user account in Hinekōrako
This guide takes you through the steps to create a user account in the Supplier Portal part of Hinekōrako. To access your Hinekōrako account you’ll need a RealMe® account. RealMe® is the New Zealand Government’s identity management service. Find out more hereoutbound.
If you don’t already have a RealMe® account, you’ll be able to create one during this process. Thereafter, you'll aways log in to Hinekōrako using your RealMe® account.
If you already have a RealMe® account that you use to access work and/or personal services, you can use it here. You don't need a new one. Your RealMe® account is only tied to your Hinekōrako account for the purposes of making sure it's really you who's logging in.
Email invitation
Establishment of your Hinekōrako user account begins when you receive an email from us with a link inviting you to create an account.
Step 1
Click on the link in the email.

Step 2
You’ll be taken to the Hinekōrako portal and from there transferred to RealMe®.
The transfer might take a moment. If it does, you may see this page. Please wait until you're redirected.

Step 3
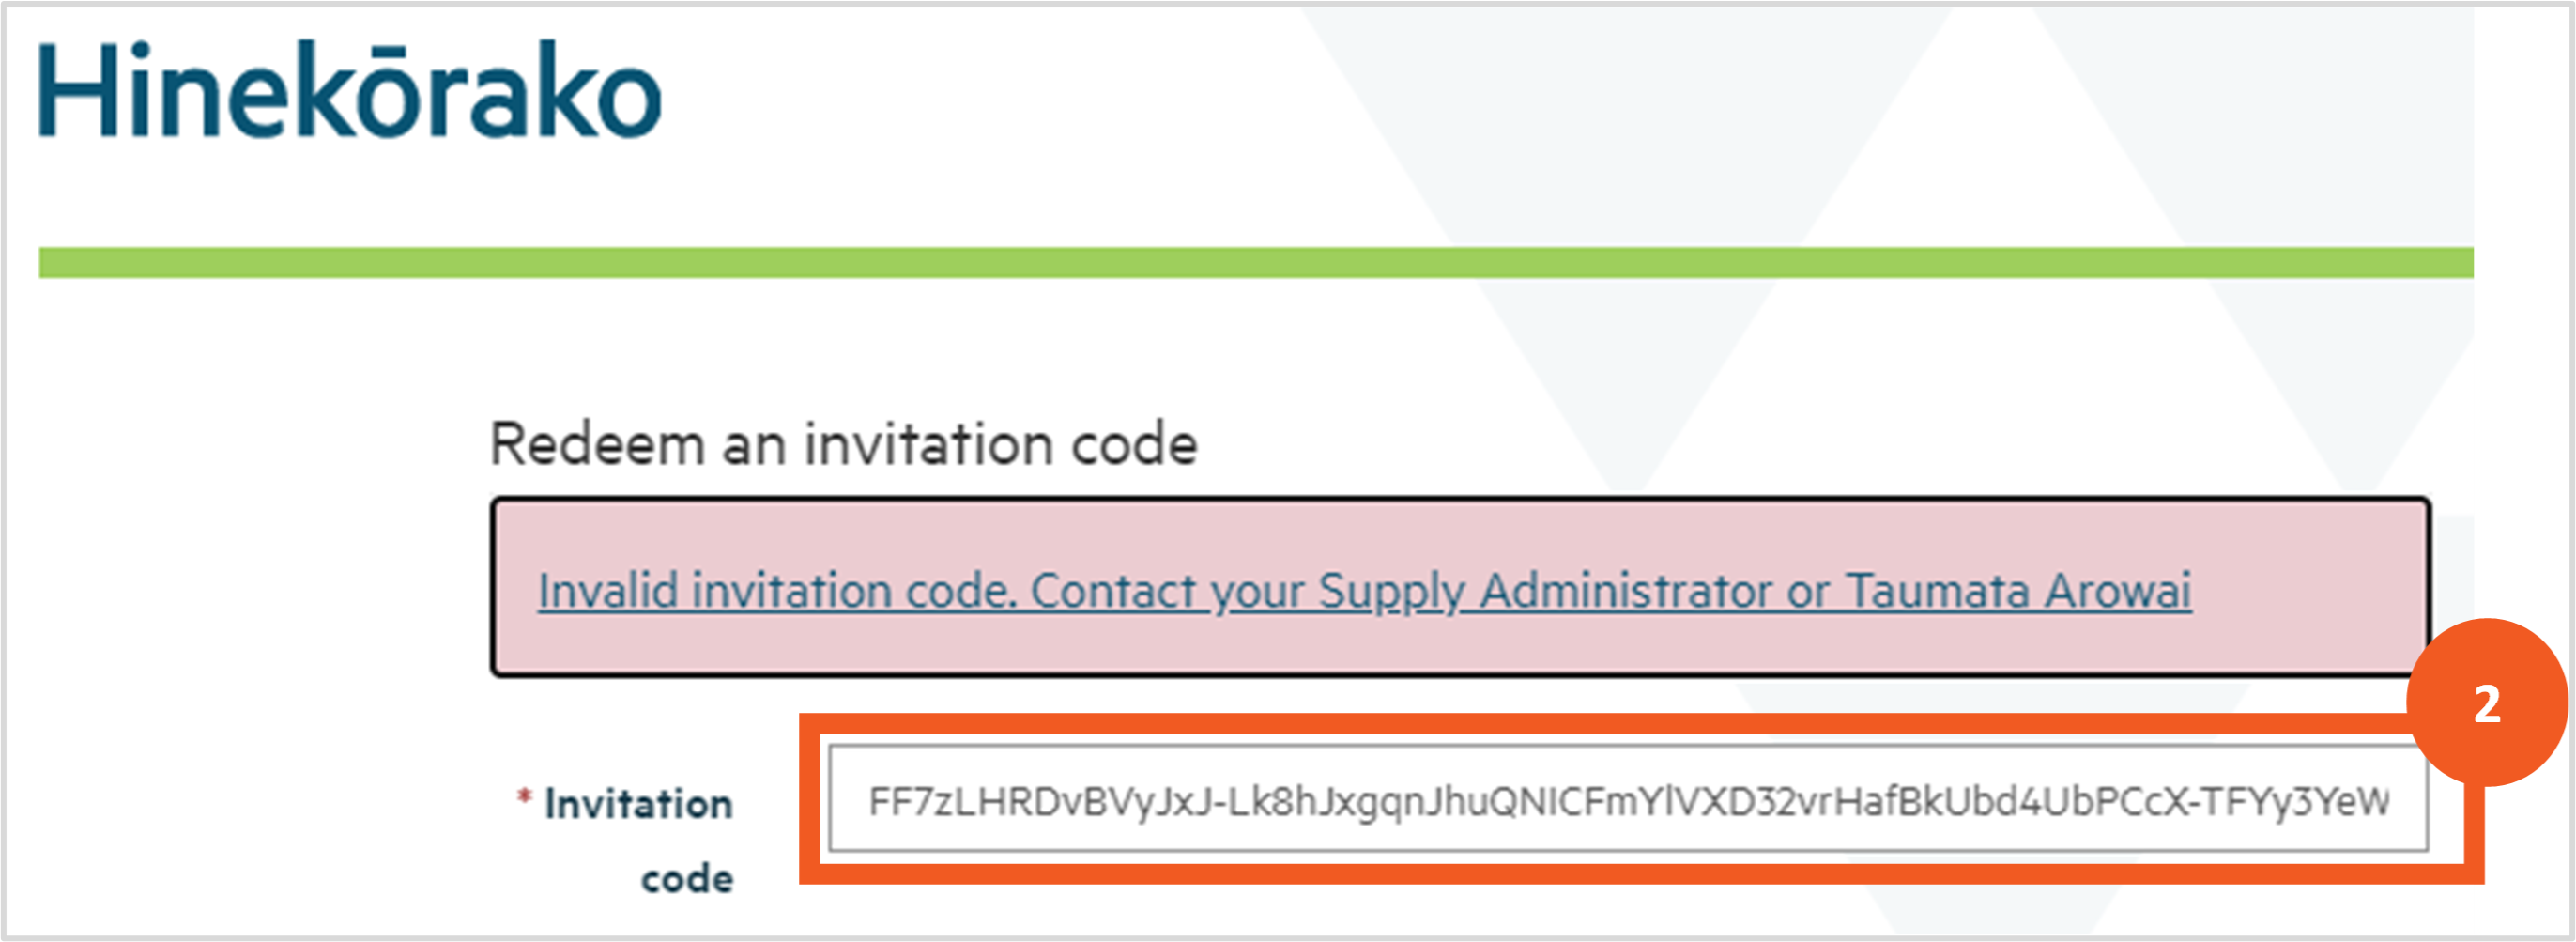
It's possible that, for your protection, your email platform may have encrypted the link in the email and then unencrypted it when you clicked on it, changing the invitation code in the link in the process. In this case you may receive an Incorrect Invitation Code error.
If you do:
- Go back to the invitation email and select and copy the invitation code included in it.
- In the Hinekōrako screen where the error is displayed, delete the current invitation code, paste in the invitation code copied from the email and hit Enter.
If you still experience an error, contact us at info@taumataarowai.govt.nz 
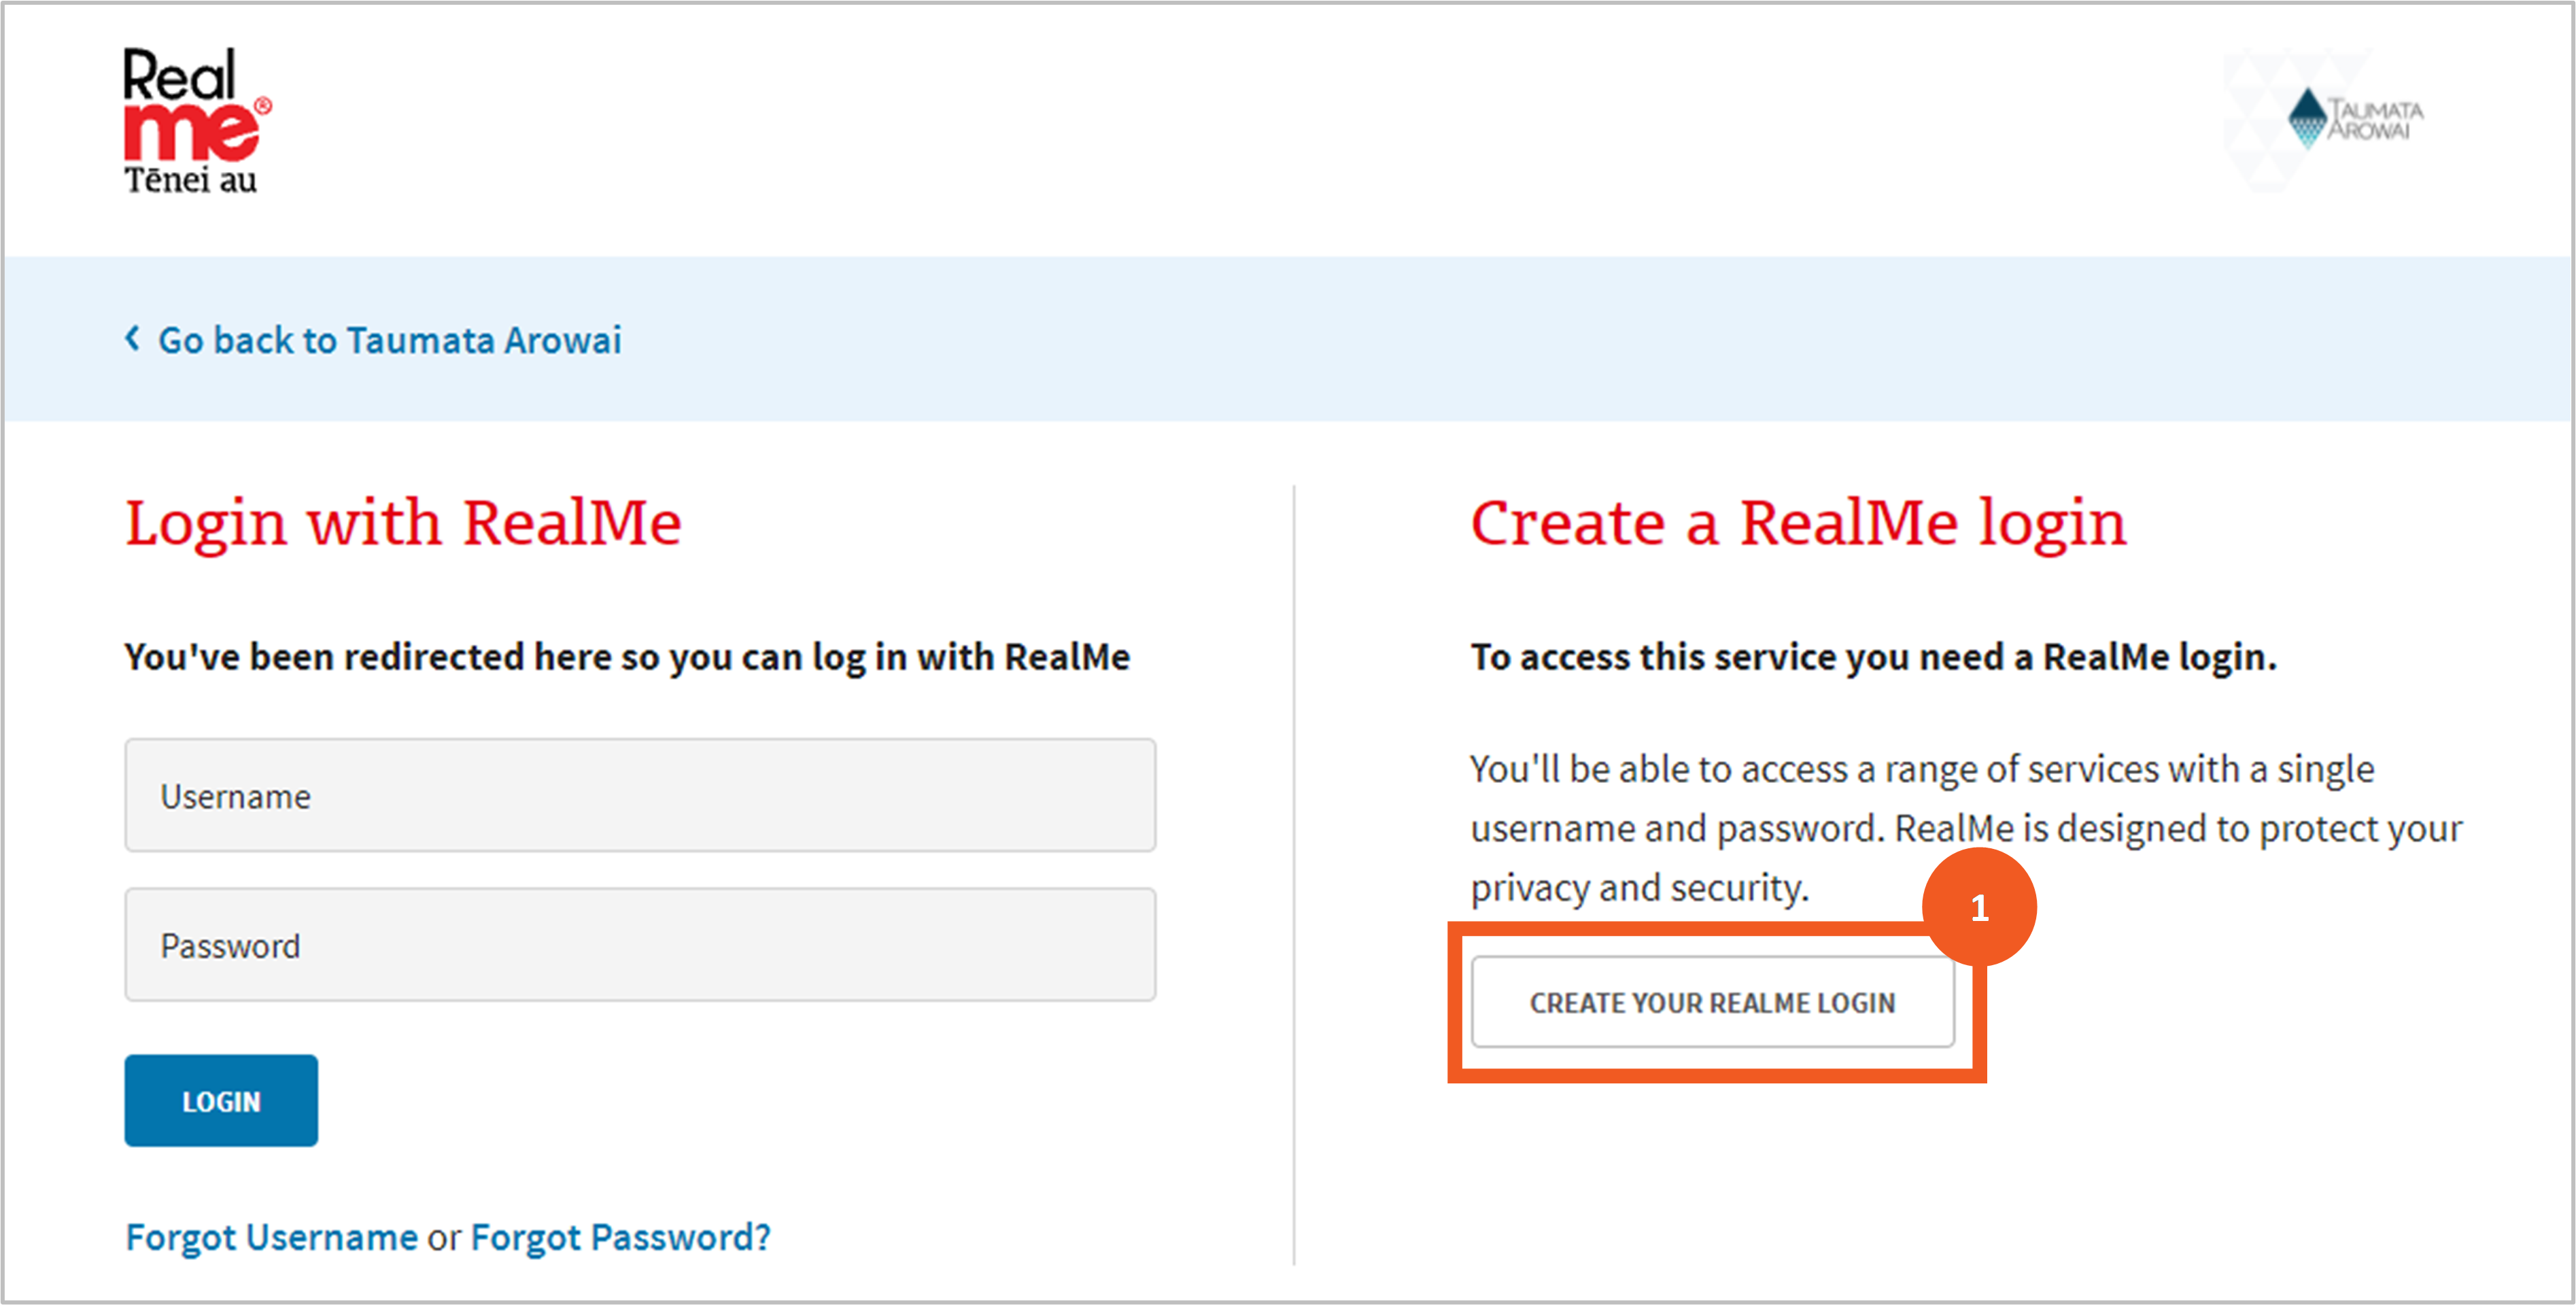
Once you're on the RealMe® page you have the following options:
- Create a RealMe® account. Go to Step 4.
- Retrieve your forgotten RealMe® username or password. Go to Step 9.
- Link an existing RealMe® account to your Hinekōrako account. Go to Step 10.
Creating a new RealMe® account
Step 4
Click on the Create Your RealMe® Login button.
Before you go further, we recommend you read the guidance for creating a new account on the RealMe®outbound website.
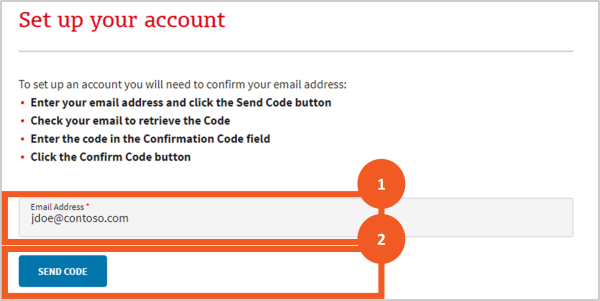
Step 5
You'll be taken to a page where you can set up your RealMe® log in details.
- Enter your email address. This does not have to be the same as the one on your Hinekōrako account. It will be the email address RealMe® uses to send you emails relating to forgotten passwords or usernames.
- Start the process of confirming the email address is yours by clicking Send Code.
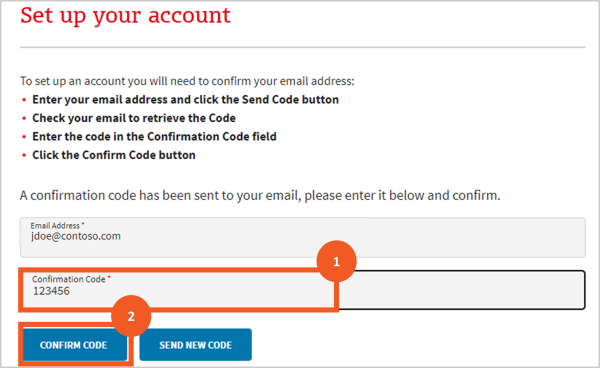
Step 6
A field will appear for entering the confirmation code sent to the email address you specified.
- Enter the code.
- Click Confirm Code.
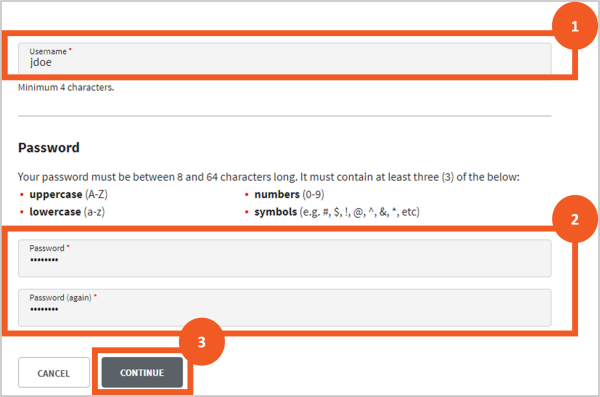
Step 7
Once you have entered the correct code:
- Enter a unique username. RealMe® will tell you if the name you have selected is already in use.
- Enter a password and then confirm that password. The passwords must match and meet the security requirements listed on the page.
- Click Continue.
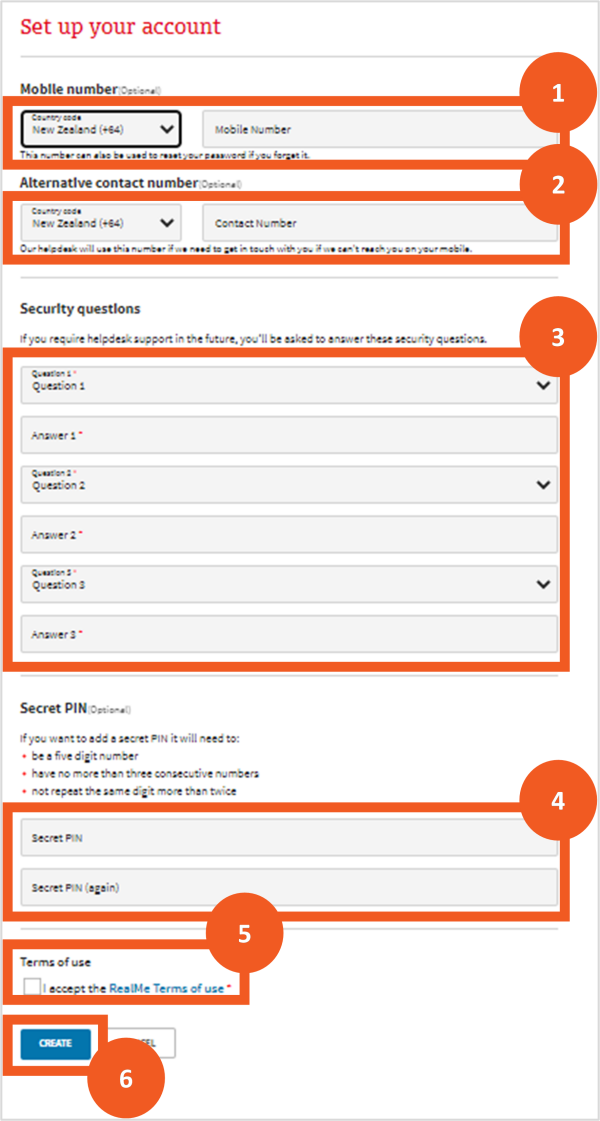
Step 8
You’ll then be taken to a page where you can provide additional security details. You can complete your account by:
- Optionally providing your mobile number. As with the password, you’ll be asked to click on Send Code and then enter the code received by text message in the field that appears.
- Optionally provide an additional contact number for RealMe® ’s helpdesk.
- Select and provide the answers to three security questions, which RealMe® ’s helpdesk will use to confirm you are who you say you are if you contact them.
- Optionally set up a 5-digit PIN as another option to confirm your identity with the helpdesk or when resetting your password.
- Read and accept the RealMe® terms of use.
- Click Create to create your account.
Retrieve your RealMe® username or reset your password
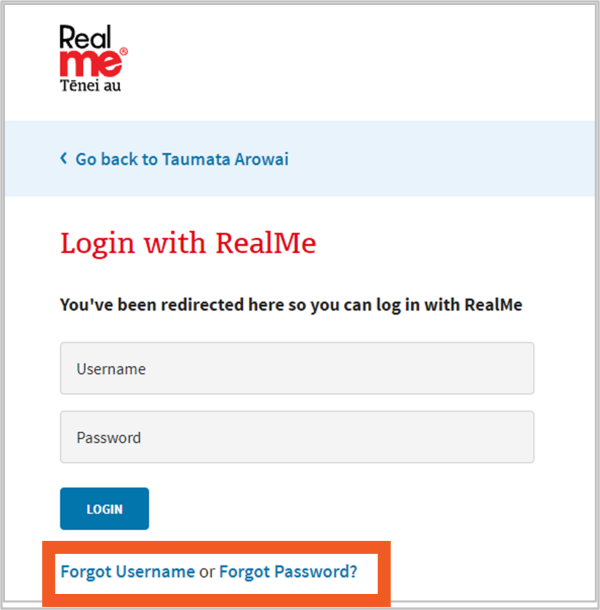
Step 9
If you have an existing RealMe® account you can use the links on the login page:
- Retrieve your RealMe® username if you've forgotten it, or
- Reset your RealMe® password if you've forgotten that.
For further instruction on how to do either, please refer to the RealMe® websiteoutbound.
Link an existing RealMe® account to your Hinekōrako account
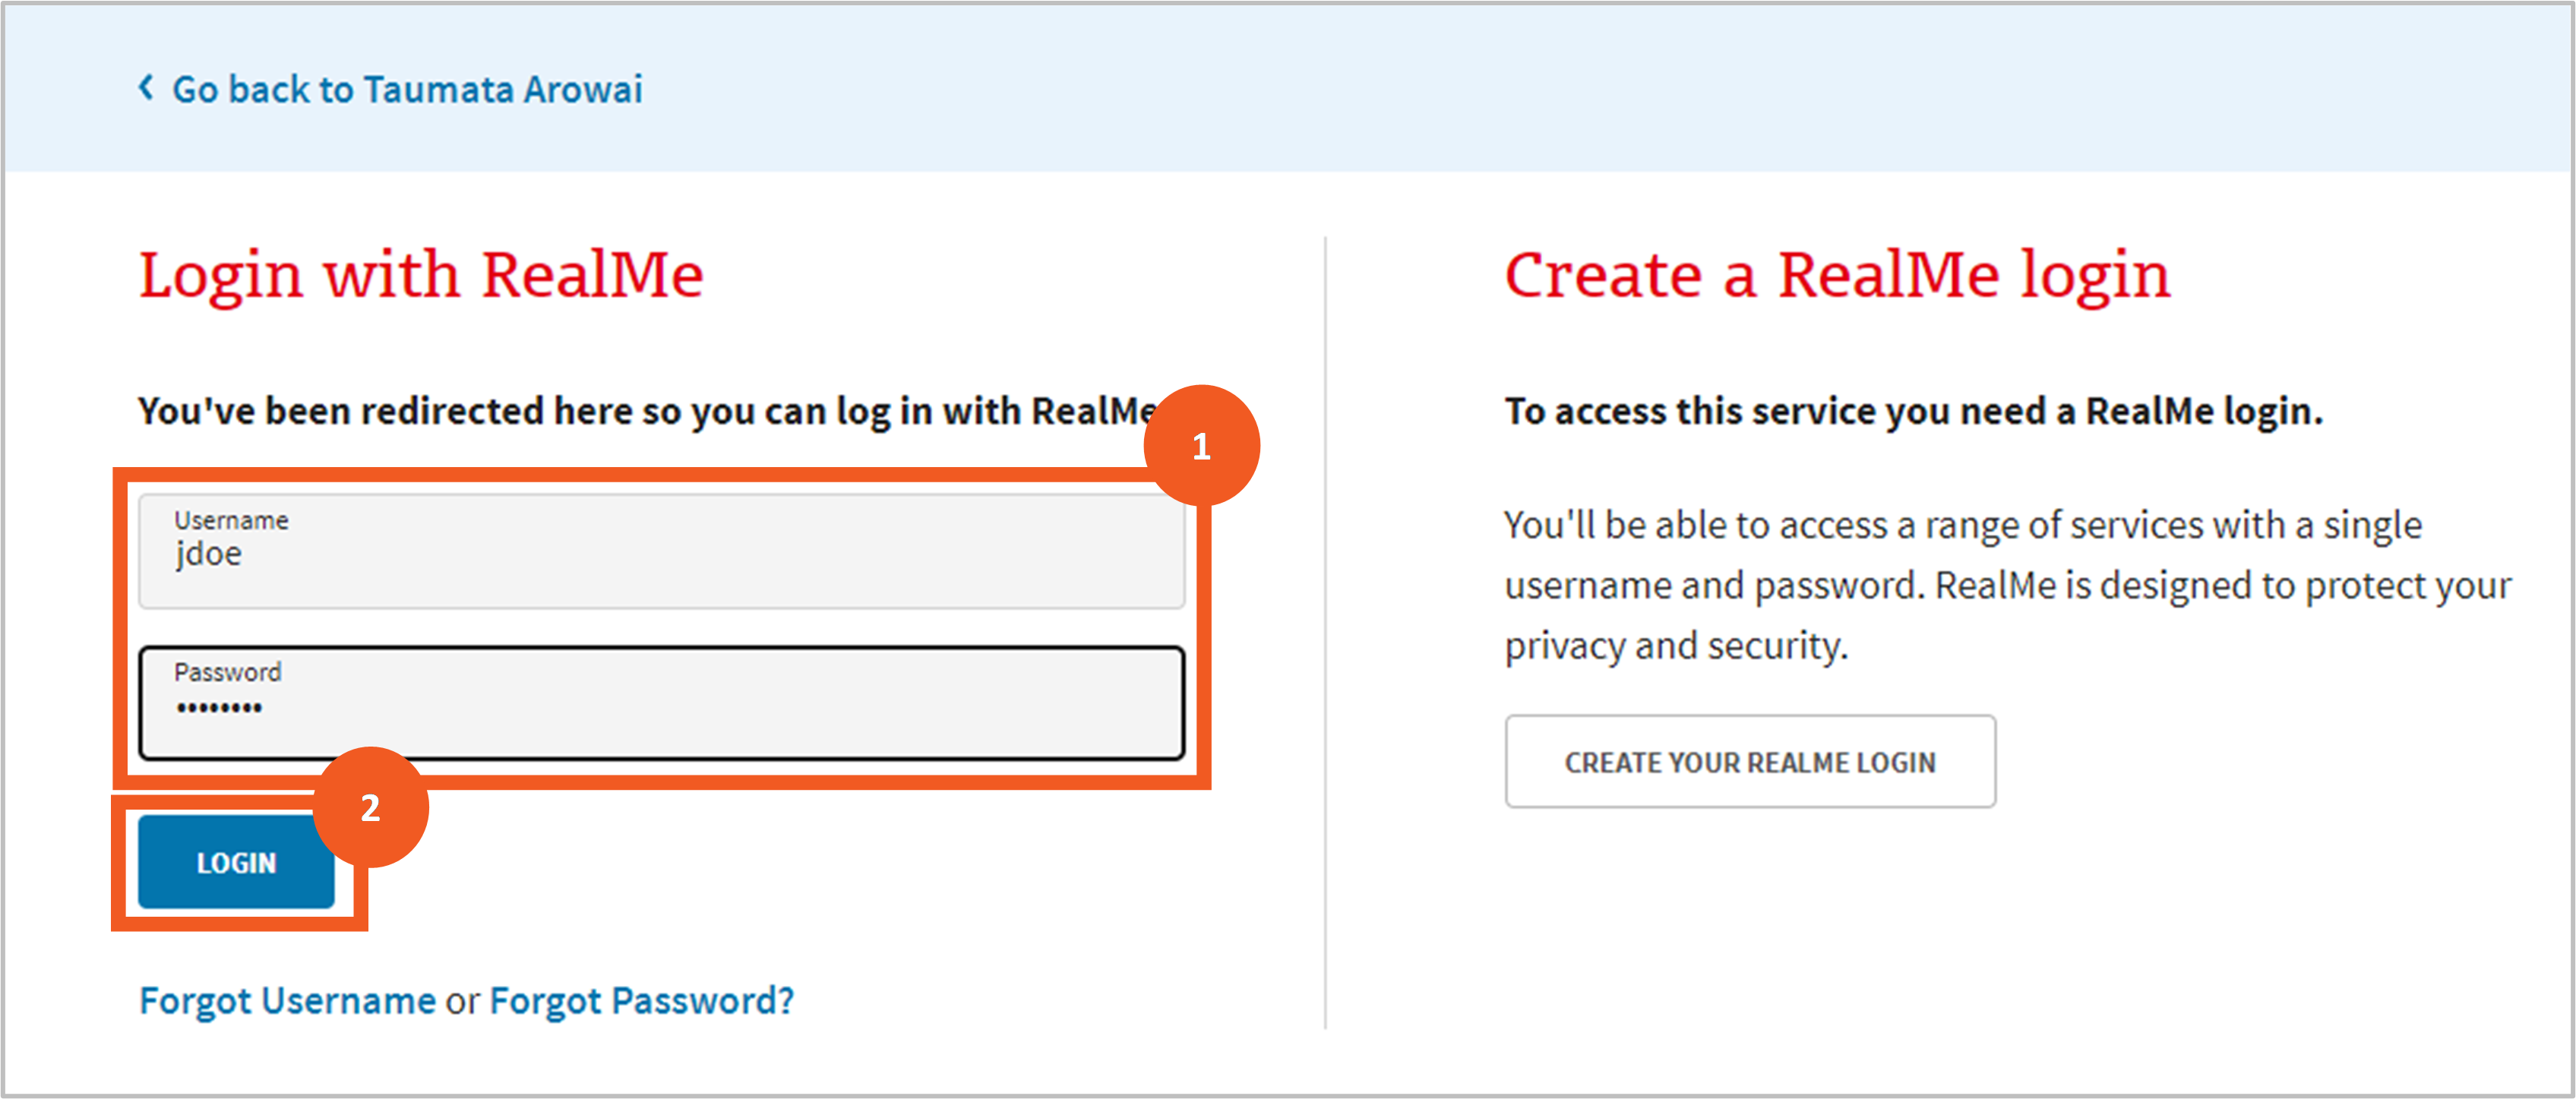
Step 10
To link your existing RealMe® account to your Hinekōrako account simply log in to RealMe® at this point by:
- entering your username and password
- clicking Login.
Read and accept the Hinekōrako terms of use and privacy statement
Step 11
Before you can access Hinekōrako you'll need to acknowledge that you've read and agree to comply with the Hinekōrako terms of access and privacy statement:
- Open and read the terms of access by clicking the Terms of Access link. The terms will open in a separate tab in your browser.
- Return to the acknowledgment page and open and read the privacy statement by clicking the Privacy Statement link. This also opens in a separate browser tab.
- Click in the acknowledgement checkbox.
- Click Continue.

Bookmark Hinekōrako for future logins
Step 12
After acknowledging the terms of access and privacy statements, you'll be taken to the My Supplies page. This is your home page for Hinekōrako.
We recommend that you add this page to your list of browser bookmarks so you can return to it easily in future. Alternatively, you can return to Hinekōrako and log in at this URL: hinekorako.taumataarowai.govt.nz.outbound
Be aware of Hinekōrako timeouts
Step 13
For your security, Hinekōrako will time out after 30 minutes of inactivity.
If you return to a Hinekōrako screen after it has timed out and attempt to move to another page, Hinekōrako will send you to RealMe® to log in again. If you were in the middle of completing a form and attempt to keep working on it, you may receive error messages relating to permissions or other system-related matters.
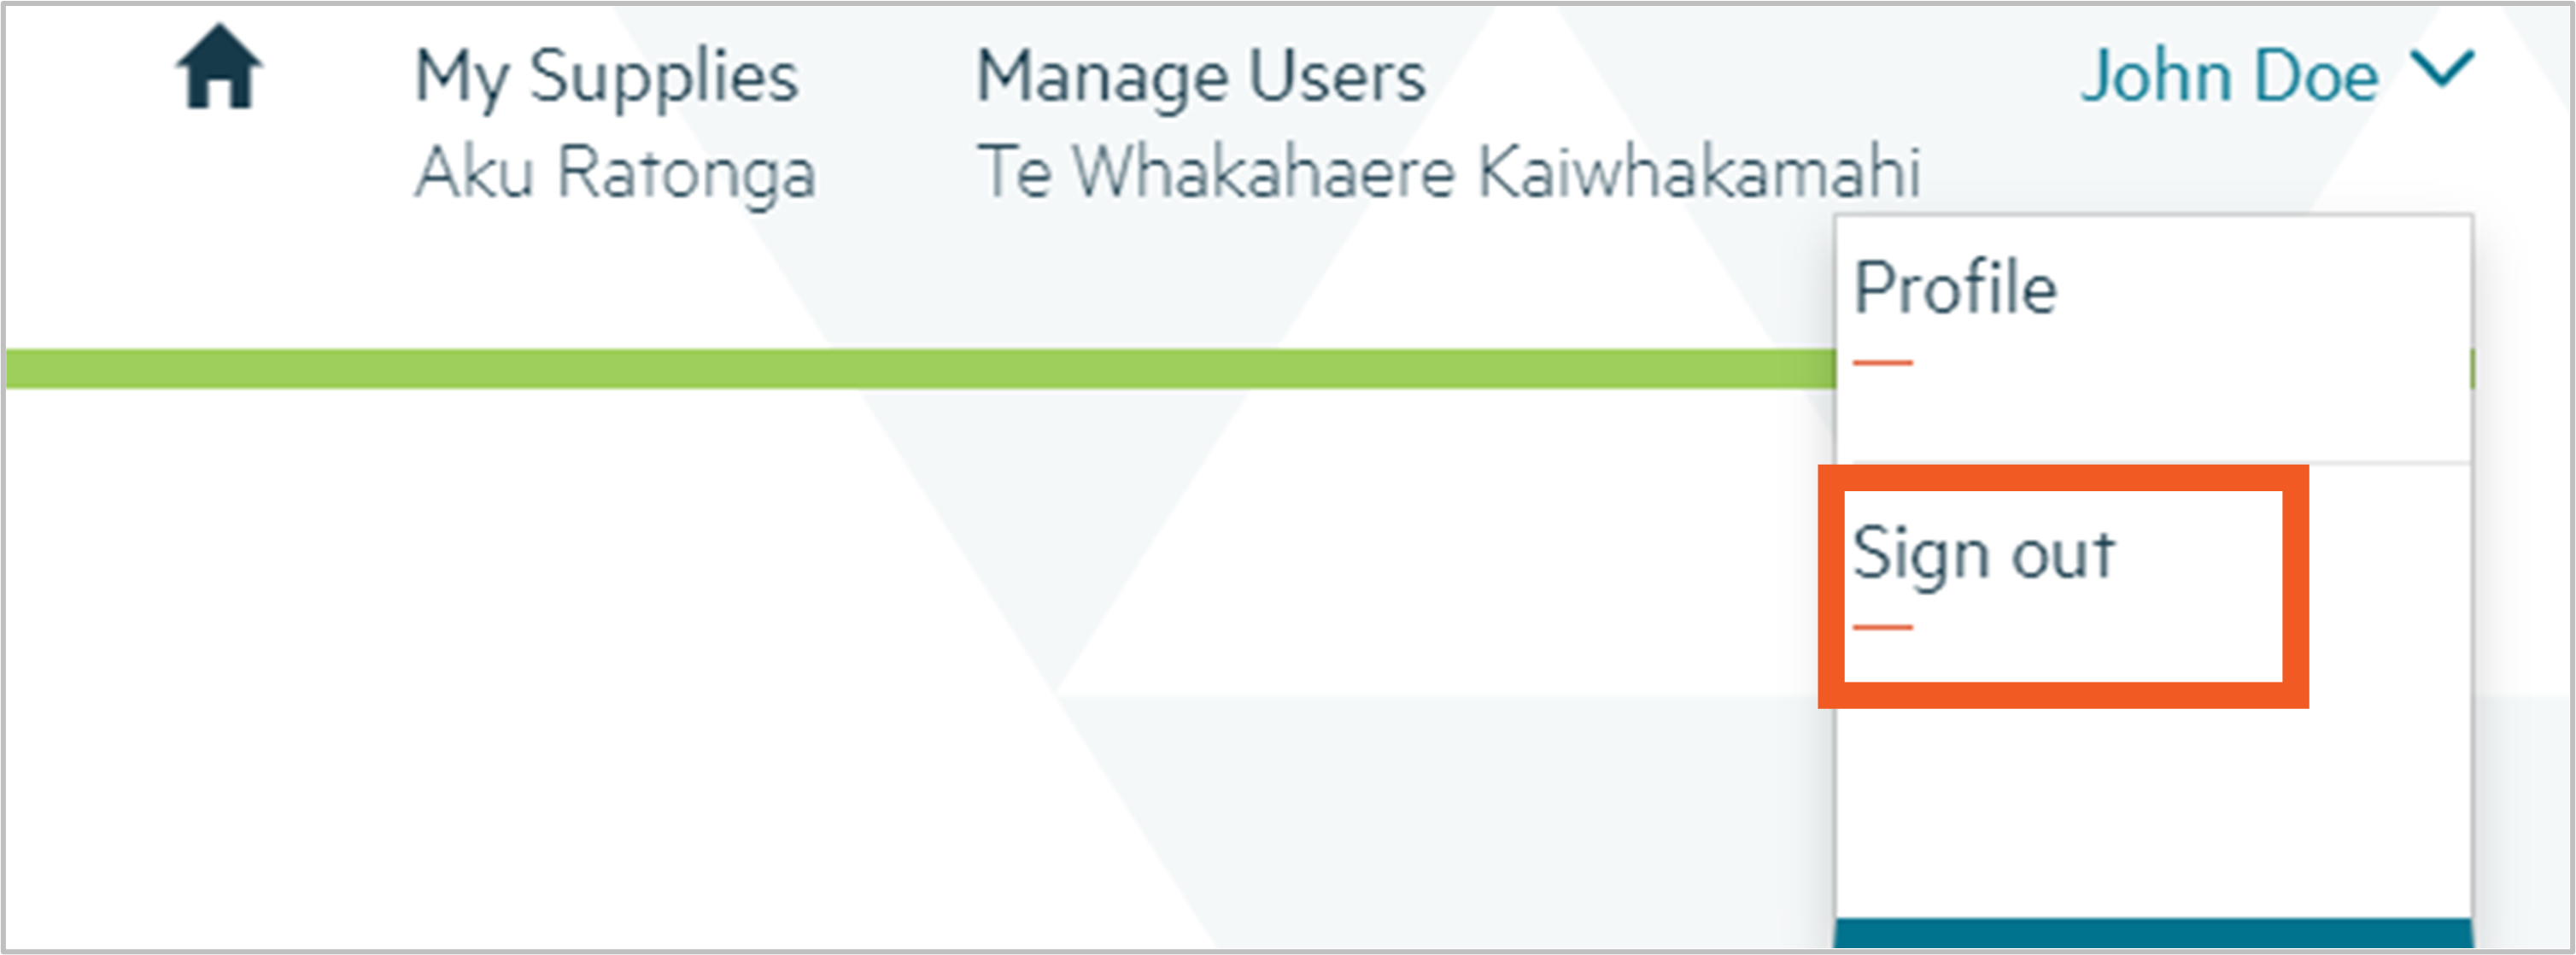
If you receive such messages, click Sign out on the dropdown menu by your name and then click on the RealMe® login button to log in again.
Familiarise yourself with the My Supplies page
Step 14
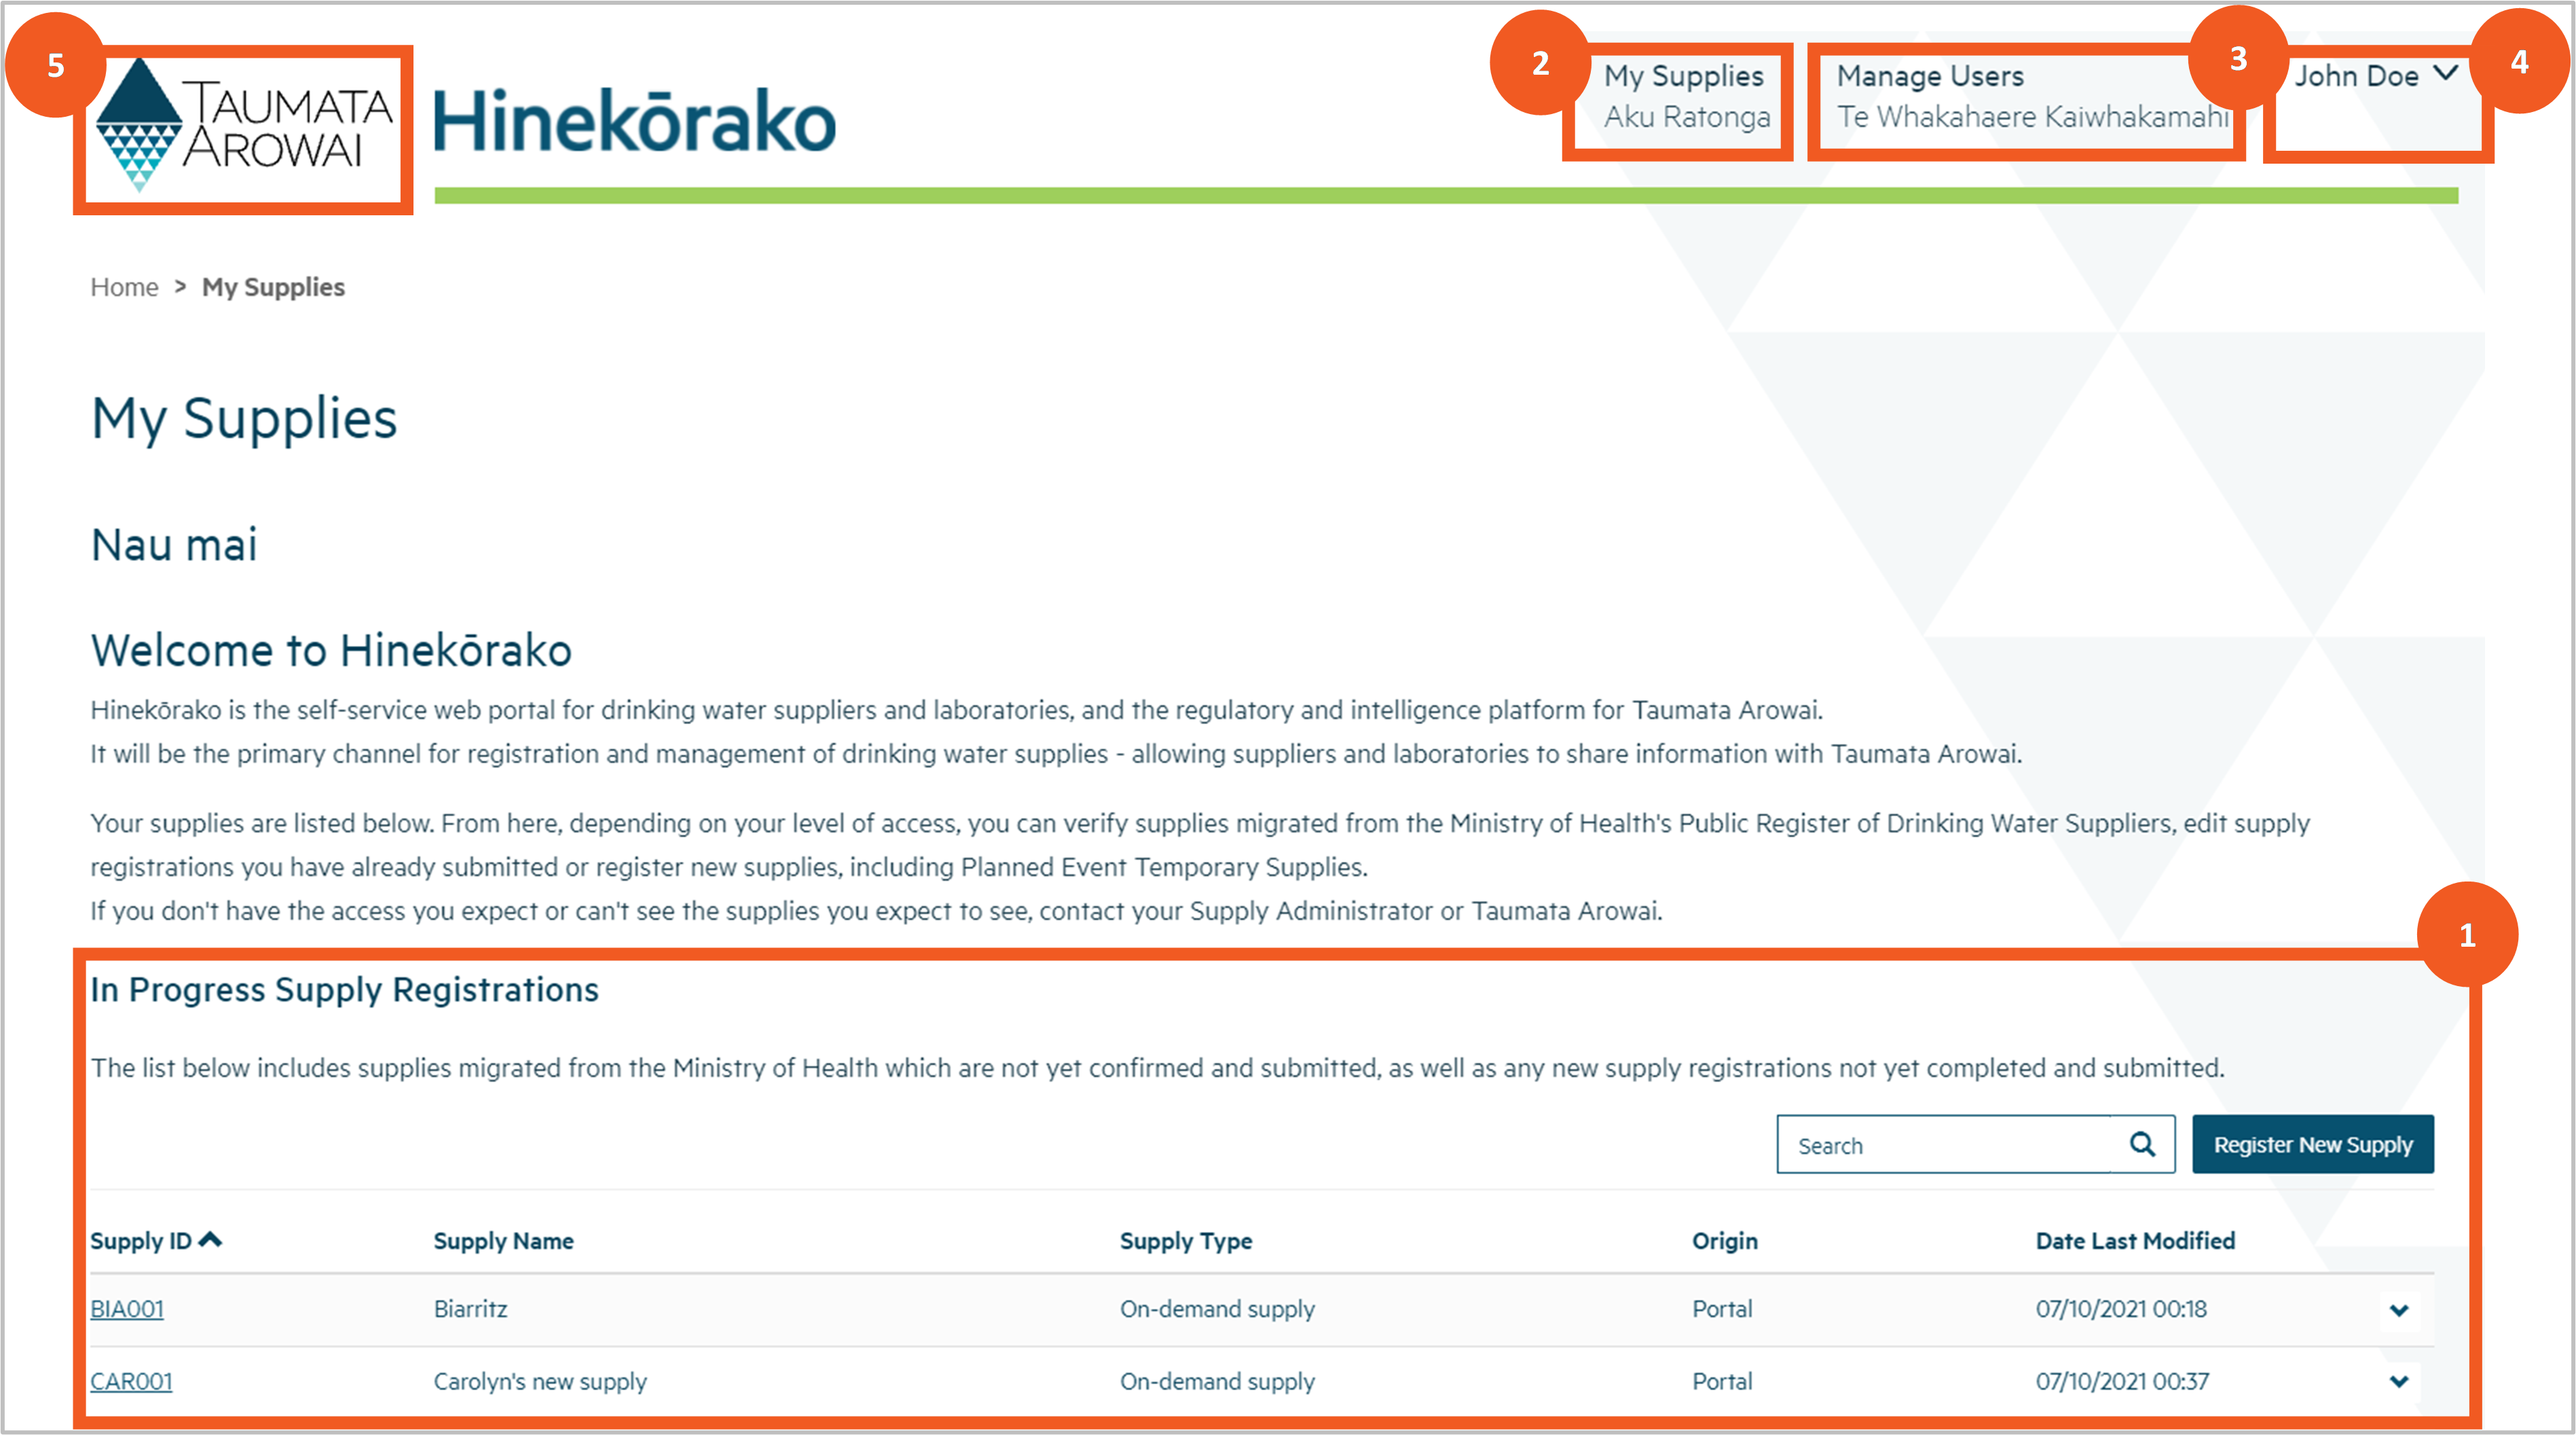
From the My Supplies page you can do a number of things:
- See your supplies and, depending on your level of access:
-
- click through to view the supply details, including all things related to the supply (e.g. any drinking water safety plans submitted to The Authority and any drinking water safety issues notified to The Authority)
- register a new supply or click through to an existing supply to view notifications related to the supply or submit a new notification. Previously unregistered supplies do not have to be registered for some time yet. Please ensure you have spoken to The Authority about your reasons for registering a new supply.
Exactly which supplies you see and what you can do with them will depend on the Hinekōrako user role you've been assigned. See the Understand supply groups and user roles guidance (in expandable section below) for more information.
The first time you log in as a supplier transferred from the Ministry of Health’s Register of Drinking Water Suppliers, you will see your supplies listed with the Origin of Migrated. These supply records are available for you to verify as complete and correct.
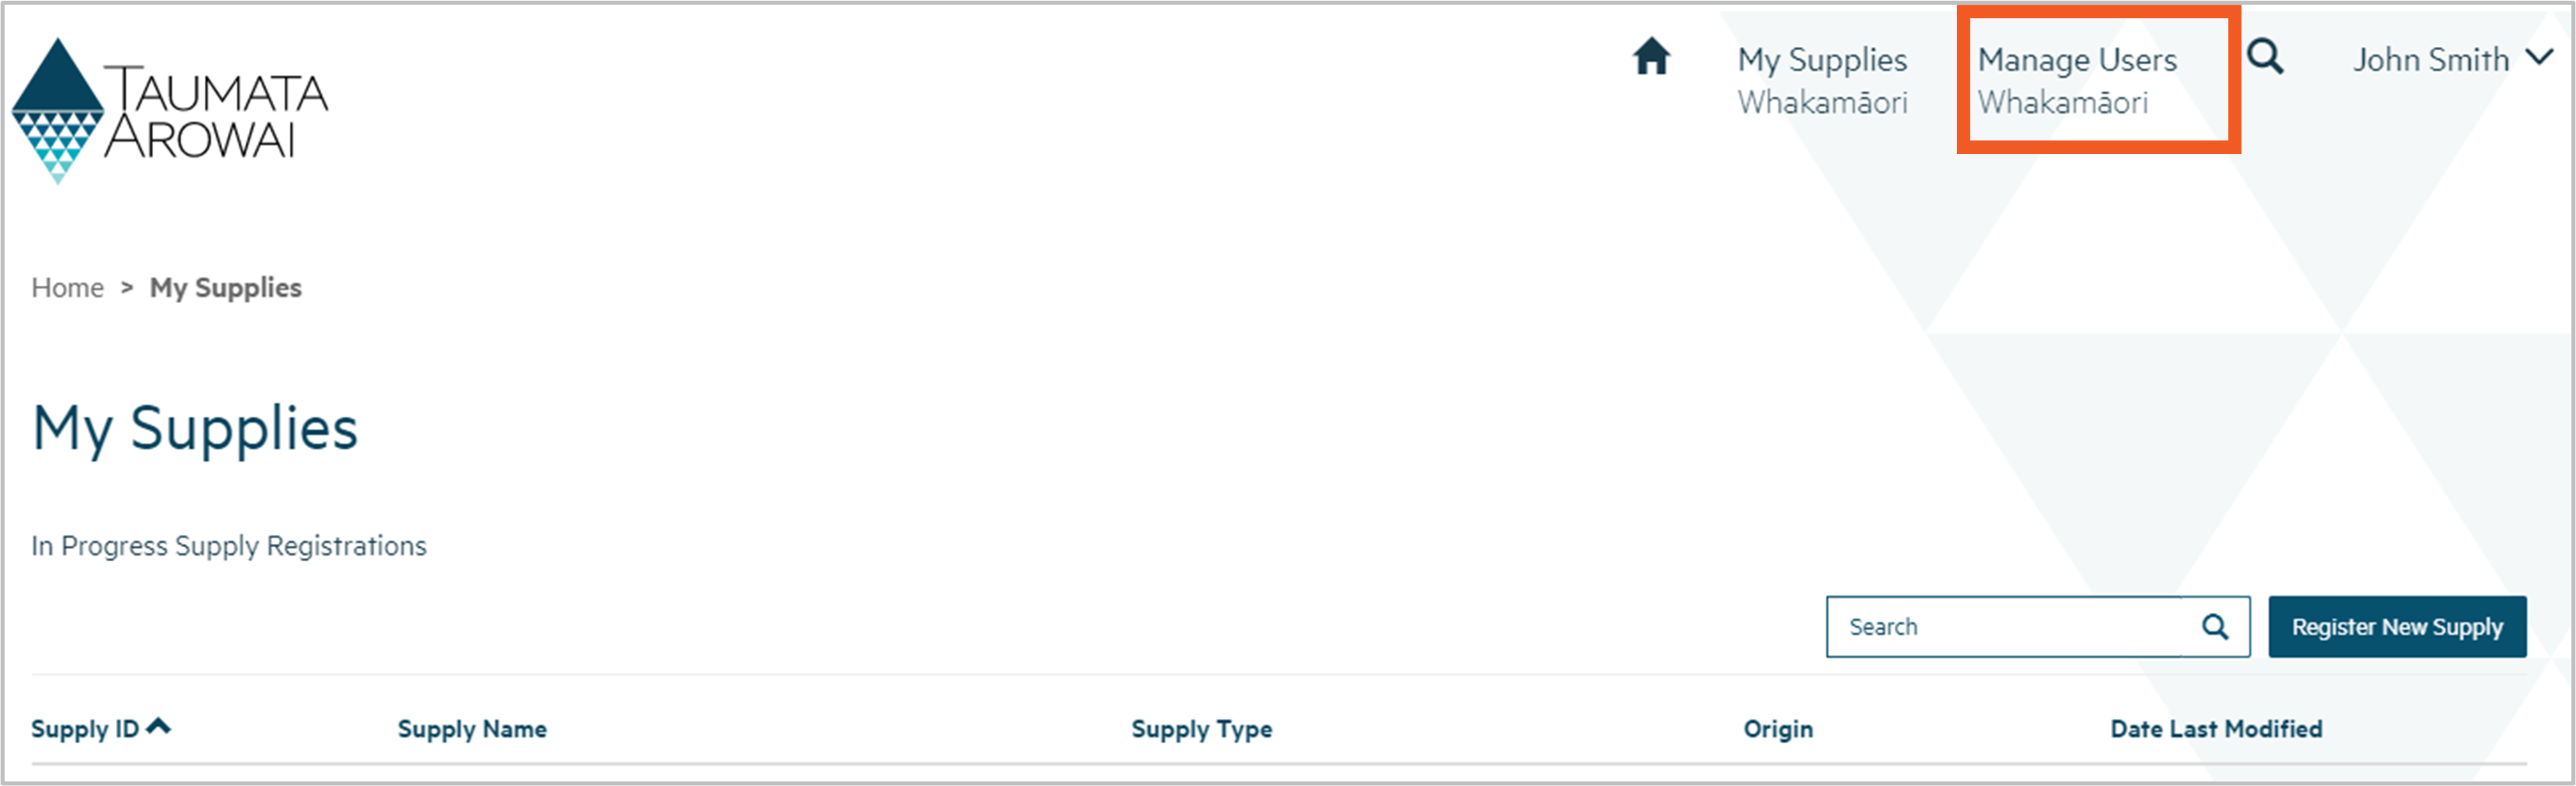
2. Return to this page, by clicking the My Supplies menu option at the top.
3. If you are a Supply Group Administrator or Supply Administrator, manage the supply portal access of other users to your supplies by clicking on Manage Users.
4. Sign out or update your own profile, including contact details, by selecting from the dropdown menu by your name at the top right of the screen.
5. Go to the Authority's website by clicking on the the Authority logo.
Information to help you complete your water carrier service details
Understanding the data held about your water carrier service in Hinekōrako
Download a pdf of this guidance: Supply data - water carrier services
Overview
This guide explains the data recorded in Hinekōrako about your water carrier service. It explains the information required in each field that you'll be asked to complete when you register your supply.
Water carrier services ('water tankers') source drinking water from other supplies, which may be your own, or a supply managed by other individuals or organisations (such as a council supply).
If you source water from your own supply, and that supply is used only for your water carrier service and not also as a general supply of drinking water to properties, then that supply will be registered as a water carrier supply.
It's important that the supplies from which you source water for your water carrier service are registered with the Authority so you can identify them, in Hinekōrako, as the source for your service.
Data held in Hinekōrako about water carrier services is divided into the following sections of the registration form. Each section is completed in a separate screen:
Section |
Explanation |
| Supply Details | The general details of the water carrier service (e.g. its name, the region in which it is primarily based). |
| Supply Components | Details of the supply or supplies that provide the water for your water carrier service. |
| Supply Relationships |
The responsibilities and roles of the various people and organisations related to the water carrier service are captured in the registration record as supply relationships. When creating a supply relationship record you'll add a person as the contact, or an organisation, then indicate the nature of the relationship of that person or organisation with the water carrier service. For example, the person or organisation might be the Owner, Operator or an agent. You can also indicate whether the person is the Overall Supply Contact and/or the Registration Contact. |
| Final Information |
This is where you upload any documents relating to the supply. For example, you can explain a complex owner/operator structure or advise whether you've requested for information to be withheld from the public register of drinking water supplies. |
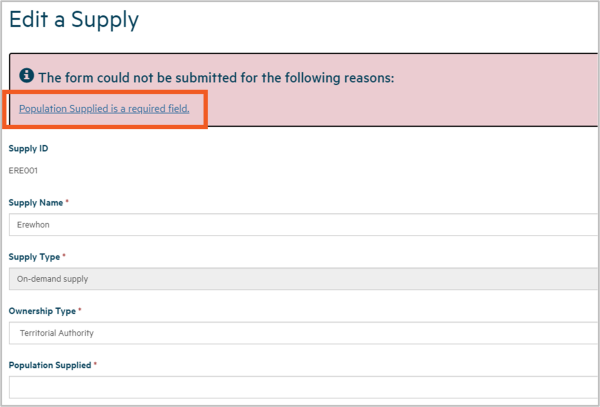
The following sections explain the data recorded in each of the above sections, including the allowable values for each piece of data and any other requirements. Mandatory field means you must provide data in that field on the screen. Mandatory fields are indicated by a red asterisk:

There are different types of fields that provide different ways of recording data. See the end of this expandable section for a full list.
Note: If you attempt to move on from any screen without providing all the mandatory data, or there's a problem with the data you've provided, one or more error messages will be displayed indicating where the problem is with that particular field. Click on the error message link to go to that field.
Edit a supply - supply details
Fields in the Supply Details section of the registration form record:
Field |
Explanation |
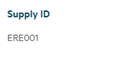
| Supply ID |
This is the unique identifier of the supply. If the supply has been transferred from the Ministry of Health’s Register of Drinking Water Suppliers, the Supply ID will be carried over from that register. IDs for new water carrier service supplies will be generated using the same convention as other supply types: by taking the first three characters of the Supply Name and then appending the next three-digit number available for that prefix. For example, if the supply is named Erewhon the prefix will be ERE. If there's already an ERE001 but not ERE002, the Supply ID will be ERE002 |
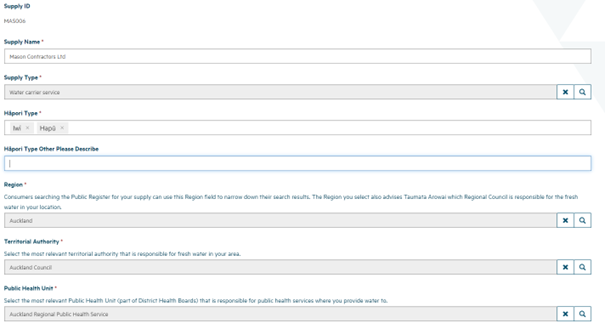
| Supply Name Mandatory field |
Describes the name of the water carrier service. This field also allows you to change the name of your water carrier service in future, if required. |
| Supply Type Mandatory field |
Choose Water Carrier Service from the list. |
| Hāpori Type Mandatory field |
This field provides Māori suppliers to correctly categorise themselves to: Iwi; Hapū; Marae; Papakāinga; Kōhanga Reo; Kura Kaupapa; Māori Community; Other; N/A This is a multi-select field. Where Other is chosen, an additional free text field appears allowing you to provide further explanation. If Hāpori is not relevant to your supply, select N/A. |
| Region Mandatory field |
Select the region that you primarily service. The Authority will also use this information to determine the regional council covering the community your supply serves. |
| Territorial Authority Mandatory field |
Select the territorial authority covering the area you service. If there's more than one, select the territorial authority for the area you primarily service. The list of territorial authorities is filtered to those that operate within the region you've selected. |
| Public Health Unit Mandatory field |
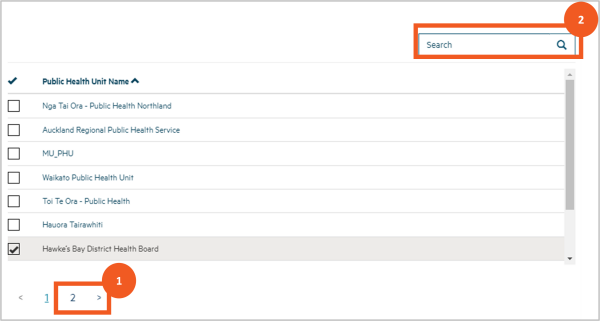
Select the Public Health Unit that looks after the communities you serve. If there's more than one, select the Public Health Unit that looks after the largest portion of your communities. |
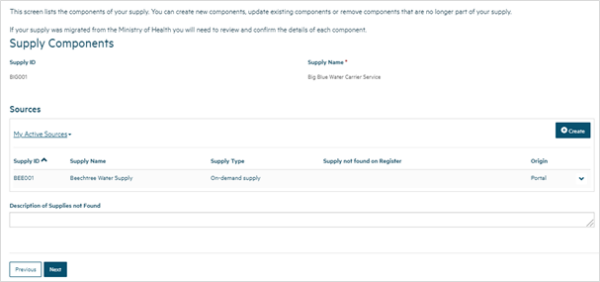
Supply components
In this section you can provide details of the supply or supplies you source your water from.
You will need to select at least one supply as your source to progress from this page.
Field |
Explanation |
| Description of Supplies Not Found |
You can enter further information here about supplies that you could not find when you were creating your source(s) (e.g. a detailed description of the supply you couldn't find where you were unsure of the name or didn't know the Supply Code from the Ministry of Health public register. |
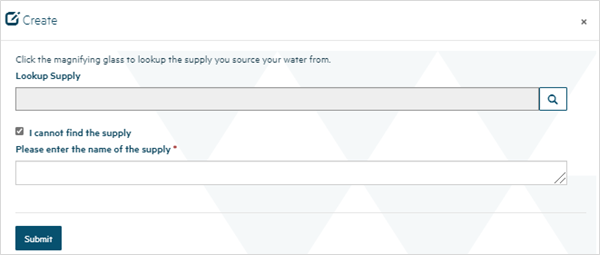
Sources - adding a supply as a source
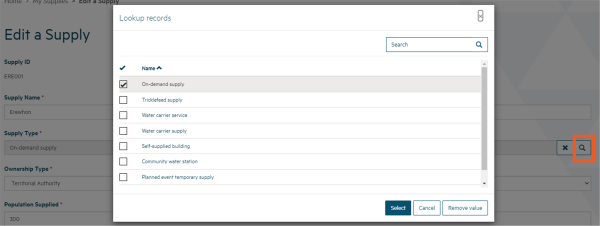
When you add a supply as a source by clicking Create, you're able to look up supplies that are registered with the Authority.
Field |
Explanation |
| Lookup Supply Conditional |
When you choose to create a new Source for a water carrier service, you can look up the supply from the public register by searching for the Supply ID or for text in the Supply Name. The public register of supplies is only populated as supplies migrated from the Ministry of Health public register are confirmed by their suppliers or new supplies are registered. It's possible therefore that you cannot find the supply you are looking for. Click on the magnifying glass icon to be returned a list of the supplies that you can select as a source. You'll need to either select a supply using this lookup or, if you can't find the supply, select the next field: I cannot find the supply. |
| I Cannot Find the Supply Conditional |
If you cannot find the supply it has either not yet been transferred to the public register on Hinekōrako or because you're not using a registered supply as you source. If this is the case, click the I cannot find the supply check box. |
| Name of the Supply Mandatory if previous field selected |
If you have indicated that you cannot find the supply, this field appears and must be completed. Enter the name of the supply you are using and, if you know it, the Supply Code from the Ministry of Health public register. If you're unsure of the name of the supply or you need to provide a more detailed description, enter what you can here. Additional details can be entered on the Supply Components page in the Description of Supplies Not Found field. |
The list of supplies that have been registered with the Authority will be displayed for you to select as your source.
Field |
Explanation |
| Search |
You can search for the supply that you use as your source by entering in the first characters of the supply name and then clicking the magnifying glass. If you are unsure of the correct name of the supply, enter an asterisk before the part of the supply name that you are sure of and then click the magnifying glass. This will return a list of supplies that match your search criteria. You can also page through the registered supplies to find the supply you are looking for. The supplies are listed in Supply Name order. You can click on the heading of Supply ID, Supply Name or Supply Type to sort the list of supplies in a different order. If you can't find the supply using Search, click Cancel to return to the Lookup Supply page. |
| Checkbox |
Once you locate the supply from which you source your water for your water carrier service, click in the checkbox and then click Select. This will select the supply and return you to the Lookup Supply page. |
| Supply ID Read only |
The Supply ID for supplies that have been registered with the Authority. |
| Supply Name Read only |
The name of supplies that have been registered with the Authority. |
| Supply Type Read only |
Supply Type is displayed to help you select the correct supply as the source for your water carrier service. |

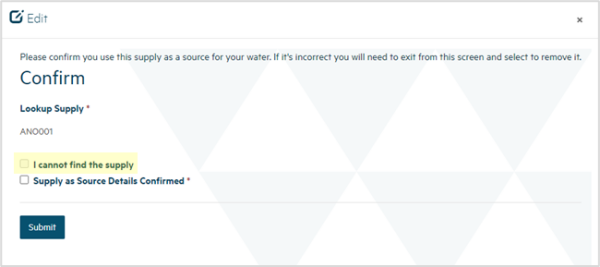
Sources - confirming a migrated supply as a source
When your water carrier service has been migrated, supplies that were used as a source will also be migrated. You'll need to confirm that the correct supply has been migrated.
Field |
Explanation |
| Confirm Supply as Source Details |
If the supply displayed is correct, click the Supply as Source Details Confirmed checkbox and then click Submit. If the supply displayed is not correct, please use the small x in the top right corner to close this screen. This will return you to the Supply Components page where you can use the Remove option to remove this supply. You can then create the correct source. |
Supply relationships
In this section you can provide details of one or more:
- organisations that have a relationship with your supply
- individuals (i.e. people) who have a relationship with your supply.
When creating a Supply Relationship with an organisation you can, and in the case of an Owner are required to, add an associated contact record for the person nominated as the Key Contact.
Supply Relationship records serve three purposes:
- They inform the Authority about the people and organisations related to the supply and their responsibilities with respect to the supply.
- Some of the information is displayed on the public register of drinking water supplies, for the benefit of consumers.
- They can be used to restrict Hinekōrako user access to supplies. See the Supply Group section below.
You are required to list all Owners and Operators of the supply, as this information is required for the public register of supplies, but you can list other organisations and individuals (e.g. agents) and indicate that they have more than one role, (e.g. Owner and Operator or Owner and Trustee).
The Registration Contact and the Overall Supply Contact are important roles and your supply must always have contacts for these roles. The Registration Contact is the person we'll contact for anything to do with the supply registration. The Overall Supply Contact will be displayed, along with all Owners, on the public register of drinking water supplies and will be the person that consumers contact regarding their supply.
If you're a Supply Group Administrator and you want to give someone access to Hinekōrako that only enables them to see a subset of the supplies you administer, you can give them a Hinekōrako role which means they can see only the supplies they, as a Contact, have a supply relationship with.
If you're a Supply Administrator:
- your access to supplies is restricted to those you have supply relationship with
- the users you manage are only those who have supply relationship with the same supplies you have have a supply relationship with
- any role you give those users will allow them to access only the supplies they have a supply relationship with.
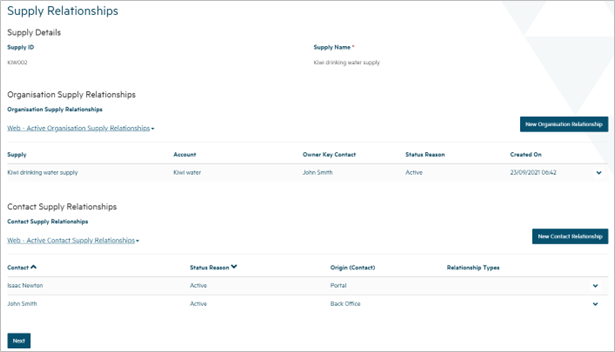
Organisation relationship
Empty organisation supply relationship form:
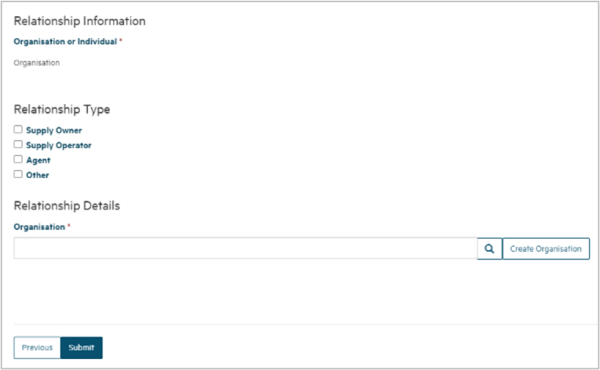
When you add or update an organisation relationship, you're able to record:
Field |
Explanation |
| Relationship Type Mandatory field |
You can choose one or more of the following relationship types:
The organisation does not need to be the Owner or Operator of the whole supply. If they're an Owner or Operator of a part of it, you should include them here. We do not capture relationships at a supply component level here. If there are complex relationships you should upload a document explaining those relationships on the Final Details screen. When Other is selected, you'll need to describe the type of relationship. |
| Organisation Mandatory field |
This is the organisation the relationship is with. If a record of the organisation has already been created for your supplies, you can find and select that organisation by:
Once you've chosen the organisation, the details of the organisation will be displayed. If you are editing an existing organisation relationship or have selected an existing organisation, you can choose to edit the organisation details. If a record of the organisation does not exist, you can create one by clicking Create Organisation. See the section below for information on the data you can capture for an organisation. |
| Owner Key Contact Mandatory field if the relationship type Supply Owner has been selected |
This is a mandatory field if the relationship types selected include Supply Owner. This is the person at the organisation who will be our Key Contact for liaising about the supply. If a record of the Individual has already been created for your supplies, you can find and select that person by:
Once you've chosen the person, their details will be displayed. If a record of the individual doesn't exist, you can create one by clicking Create Contact. See the section below for information on the data you can capture about an individual. |
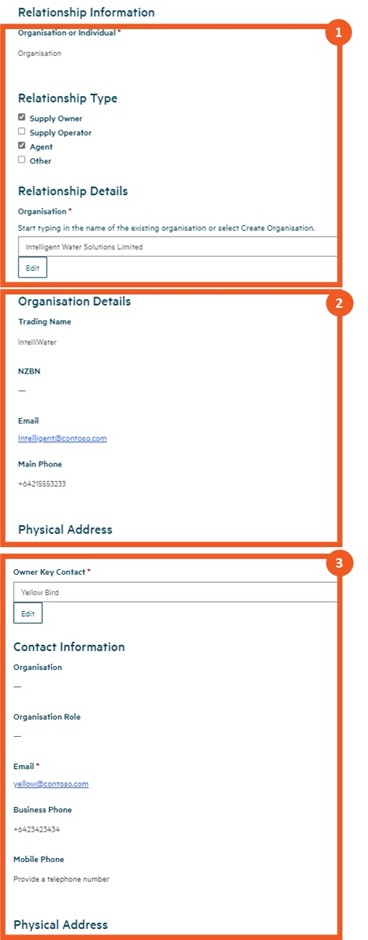
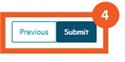
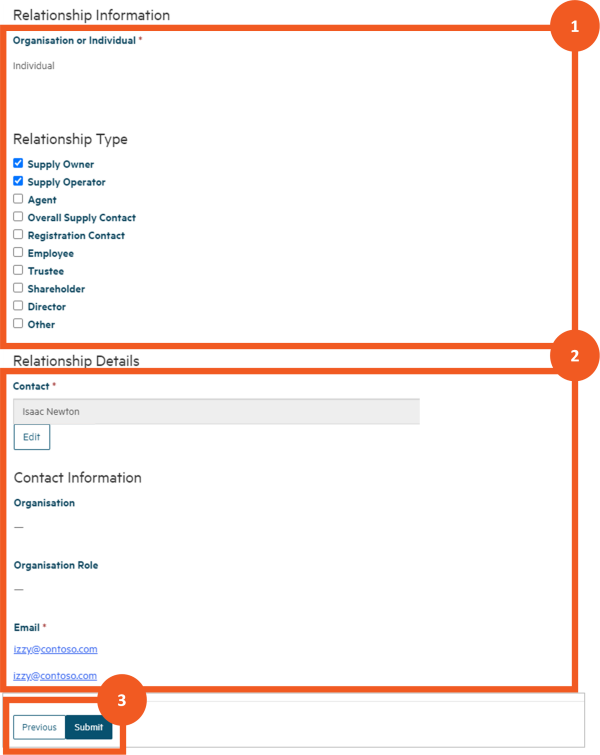
Populated organisation supply relationship form showing:
- the relationship details that have been entered
- some of the read only details of the organisation the relationship is with, and the option to edit those details
- some of the read only details of the Key Contact individual, because in this case the organisation is a Supply Owner.
- the option to Submit the new or edited relationship or return to the previous screen.
Organisation
When you create or edit an organisation, you're able to record the following:
Field |
Explanation |
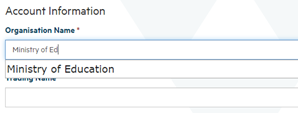
| Organisation Name Mandatory field |
See the Organisation Name field in the list of field types at the end of this guidance, including an explanation of the NZBN look up. |
| Trading Name Optional field |
Automatically populated if you select an organisation from the NZBN look up. Can be manually entered. |
| NZBN Read only field |
Automatically populated if you select an organisation from the NZBN look up. |
| Email Optional field |
The general email address of the organisation. |
| Phone number Mandatory field |
Must start with + followed by the country code (e.g. +64 for New Zealand). |
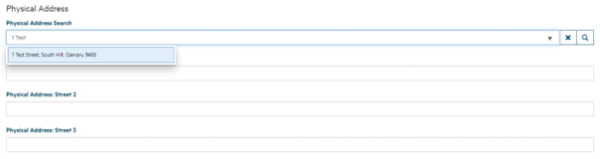
| Physical Address Search Mandatory field |
See the Address Search field in the list of field types at the end of this guidance, including an explanation of the NZ Post address database look up. |
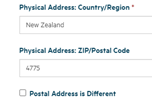
| Physical Address fields Mandatory fields (sometimes) |
Some fields are mandatory. Automatically populated if you select an address from the Physical Address Search look up results. |
| Postal Address is Different Optional field |
Click on this if the postal address is different from the physical address. Postal Address fields will then appear. |
| Postal Address Search Mandatory field |
Mandatory field if Postal Address is Different is checked. See the Address Search field in the list of field types at the end of this guidance, including an explanation of the NZ Post address database look up. |
| Postal Address fields Mandatory fields (sometimes) |
Some fields are mandatory. Automatically populated if you select an address from the Postal Address Search look up results. |
Contact relationship
When you create or edit a relationship with a contact, you're able to record the following:
Field |
Explanation |
| Relationship Type Mandatory field |
Select one or more roles for the person, in relation to the supply, from:
When Other is selected you'll need to describe the type of relationship. |
| Contact |
The contact who has a relationship to the supply. If a record of this person has already been created, you can find and select that person by:
If a record of the person does not exist you can create one by clicking Create. If you're editing an existing contact relationship you can choose to edit the person’s contact details from here. See the section below for information on the data you can capture for a contact. |
Populated contact supply relationship form, showing:
- the relationship details that have been entered
- some of the read only details of the contact the relationship is with, and the option to edit those details
- the option to submit the new or edited relationship or return to the previous screen.
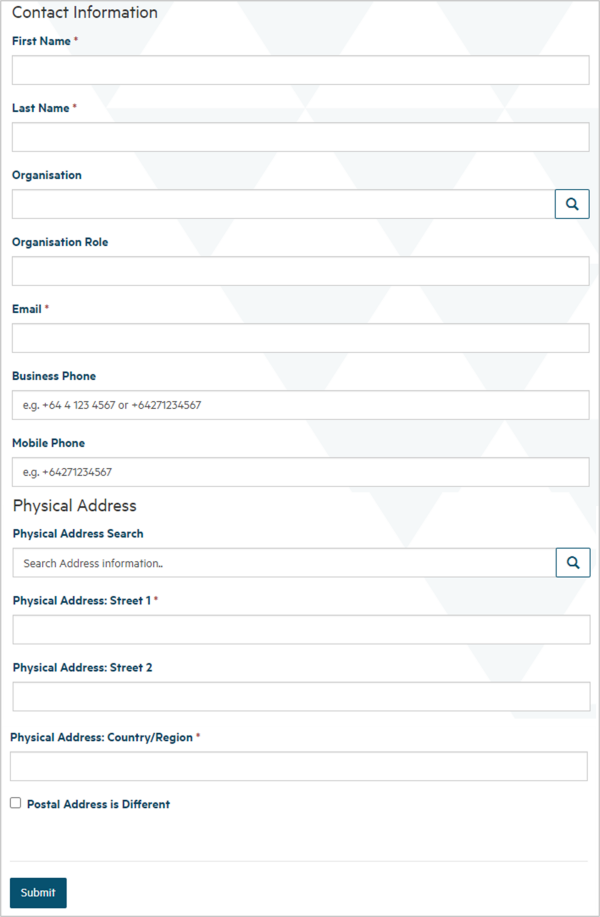
Contact
When you create or update a record of a contact who has some relationship to the supply, you're able to record the following:
Field |
Explanation |
| First Name Mandatory field |
The first name of the contact. |
| Last Name Mandatory field |
The last name of the contact. |
| Organisation Name Optional field |
If the person is part of an organisation and that organisation has a relationship with the supply, you can find and select that organisation by:
|
| Organisation Role Optional field |
The role the contact has within the organisation. |
| Email Mandatory field |
The contact's email address within the organsiation. |
| Business Phone Mandatory field |
It's mandatory to provide either a business phone number or a mobile phone number (see next field in this table). The number must start with + followed by the country code (e.g. +64 for New Zealand). |
| Mobile Phone Mandatory field |
It's mandatory to provide either a mobile phone number or a business phone number (see previous field in this table). The number must start with + followed by the country code (e.g. +64 for New Zealand). |
| Physical Address Search Mandatory field |
See the Address Search field in the list of field types at the end of this guidance, including an explanation of the NZ Post address database look up. |
| Physical Address fields Some mandatory fields |
Some fields are mandatory. Automatically populated if you select an address from the Physical Address Search look up results. |
| Postal Address is Different Optional field |
Click on this if the postal address is different from the physical address. The Postal Address fields will then appear. |
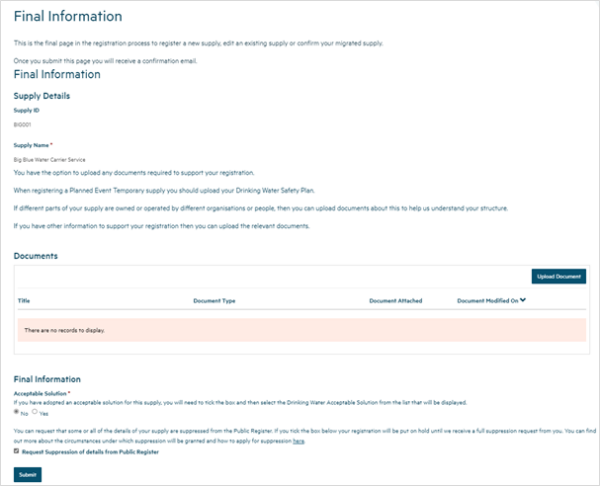
Final information
In this section you can:
- upload documents related to your supply registration
- request the withholding of details of your supply from the public register.
Documents section
When you upload a document you can provide:
Field |
Explanation |
| Document Type Mandatory field |
Select the type of document you want to upload:
|
| Document Description Optional field |
You can provide a description of the document you're uploading. |
| Attach a File Mandatory field |
Select Choose File to upload your document. |
| Malware Scan Read only field |
This field appears once the file is uploaded and reports the status of a virus scan of the file. |
Final information section
In the Final Information section of the page, you're able to record:
Field |
Explanation |
| Acceptable Solution Mandatory field |
This doesn't apply to water carrier services, so leave this field set to No. |
| Request Withholding of Details from the Public Register Optional field |
If you indicate the need to withhold details, we will not automatically add your new supply registration to the public register of supplies. We will place the application on hold until we receive and make a decision on a formal request from you to withhold supply details. See the end of this guidance for a list of the data from your supply that will appear in the public register (unless withheld) |
List of field types
Field Type |
Explanation |
| Free text field |
This is a simple field in which you can type text to record data:
|
| Read only field |
These are fields that are displayed for your information only. You don't need to (and cannot) update them:
|
| Fields in which there are a limited number of options and you can pick one of them |
The options are usually all displayed on the screen, and you select one by clicking on the circle next to it:
|
| Fields in which there are many options to choose from and you can pick one of them |
There are two ways Hinekōrako enables you to make your choice, depending on how it stores the options. Sometimes you can click on the down arrow at the end of the field to open a drop down list of options to choose from:
Sometimes you can click on the magnifying glass, which will open a pop-up screen listing the options to choose from:
Select the option you want by ticking the box next to it and then clicking Select. Sometimes this list is long and is broken across pages. You can:
|
| Fields in which you can select one or more options |
Below the field title there will be a series of checkboxes, which you can click on to select one or more of the options:
|
| Address search |
Whenever you're asked to record an address, a Physical Address Search field allows you to start typing the address and Hinekōrako will look up the database of NZ Post addresses as you type, giving you a list of addresses it has found. When your address appears in the list you can click on it to select it and populate the address fields:
If your address isn't found, you can enter it in the fields yourself. Sometimes we'll ask you for the postal address as well as the physical address. By default we'll assume they are the same, but if they are not you can click the Postal Address is Different checkbox.
If you click the checkbox, Postal Address fields will appear, including a Postal Address Search box you can use to find your address in the NZ Post database. |
| Organisation name |
If you're creating a new record of an organisation, when you start typing in the Organisation Name field, Hinekōrako will start looking up the NZ Business Number register and display a list of organisations on that register that match the text you have entered.
If you select the organisation from the dropdown list, the Organisation Name, Trading Name and NZBN fields will be populated automatically. If the organisation isn't NZBN registered, you can complete recording in the Organisation Name field by continuing to type and then entering the Trading Name (if relevant) manually. |


Details shown in the public register of drinking water supplies
Supply details
Field |
Description |
| Supply ID |
This is the unique identifier of the supply. If the supply has been transferred from the Ministry of Health's register of drinking water suppliers, the Supply ID will have been carried over. If the supply is new, Hinekōrako will generate a new ID by taking the first three characters of the Supply Name and then appending the next three-digit number available for that prefix. |
| Supply Name | The name of the supply entered when the supply was registered or updated. |
| Supply Type | The type of supply: Water Carrier Service. |
| Registration Status | The current status of the registration. This will generally be displayed as Registered, but might also be Lapsed or Cancelled. |
| Acceptable Solution Type | Not applicable to water carrier services. |
| Region | The name of the region served by your water carrier service. |
| Territorial Authority |
The name of the territorial authority responsible for the area served by your water carrier service. |
| Public Health Unit (PHU) | The name of the PHU responsible for the area served by your water carrier service. |
Overall Supply Contact details
Field |
Description |
| Legal Name |
First and last name of the contact where relationship type is Overall Supply Contact. If there's an associated organisation for the contact, the organisation name is also displayed. |
| Trading Name |
If there's an associated organisation for the contact, the trading name of the organisation is also displayed |
| Supply Roles |
The relationship roles for the overall supply contact where the role is Supply Owner, Supply Operator or Overall Supply Contact. Other roles are not displayed. |
| Contact Email | Email address for the Overall Supply Contact. |
| Phone Number(s) | Phone number(s) for the Overall Supply Contact. |
Owner or Operator contact details
Field |
Description |
| Legal Name | First and last name of the contact where relationship type is Supply Owner or Supply Operator. |
| Supply Roles |
The relationship roles for the contact where the role is Supply Owner or Supply Operator. Other roles are not displayed. |
| Contact Email | The email address for the contact. |
Owner or Operator organisation details
Field |
Description |
| Legal Name | The name of the organisation where relationship type is Supply Owner or Supply Operator. |
| Supply Roles |
The relationship roles for the organisation where the role is Supply Owner or Supply Operator. Other roles are not displayed. |
| Contact Email | The email address for the organisation. |
| Trading Name | The trading name for the organisation. |
Supply components - supplies as sources
Field |
Description |
| Supply ID | The identifier for the supply selected as the source for the water carrier service. |
| Supply Name | The name of the supply selected as the source for the water carrier service. |
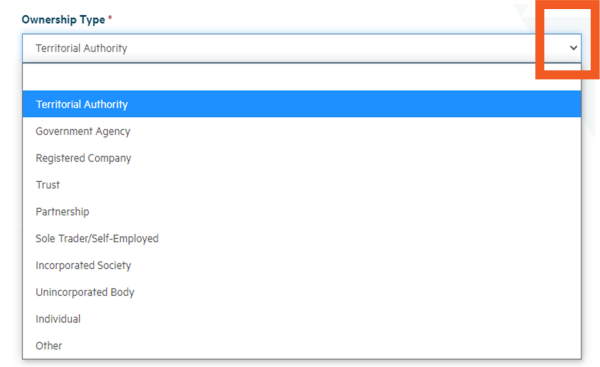
Determining the Supply Category
The Supply Category field is used to segment supplies by ownership. Please note that this field is not for identifying the business type. A business type field is located on the supply owner’s account record.
The supply categories are:
- Territorial Authority
- Government
- Water Organisation – includes Council Controlled Organisations
- Māori Authority – could be operating on behalf of a trust, company or landowner
- Private Company
- Community – these supplies are operated within the community and by the community, e.g. societies, charities, iwi/hapu, tertiary education providers, community associations.
- Individual – includes sole traders and self-employed people.
- Other – when Other is selected, you must describe the supply category.
Determining your local authority
In most cases the territorial authority for the community served by your water supply will be readily identifiable.
Hinekōrako will ask you to select your region first. The territorial authorities within that region will then be presented.
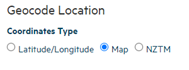
Hinekōrako allows only one region and territorial authority to be selected per supply. If the supply serves communities that are evenly spread across multiple regions and territorial authority boundaries, you should select the primary one - i.e. where most of the consumers are located. At the end of the registration process you can upload a document that details the other regional councils and territorial authorities your supply covers , if needed.
All the individual communities served by your supply should be included in the Community field. These are shown on the public register of drinking water suppliesoutbound and allow consumers to identify supplies they may be connected to.
Determining your Public Health Unit (PHU)
For many water supplies, the PHU will be known or easy to identify.
There is a list of PHUs and contact details on the Ministry of Health websiteoutbound. The area covered by each PHU doesn’t necessarily correspond exactly to the district health board (DHB) areas. For example, Regional Public Health covers Capital and Coast, Hutt and Wairarapa DHB areas.
Hinekōrako allows only one PHU to be selected. If you consider that multiple PHUs cover the area served by your supply, contact us at opssupport@taumataarowia.govt.nz. You can upload a document can on the last page of the registration record to detail the multiple PHUs across your water supplies.
If you're unsure about which PHU you would primarily interact with in an emergency, contact each possible PHU to determine if your water supply is within their boundary.
Understanding supply relationships in Hinekōrako (video)
This video walks through how a registered water carrier can edit and confirm their migrated supply relationships in Hinekōrako.
Understanding supply components (video)
This video walks through how a registered water carrier can edit and confirm their migrated source supply in Hinekōrako - taking a close-up look at supply components.
Understanding 'final information' in your Hinekōrako record (video)
This video walks through the final confirmation screens for a water carrier after confirming migrated supply details in Hinekōrako.
Uploading your drinking water safety plan
Download a pdf of this guidance: Uploading your drinking water safety plan in Hinekōrako
This guidance shows you how to upload a new drinking water safety plan to Hinekōrako and confirm that it has been submitted successfully.
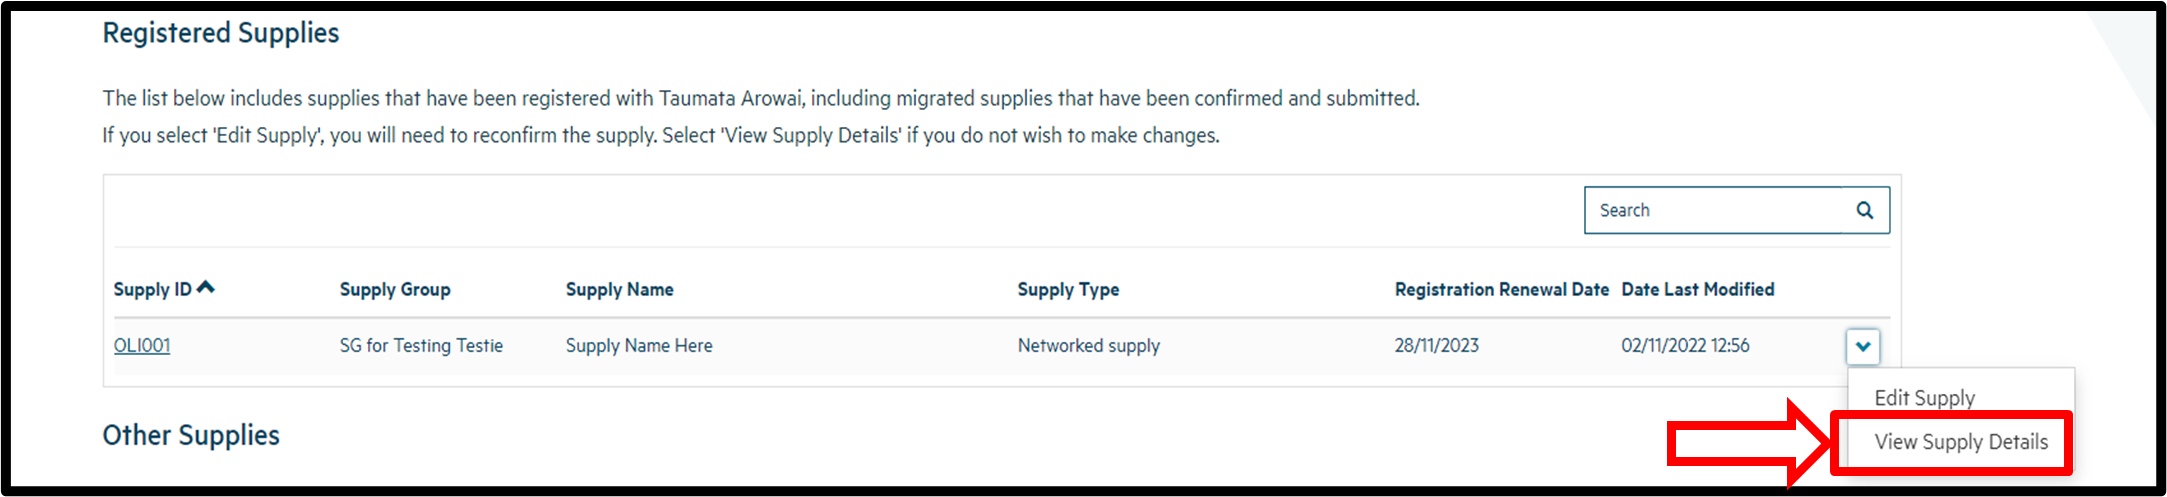
Step 1
Log in to Hinekōrakooutbound and from the front page select View Supply Details from the dropdown menu on the right-hand side.
Step 2
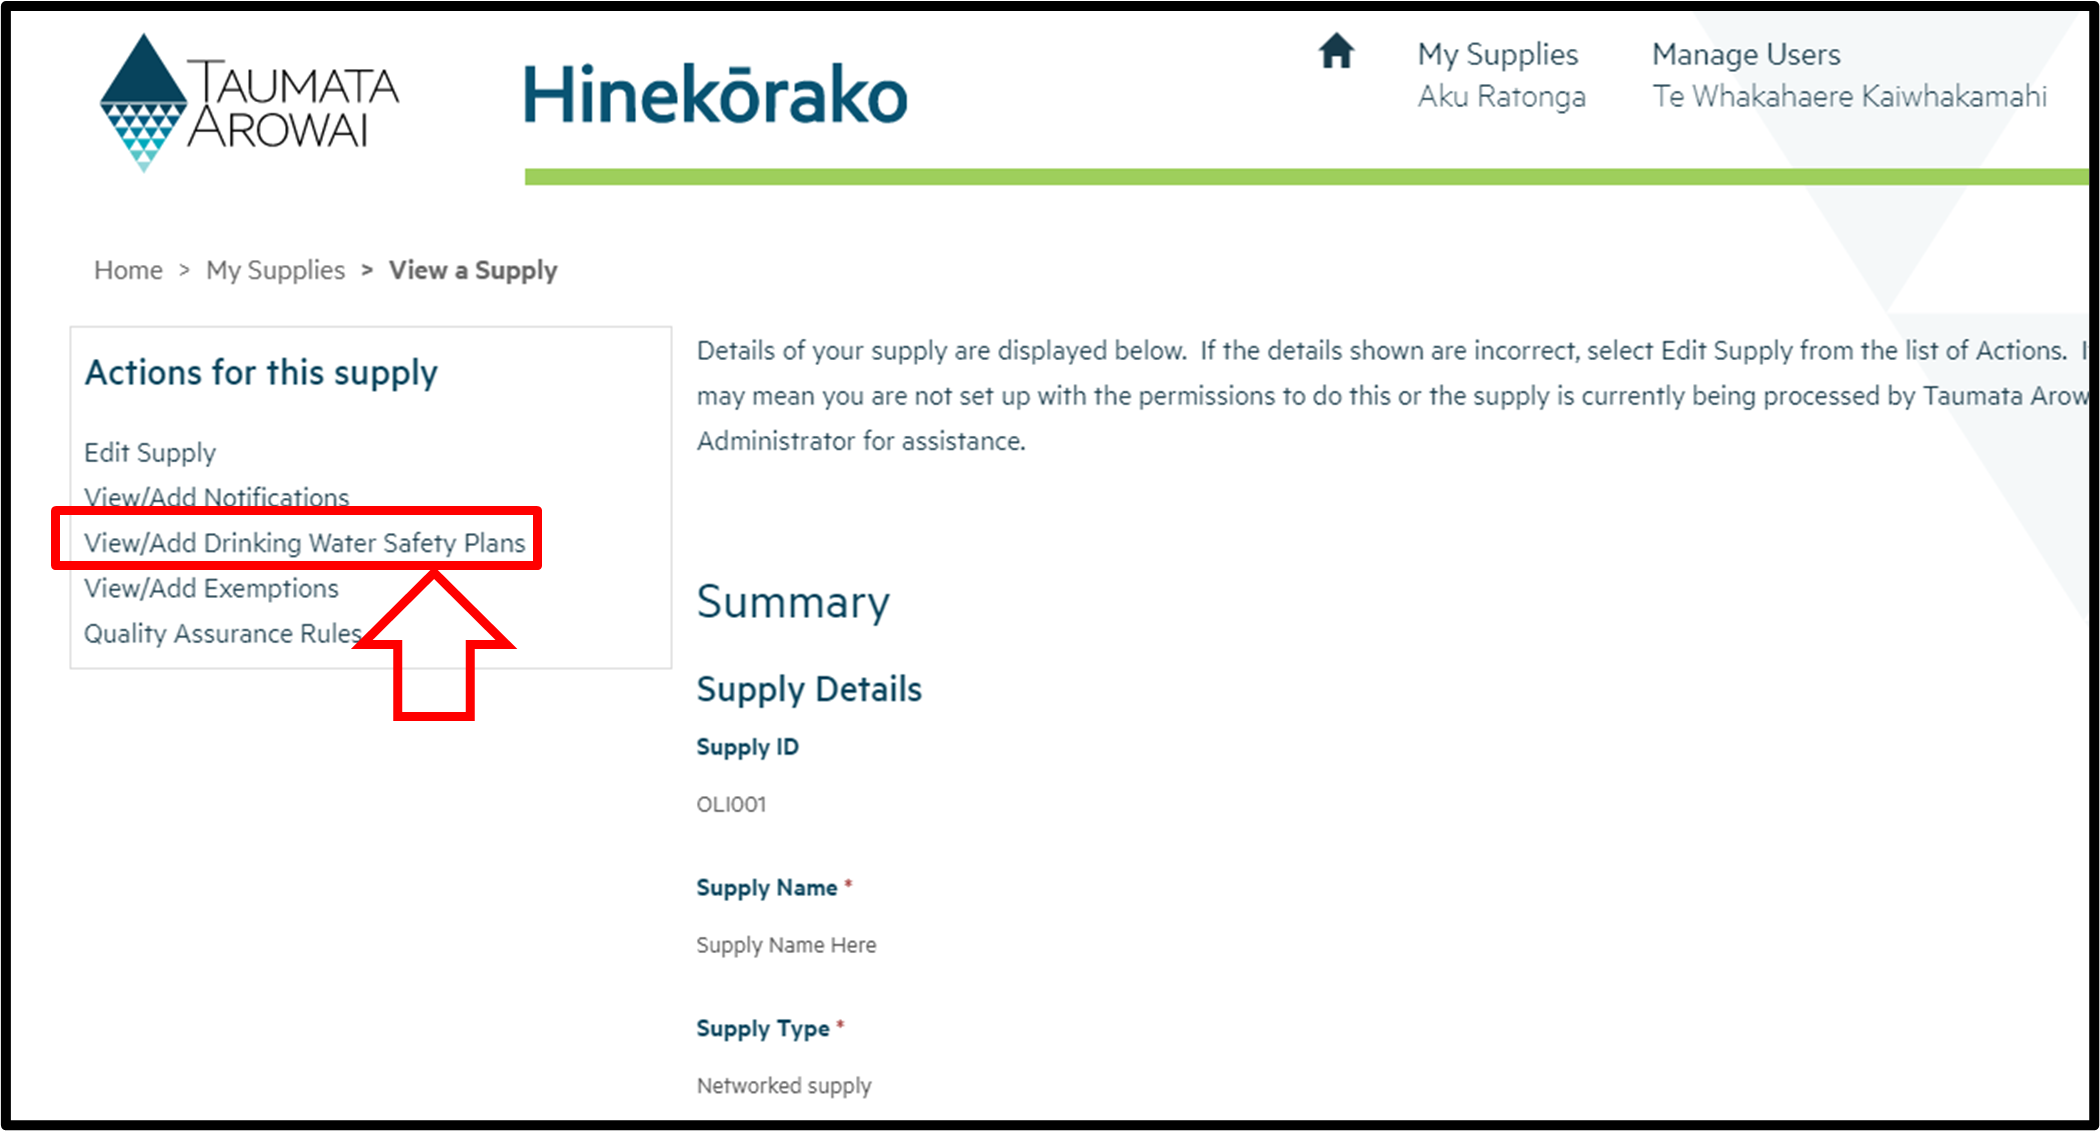
On the left side of this page there's a menu headed Actions for this supply. From this menu, select View/Add Drinking Water Safety Plans.
Step 3
On the Drinking Water Safety Plans page, select Add New Drinking Water Safety Plan. In the table, you'll be able to see drinking water safety plans that have already been submitted.

Step 4
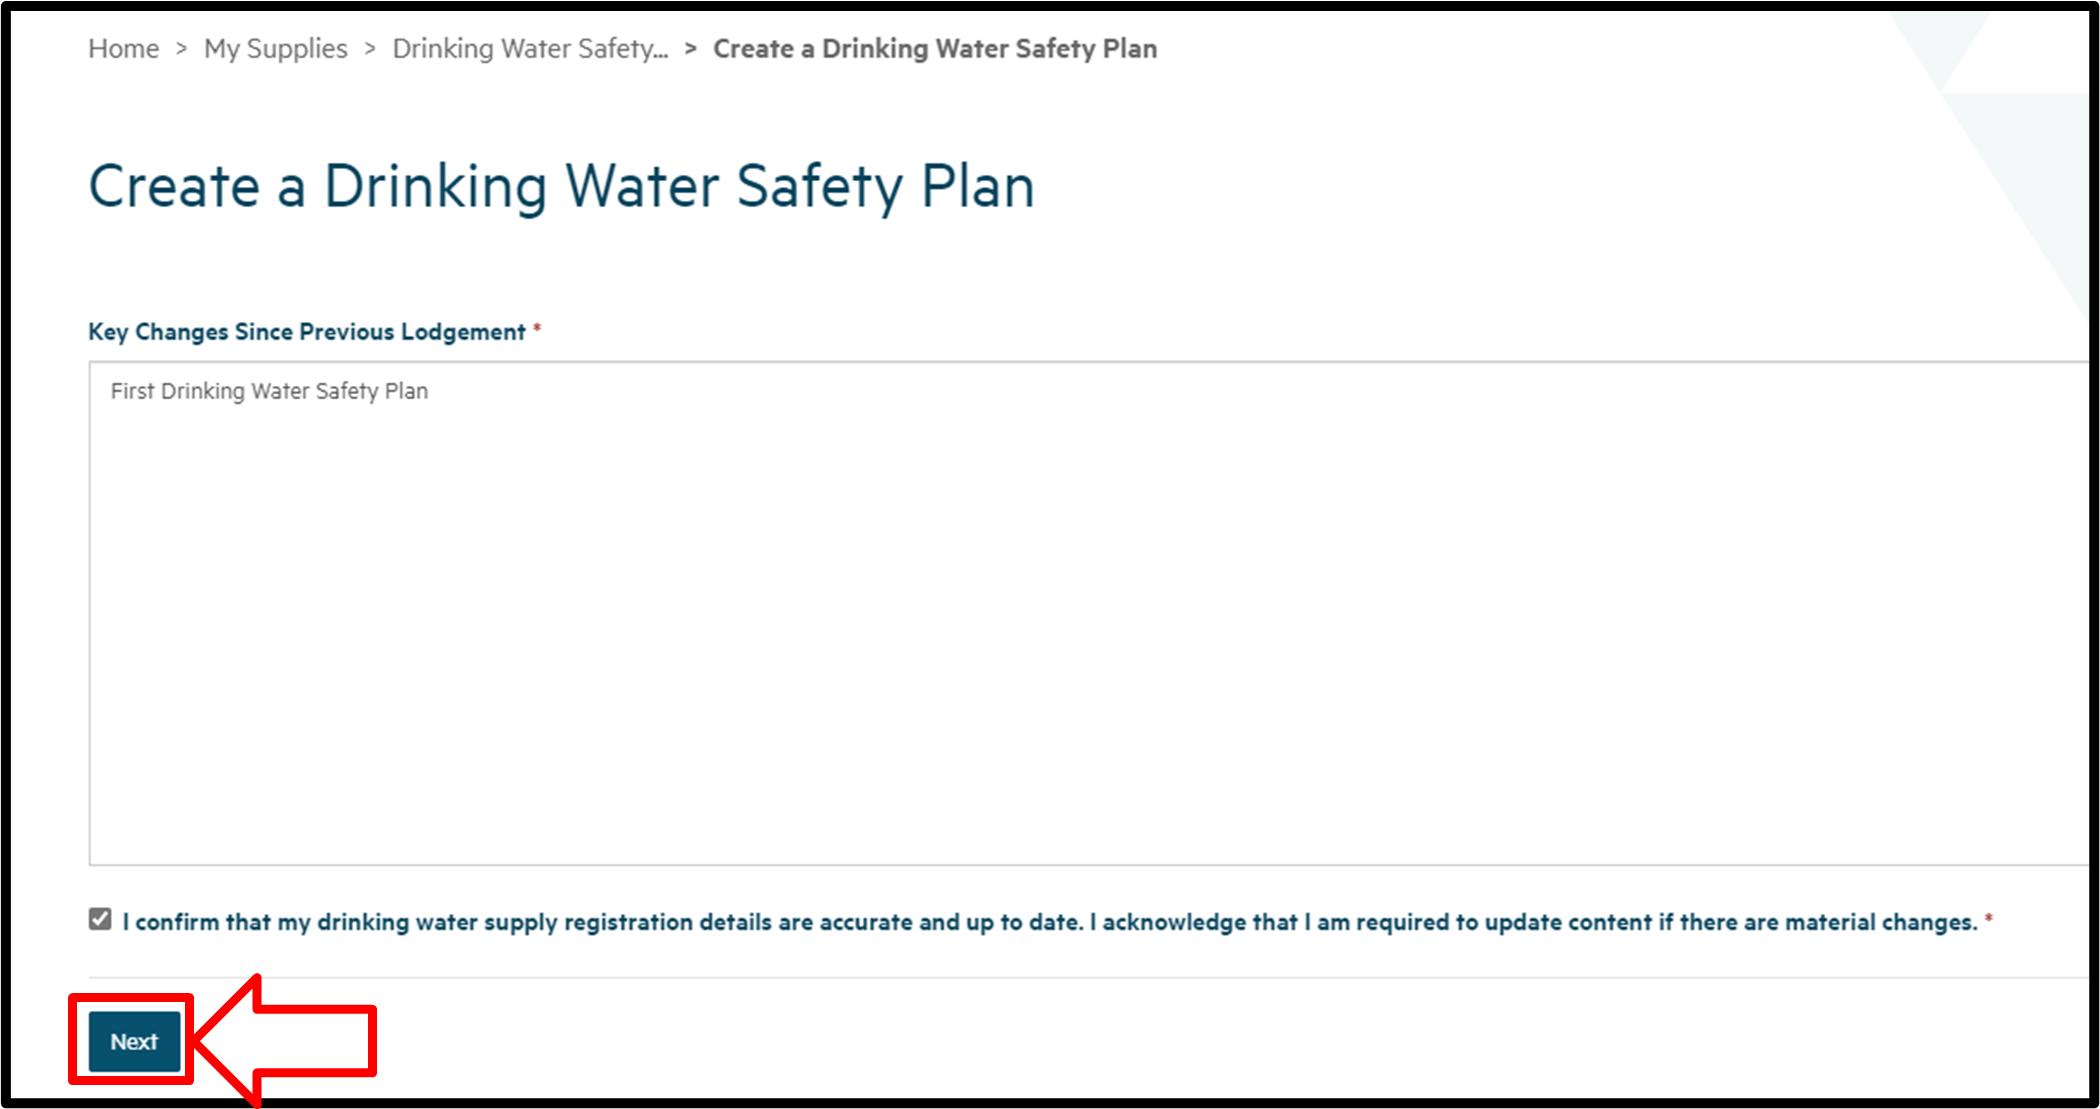
If this is the first plan to be uploaded for this supply, you can add a short description in the text field (e.g. "supply name, drinking water safety plan, date").
Confirm that your registration details are correct by checking the box, then click Next.
Step 5
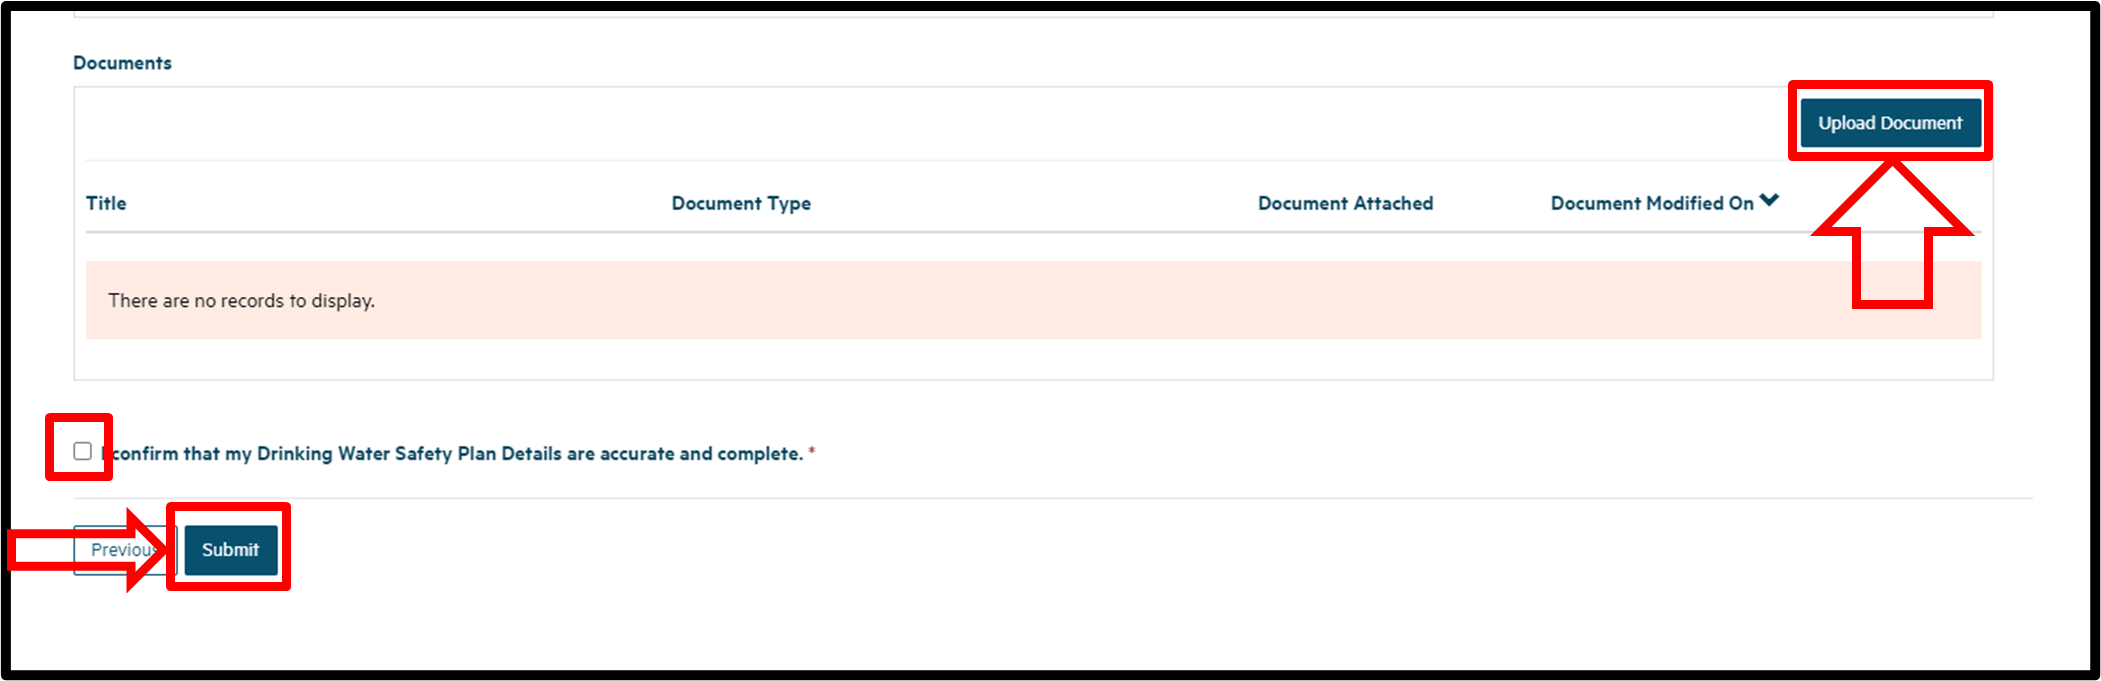
Upload your drinking water safety plan on this same page by clicking Upload Document. The Document Description field is optional but is a useful place to note information that supports your plan. Once you've uploaded your document, confirm that the plan is accurate and complete by checking the box, then click Submit.
Step 6
To check that your drinking water safety plan has been submitted successfully, follow steps 1 to 3 of this guidance again. You plan should now be showing in the table of submitted documents.
See also Managing your drinking water safety plan (below).
Requesting to withhold information from the public register of drinking water supplies
Download a pdf of this guidance: Requesting to withhold information from the public register of drinking water supplies
This guidance explains how to request for information to be withheld from the public register of drinking water suppliesoutbound, and the factors we consider when assessing such requests. It also clarifies the interface with the registration process for drinking water supplies.
Under the Water Services Act 2021outbound, we're required to maintain a publicly available version of the register of drinking water supplies containing information specified in the Act. This is referred to as the ‘public register’. There are two key purposes for having a public register:
- To enable consumers, the public and organisations such as local authorities to find out about the water supplies in their local areas.
- To enable consumers to contact the people responsible for their water supply if there is a problem.
The public register includes some of the information provided by water suppliers when they register their water supplies with the Authority.
Information in the public register
The public register must include the following information:
- Legal name and contact details of the owner, including the trading name if applicable.
- Area the drinking water supply supplies (referred to as community on the public register).
- Number of persons expected to be using the drinking water supply.
- Legal name and contacts details of the drinking water supply operator, if different from the owner, and the operator’s trading name if applicable.
- Information that relates to the authorisation of the operator of the supply (if any). Note: there is not an authorisation framework at this time.
- Any other information the Authority considers is in the public interest to disclose.
The following additional information will also be displayed on the public register:
- Supply name, identifier, supply type, registration status.
- Local authority: region and territorial authority.
- Regional Public Health Service.
- Acceptable solution: type of acceptable solution being used, if applicable.
- Supply components: active source type and identifier, treatment plant(s) name(s) and identifier(s), distribution zone(s) name(s,) identifier and population(s).
- Overall supply contact: contact name, contact organisation if applicable, relationship type (supply contact, owner, operator), contact email and phone number.
- Supply operator(s): organisation or contact name, trading name if applicable, relationship type (owner, operator, agent), contact email.
- Gazette notice link: This is displayed if the supply has been granted a general exemption from complying with a range of legislative requirements, or are within the description of a class of water supplier that is exempt from complying with a range of legislative requirements.
Reasons for withholding information from the public register
Section 55(3) of the Water Services Act gives the Authority discretion to withhold information from the public register:
(3) The Authority may withhold any information from the publicly available version of the register if it considers it is in the public interest to do so, which may include the protection of—
(a) the privacy of natural persons; or
(b) the security of a drinking water supply.
The Authority is not required to withhold any information, but may do so where it considers it is in the public interest, including to protect the privacy of the natural persons or the security of a drinking water supply.
Authorised Hinekōrako portal users for the water supply record and Authority staff will still be able to view the suppressed information in the registration record in Hinekōrako. The supporting information for a suppression is held separately from the registration record and is available only to people within the Authority with appropriate access authority. It is not available to the water supply portal users or the public generally.
Considering the public interest
The public interest test is whether it is in the public interest to withhold information from the public register. This includes considering two competing aspects:
a. The public interest of enabling consumers and the general public to find out about their own water supplier and water supply, or the water supplies in their local areas ,and to access the information that enables them to contact the water supplier, and
b. The public interest of protecting the:
i. privacy of natural persons who are involved in operating a water supply that supplies drinking water to other consumers
ii. security of a drinking water supply (e.g. to minimise the risk of malicious actions being taken that could create public health risks for consumers)
iii. other interests identified and advanced by the person seeking the suppression of public register details.
The default statutory position that certain details will be available on the public register – unless a decision is made to withhold those details – is also a factor when assessing public interest considerations.
When considering a request and supporting reasons or information, the Authority will take into account whether the information that the request relates to is already publicly available (e.g. on the companies, charities, or incorporated societies registers).
Submitting a request to withhold information during the registration process
During the registration application process, the registration contact (the person responsible for maintaining the registration record) can indicate that they intend to submit a request to withhold information from the public register.
The registration process will be completed as per normal within the 20 working days timeframe. No information about the supply will be included on the public register until an assessment of the withholding request has been completed.
The registration contact will receive an acknowledgement email from us that outlines the process and the email address to use to provide further information about the request to withhold.
Where the request relates to personal information about an individual (i.e. as owner, operator or overall supply contact) the supporting information for the suppression request can be provided directly to us by the individual concerned or their authorised agent/representative in a separate email to protect the individual’s privacy.
Submitting a request to withhold information once a drinking water supply is registered
The registration contact may email the Authority directly requesting that information is withheld after the supply has been registered.
The request should be sent to OpsSupport@taumataarowai.govt.nz and include:
- requestor’s name, contact details and role in the supply (e.g. owner, operator)
- supply name, supply ID (to ensure the correct supply is identified by the Authority)
- list of the information items that are requested to be withheld
- reasons for the request and where appropriate, provide information in support of the request.
Where the request relates to withholding personal information about an individual included in the public register (i.e. as owner, operator or overall supply contact), the supporting information for the request can be provided directly to the Authority by the individual concerned in a separate email to protect the individual’s privacy.
The Authority will amend the registration record to withhold the information on the public register on an interim basis, pending the completion of the assessment process.
Requests to protect the privacy of natural persons
As the Water Services Act 2021 envisages that the name and contact details of the owner and operator are ordinarily displayed on the public register, there usually needs to be persuasive grounds for withholding such details.
Reasons that may justify the withholding of personal details include where the individual who is the subject of the request has reasonable cause for concerns about:
- their own safety and security
- the safety and security of their family or other contacts
- harassment of themselves or their family or other contacts.
Requests to withhold personal contact details that are also used for domestic purposes, such as a personal cell phone number, residential landline number or domestic email address may be granted without requiring further justification or supporting evidence on the basis of the asserted privacy interest in that information.
Alternatively, individuals who are owners, operators or overall supply contacts could consider establishing an incorporated society and using generic email addresses. An unincorporated group cannot be used as an owner.
For requests to withhold non-domestic personal details, supporting information must be provided. Information can include:
- a restraining order that is in force under the Harassment Act 1997
- a non-contact order under the Victims’ Orders Against Violent Offenders Act 2014
- a protection order under the Family Violence Act 2018 for the individual
- a declaration by a constable that he or she believes the publication of information that discloses, or is likely to disclose, the whereabouts of the applicant may prejudice the safety of the individual or their family, and that the circumstances that lead to this risk are still active
- other circumstances not included above where the individual’s safety or privacy (or their family’s) would be unreasonably prejudiced if the personal information was displayed, supported by evidence and a declaration that the information is accurate and provided in good faith.
The information submitted in support of a request will only be reviewed by the Authority staff involved in the processing of or decision on the request, and where necessary, by the Privacy Officer and authorising manager. The information will be stored in a restricted access location.
Reasons that are unlikely to justify the withholding of personal information – other than domestic contact details – on the public register include:
- not wanting the information to be publicly available
- a belief that the public register is unfair or unreasonable
- a belief that it is not necessary for the information to be available.
If a request to withhold the personal details of an individual is approved, it will be applied to all water supplies that the individual is connected within Hinekōrako at the time of the request. If the individual has a later connection to a different water supply, a new request must be submitted.
Requests to protect the security of the water supply
The location of the drinking water supply source and the abstraction points are not included on the public register. The Act doesn’t include this in the categories of information that must be displayed on the public register.
If a request is received to withhold the supply name or treatment plant name to protect the security of the water supply, sufficient information must be provided to explain the security concern. The physical addresses are not included on the register. This will be considered against the public interest of consumers and the public being able to find out about their own water supply or water supplies in the area.
Other reasons for requests to withhold
The Water Services Act 2021 provides that the Authority may withhold any information about a water supply on the public register for any reason, if considered in the public interest to do so, not just personal information or security of the water supply.
The Authority will consider all relevant aspects of the public interest when assessing withholding requests made on grounds not discussed above.
Processing the request to withhold
The Authority will process a request to withhold information as quickly as possible. Generally, we will endeavour to do this within 20 working days, but it may take longer. The actual timeframe will depend on the nature of the withholding request.
The request must be confirmed at each renewal of the registration record for the relevant supply. A reminder email will be sent to the registration contact and the individual concerned (if the withheld information relates to personal information).
The Authority will take reasonable steps to confirm that the information needs to continue to be withheld before making the information available on the public register.
If a withholding request is approved, we will advise the requester/individual concerned by email:
- what information will be withheld
- if the approval results in no contact information for the water supply on the public register, a member of the public will be able to email the Authority and this will be forwarded to the water supply contacts (or the supply contacts will be contacted by the Authority)
- that owners and operators remain responsible for all duties and obligations for a supply, including responding to complaints or questions on the water supply from consumers or the public
- a reminder email will be sent 4 weeks prior to the registration renewal date advising that confirmation of the request to withhold is required, along with relevant supporting information.
If the provisional decision is that the request will not be approved, we will advise the requester by email:
- of the reasons for declining the request to withhold.
- that we will reconsider the request in light of any additional information the requestor chooses to provide within 10 working days (or any longer period the Authority may allow)
- that, if no further information is received, the Authority will remove the temporary withholding of the information after five working days from the date of notification of the final decision to decline, and the information will be displayed on the public register and an email will be sent at that time to the individual/requestor
- of their ability to make a complaint to the Ombudsman (requestor or affected individual) or the Privacy Commissioner (affected individual only)
- to tell the Authority if a complaint is made to the Ombudsman or the Privacy Commissioner, so the temporary withholding continues, pending the resolution of the complaint.
Once your Hinekōrako record is set up – managing your details
This guidance shows you how to manage details of your water carrier service in Hinekōrako. You can also manage who in your organisation can access the portal and view or edit details of your service.
Managing your users
Managing an individual user profile
This guidance explains how to manage the details of your user profile in Hinekōrako.
Overview
To access the profile screen, sign in to Hinekōrakooutbound, click on your name at the top right corner of the screen and click Profile.
The following explains the data that's recorded on the profile screen, including the allowable values for each entry and any other requirements.
A mandatory field (indicated by a red asterisk) means you must provide data in that field.
There are different types of fields that allow different ways of recording data.
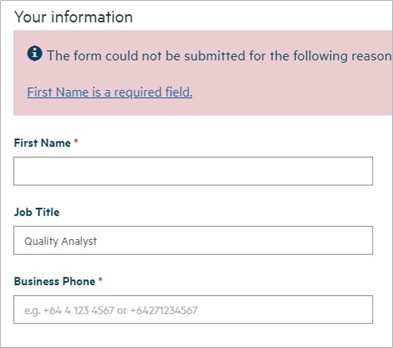
If you attempt to move on from the profile screen and haven't provided all mandatory data, or there's a problem with the data you've provided, one or more error messages will be displayed indicating the problem. If the problem is with a particular field, you can click on the link in the error message to go to that field.
Profile screen

The profile screen records the following details about you. Once you've entered the information, click Update to save the details.
|
Field |
Mandatory Field |
Explanation |
|
First Name |
Yes |
Your first name. |
|
Last Name |
Yes |
Your last name. |
|
Job Title |
No |
Your job title. |
|
|
Yes |
Your email address. Must be in a valid email format. |
|
Business Phone |
One of Business or Mobile Phone is mandatory |
It’s mandatory to provide either a business phone number or a mobile number, as described in the field below. The number must start with + followed by the country code (e.g. +64 for New Zealand). |
|
Mobile Phone |
It’s mandatory to provide either a mobile phone number or a business phone number, as described in the field above. The number must start with + followed by the country code (e.g. +64 for New Zealand). |
|
|
Physical Address Search |
No |
You can use this field to find your physical address in the database of NZ Post addresses. As you start typing the address, Hinekōrako will look up the database as you type, giving you a list of addresses it has found. When your address appears in the list you can click on it to select it and populate the address fields below: |
|
Physical Address fields |
Some |
These fields are automatically populated if you select an address from the Physical Address Search look up results. If the address is not found, you can record it in the fields yourself. |
|
Postal address is different |
No |
Click on this if the postal address is different from the physical address. If you click on it, Postal Address fields appear. |
|
Postal Address Search |
No |
You can use this field to find your postal address in the database of NZ Post addresses. As you start typing the address, Hinekōrako will look up the database as you type, giving you a list of addresses it has found. When your address appears in the list you can click on it to select it and populate the address fields below: |
|
Postal Address fields |
Some |
These fields are automatically populated if you select an address from the Postal Address Search look up results. If the address is not found, you can record it in the fields yourself. |
Managing supply portal users (for Supply Administrators)
Download a pdf of this guidance: Managing supply portal users (for supply administrators)
This guidance explains how, as a Supply Administrator, you can provide others with access to the supplies you administer and manage what they can and cannot do with respect to those supplies.
As a Supply Administrator, you have administrator permissions within Hinekōrako, but only for the supplies that you have a supply relationship with. If you are a Supply Group Administrator, use the guidance under the next expandable heading.
Step 1
Log into Hinekōrakooutbound and click on Manage Users at the top of the page. If you can't see that link it means you're not a Supply Administrator and don't have permission to manage users.
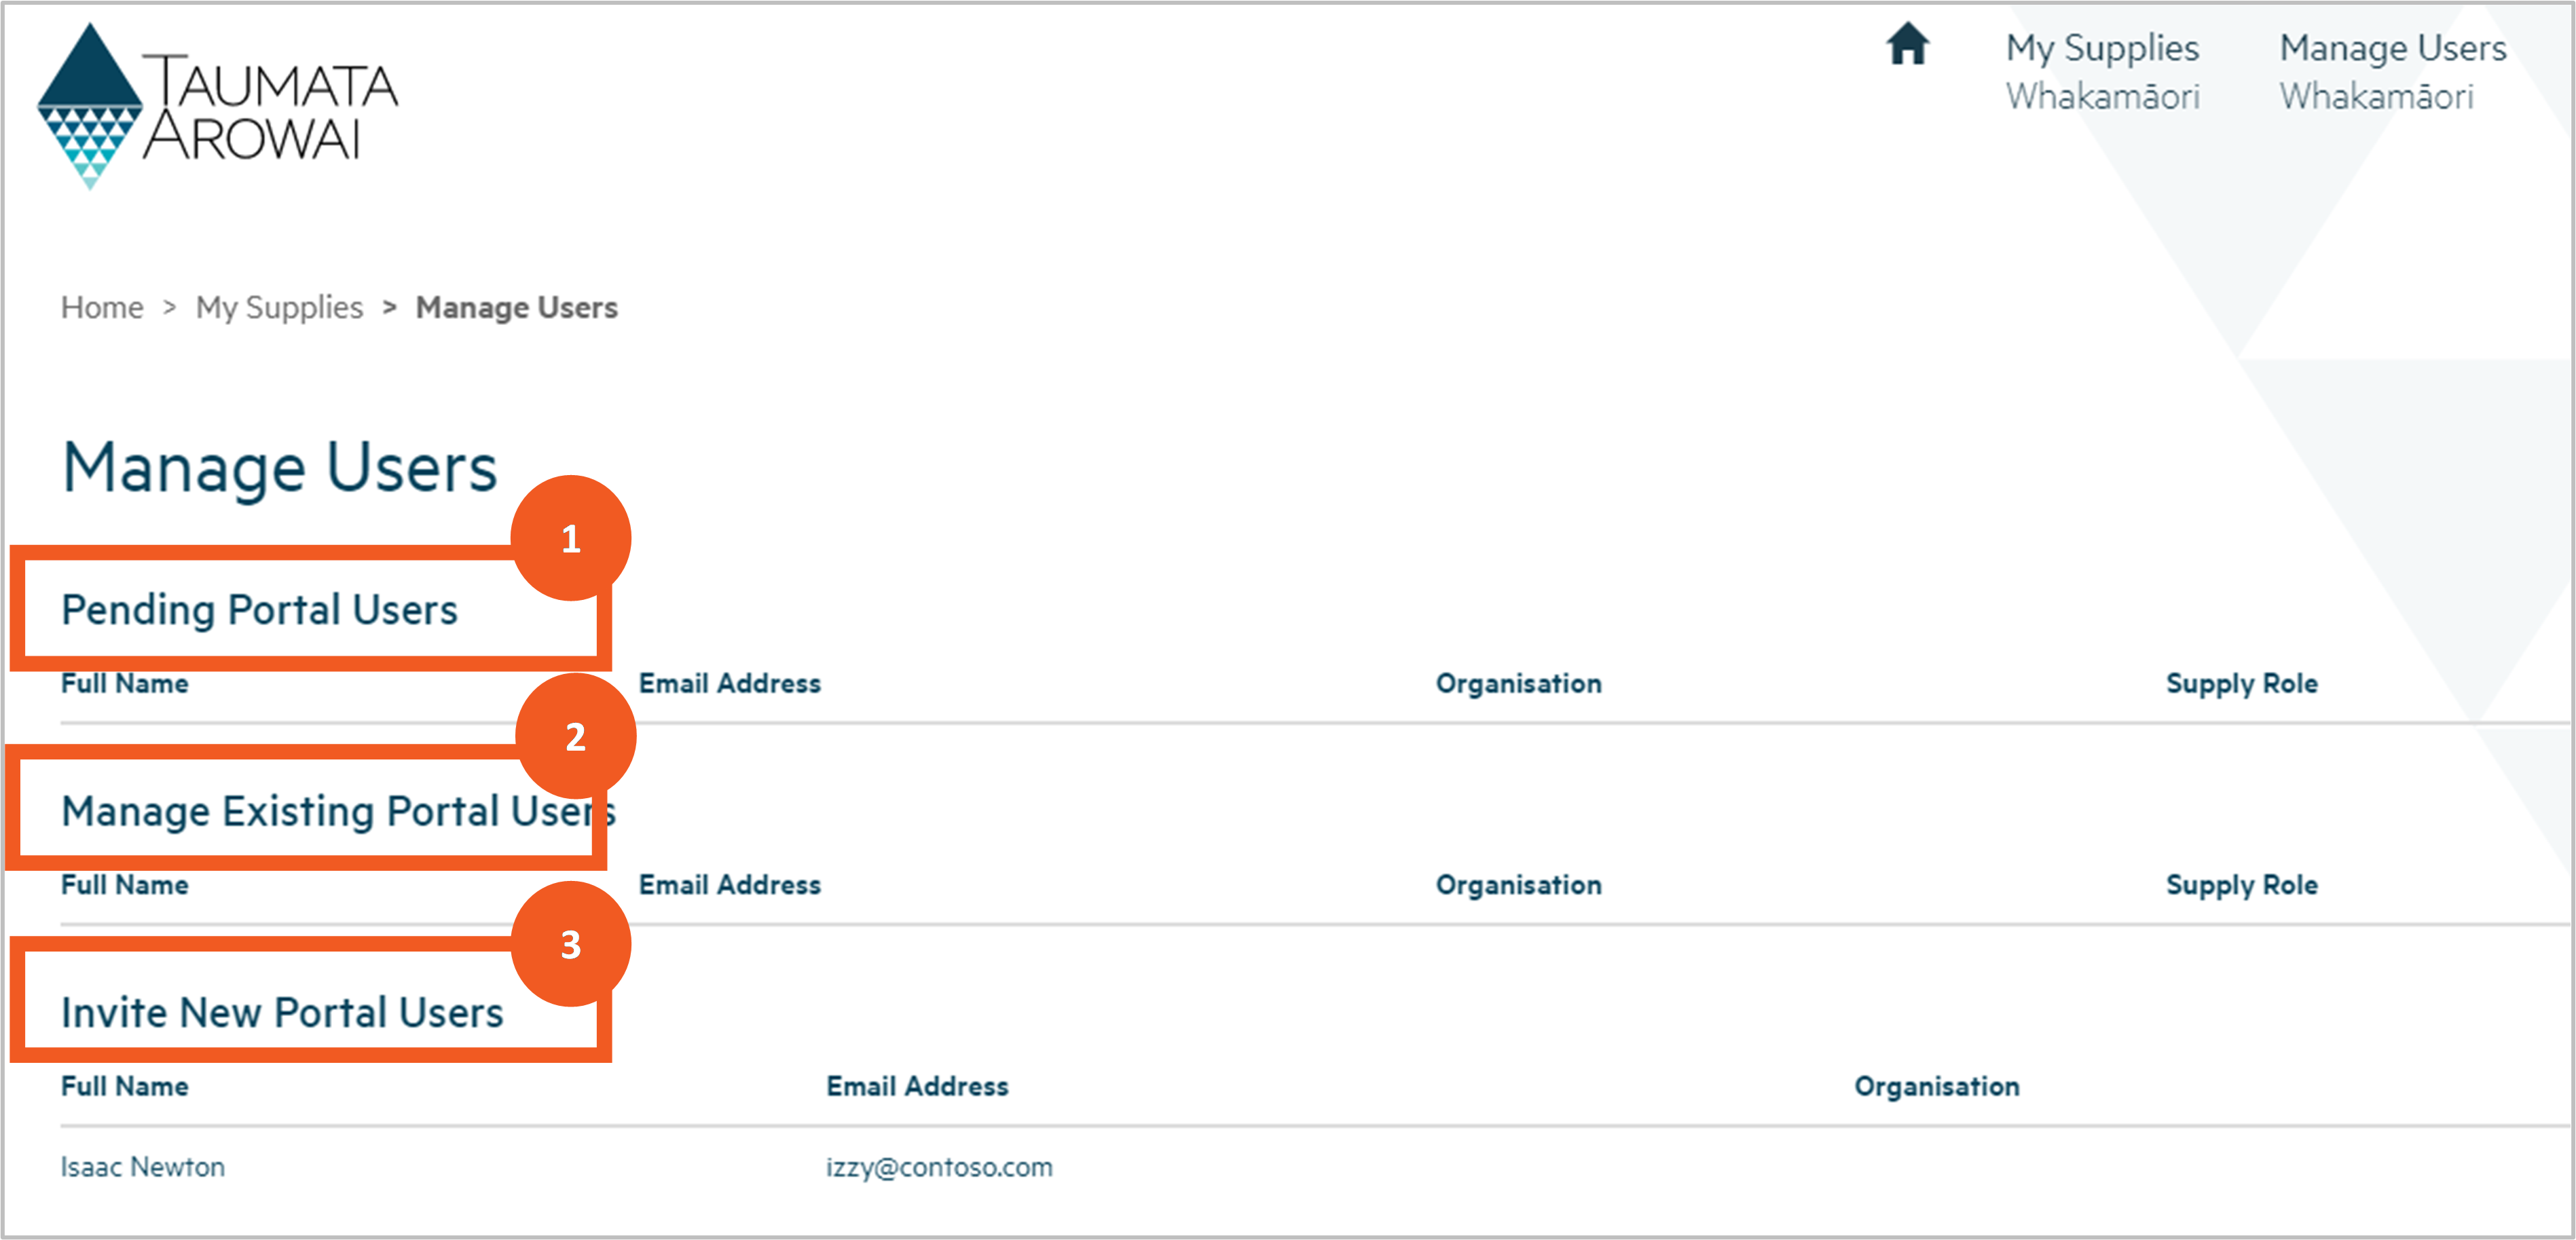
The Manage Users screen shows three lists (see graphic below):
- Pending Portal Users: a list of people who have been emailed an invitation to set up their portal user account, but who have not yet done so.
- Manage Existing Portal Users: a list of people who currently have a portal account.
- Invite New Portal Users: a list of the people who have a relationship with one or more of the supplies you administer, but who have not yet been sent an invitation email.
If you cannot see a person you expect to see in one of these lists, it's likely because they don't have a relationship with one of the supplies you administer.
From here you can do one of three things:
- Send an invitation to a person who has not yet been sent one. Go to Step 2.
- Resend an invitation to a person who has been sent an invitation but has lost it or it has expired. Go to Step 4.
- Manage which supplies an existing user can see and what they can do with those supplies. You can also grant or remove Supply Administrator rights, controlling who can and cannot manage users. Go to Step 6.
Invite a new portal user
Step 2
Find the person you wish to invite to become a portal user and then click Invite User using the dropdown arrow at the end of their row in the Invite New Portal Users list.

Step 3
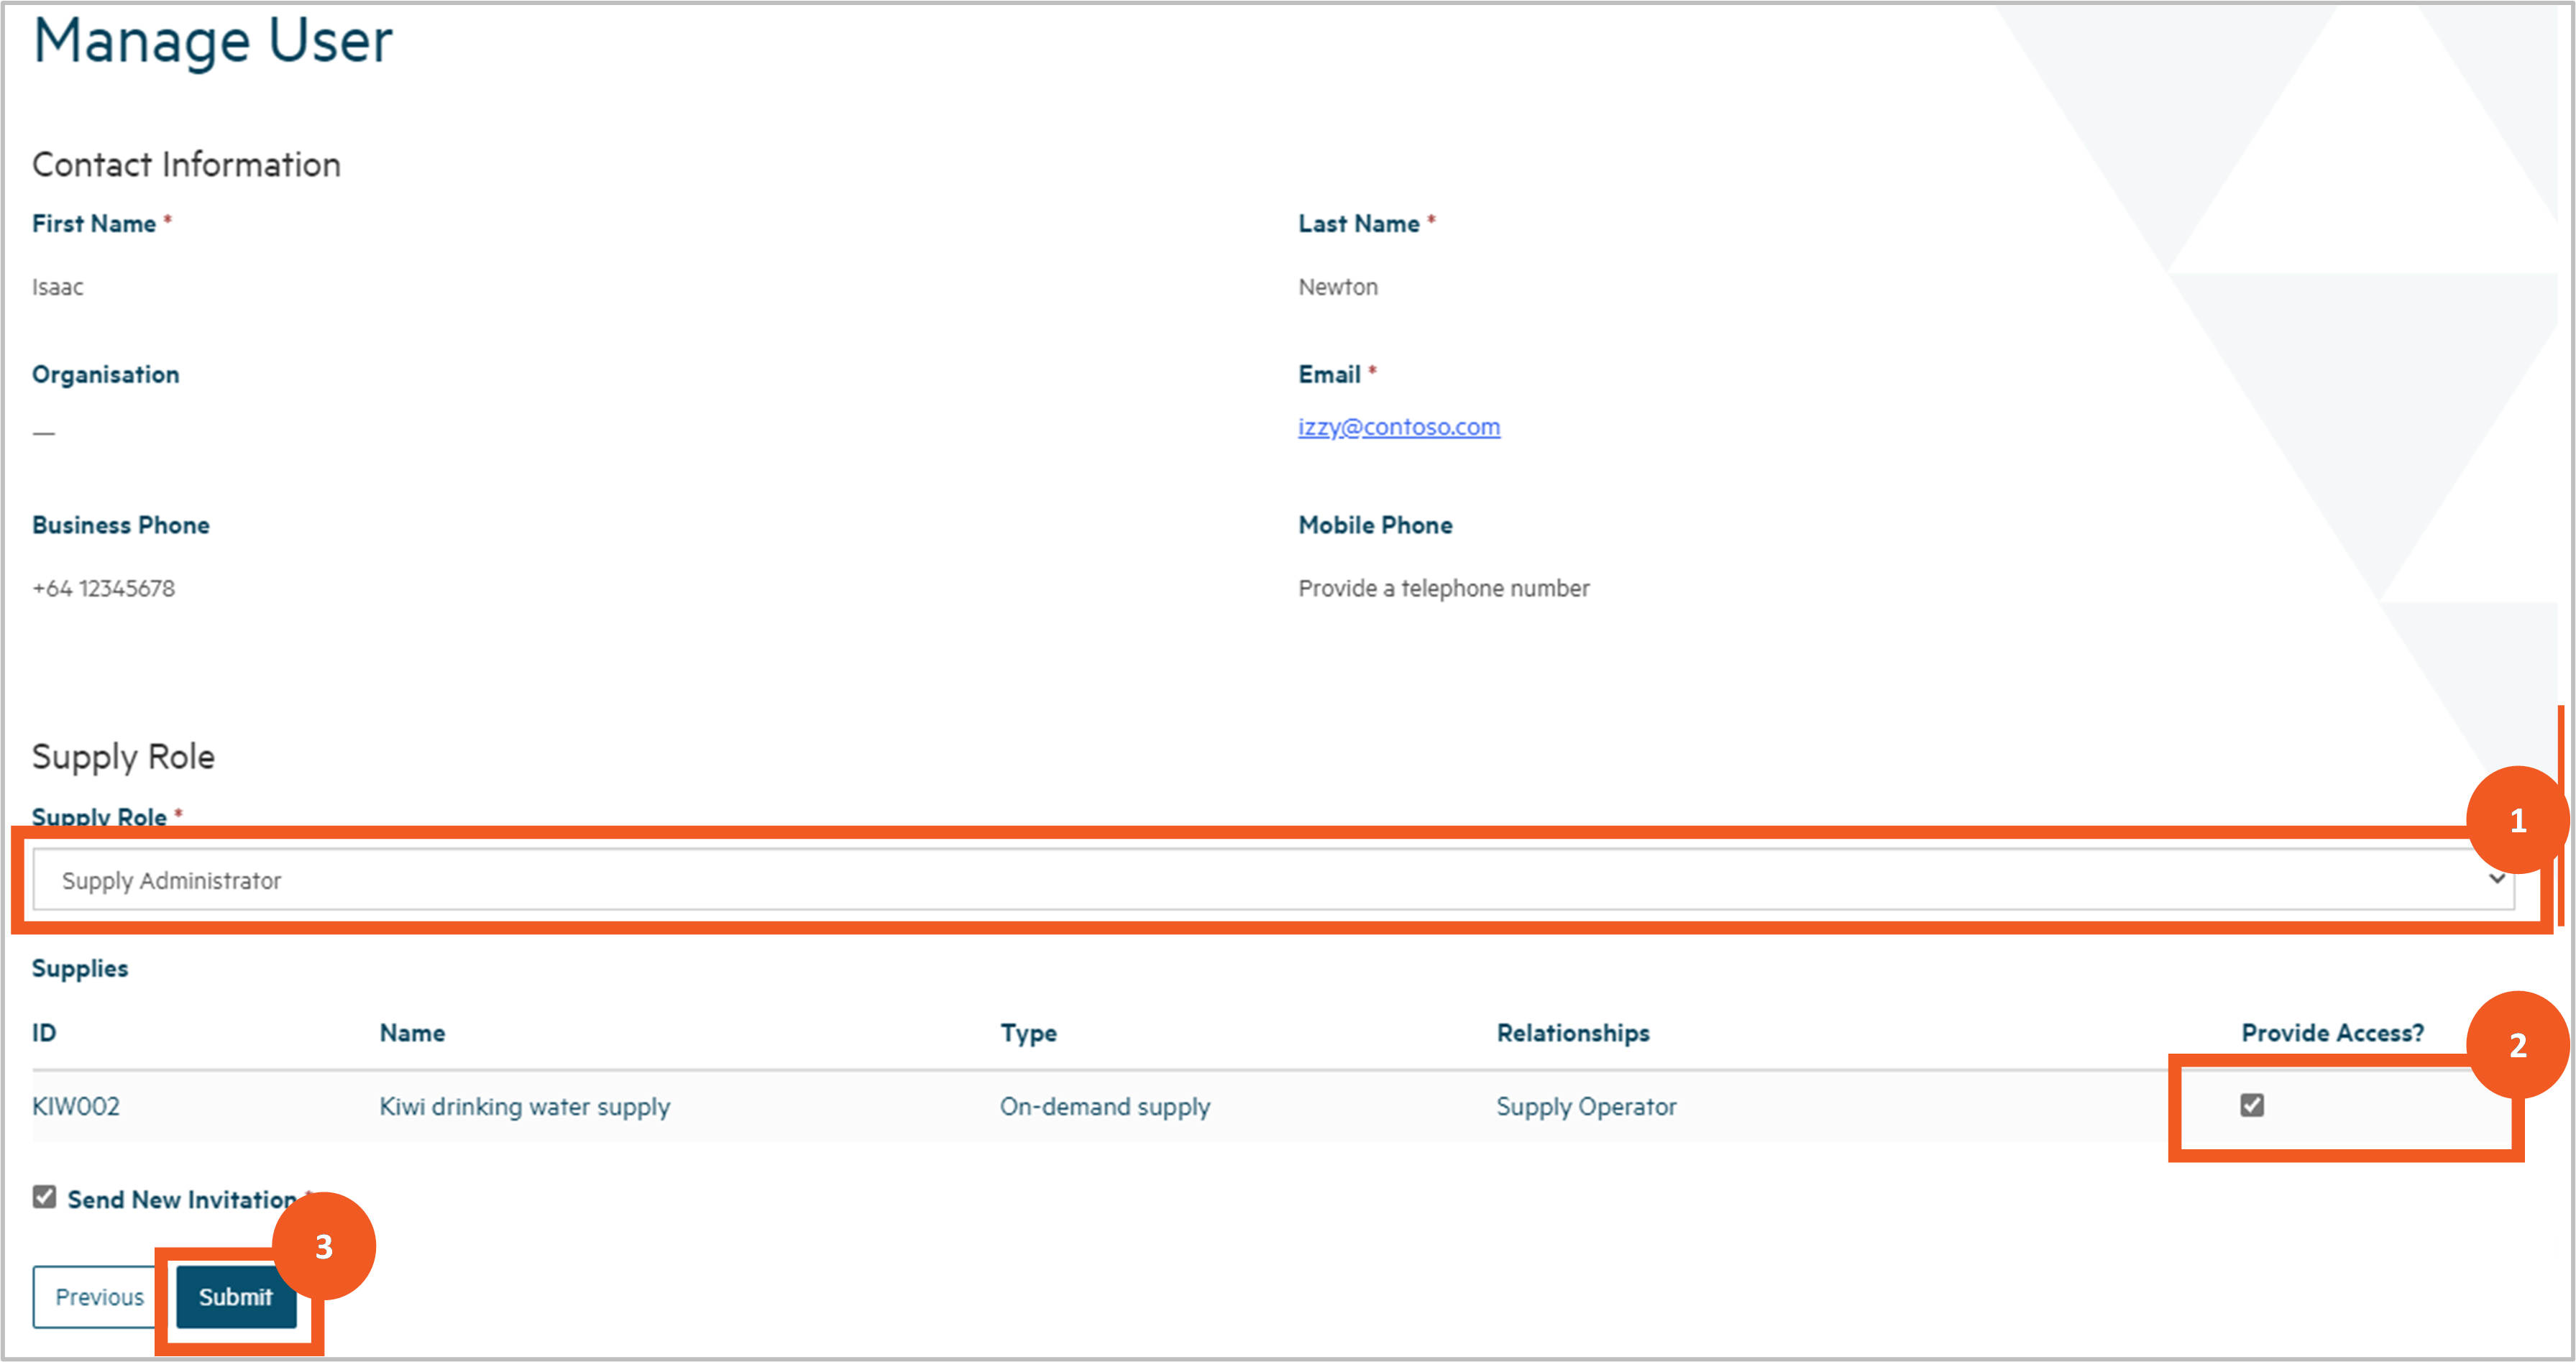
You’ll be taken to a screen where you can see the contact details of the person and a list of the supplies with which they have a relationship in the registration records. You can grant them access by:
1. Selecting the role you want the user to have:
- Supply Administrator will give them the same rights you have: being able to update any data or submit any records to the Authority for supplies they have a supply relationship with, and invite and manage other users that have supply relationships with those supplies.
- Supply User will give them the rights to update data and submit records to the Authority for supplies they have a supply relationship with, but not manage users.
- Supply Read Only will allow them to view data but not update it.
2. Selecting which supplies you want them to have access to in the portal by checking the Provide Access box for the supply.
3. Clicking the Invite and Assert Identity checkbox. In doing so you're asserting that the person whose email the invitation is being sent to is the person you want to grant access to. This means the person will not need to confirm their identity when they set up their user account, which is a step that will be added to Hinekōrako in the future.
4. Clicking Submit.
This will send an invitation email to the person’s email address, including a link that, when clicked, will start the process through which they will create their user account.
You'll be returned to the Manage Users page, where you should now see the new user in the Pending Portal Users list.

Resend an invitation
Step 4
If a person you've invited to create a portal account has lost their email invitation or has been unable to set up the account because the invitation has expired, you can resend the invitation by choosing Resend Invite from the dropdown arrow at the end of their row in the Pending Portal Users list. Invitations expire after 14 days.

Step 5
You’ll be taken to a page where you can:
- check and change the role you want to give them
- check and change the supplies they will have access to
- click Submit to send the new invitation email.
Manage existing users
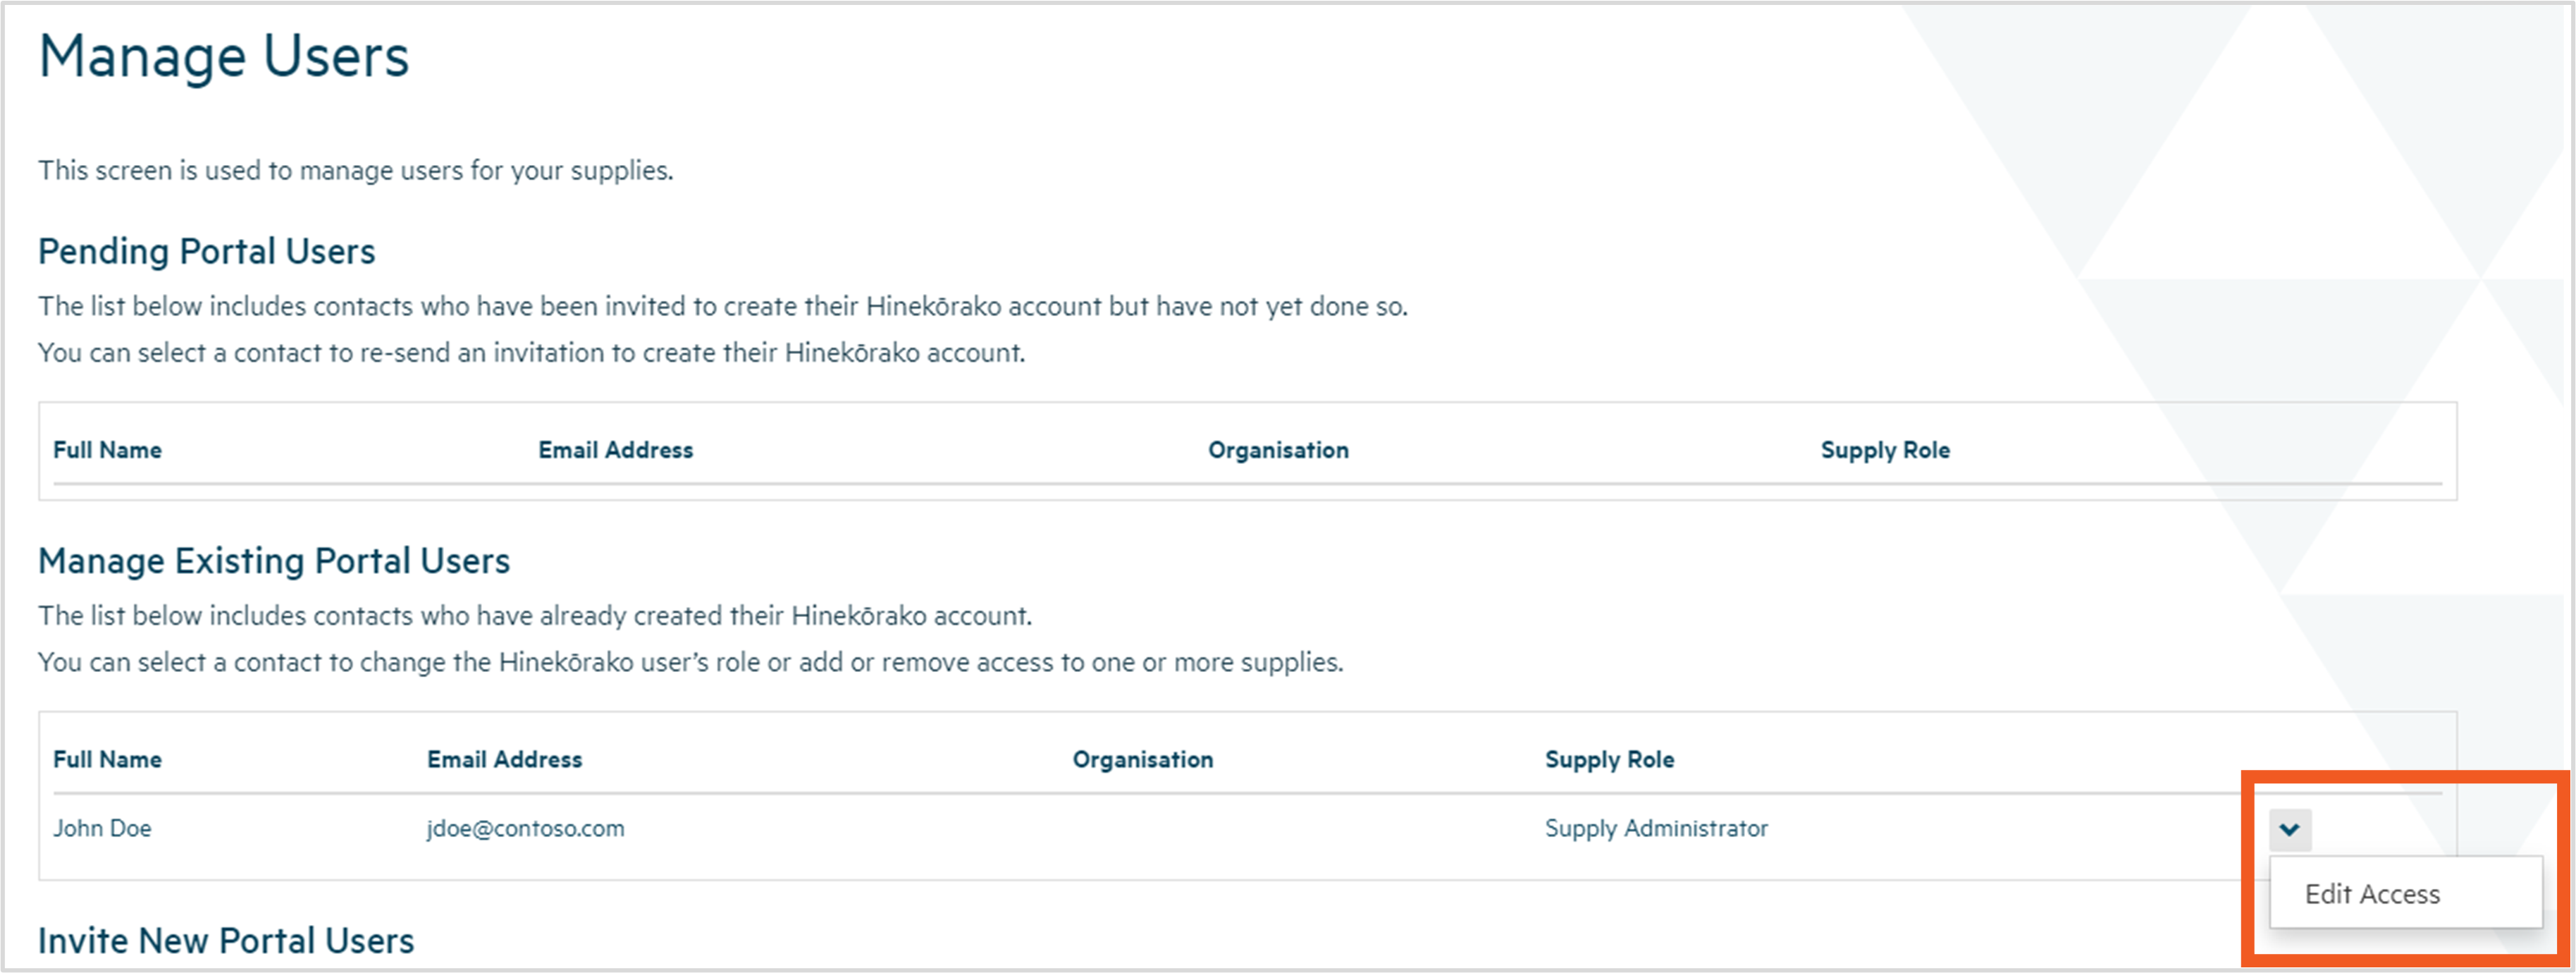
Step 6
To manage the access of an existing portal user, on the Manage Users page click on the dropdown arrow at the end of that user’s row in the Manage Existing Portal Users section and choose Edit Access.
Step 7
You’ll be taken to a page where you can:
- view the contact details for the person. You cannot change their details. Only they can update their profile.
- change the supply role for the user (see Step 3 for an explanation of each role).
- change which supplies the user has access to. They can only access supplies they have a supply relationship with.
Make the required changes and click Submit. To remove the user's access entirely, uncheck the Has Supply Access box for all supplies.

Managing supply portal users (for Supply Group Administrators)
Download a pdf of this guidance: Managing supply portal users (for Supply Group Administrators)
This guidance explains how to provide others with access to the supplies you administer and to manage what they can and cannot do with respect to those supplies. This guide is for Hinekōrako users with the role of Supply Group Administrator. This means you have administrator powers within Hinekōrako across all supplies in your supply group.
You can invite people to create a user account for the Hinekōrako supply portal, regardless of whether they have a supply relationship with a supply in your supply group. This includes creating the contact record of a person not currently connected to your supply.
Step 1
Log in to Hinekōrakooutbound then click on the Manage Users link at the top of the page. If you cannot see that link it means you are not a Supply Group Administrator and don’t have permission to manage users.
The Manage Users screen has three lists (see graphic below):
- Pending Portal Users - a list of people who have been emailed an invitation to set up their portal user account, but who have not yet done so.
- Manage Existing Portal Users - a list of people that currently have a portal account.
- Invite New Portal Users - a list of the people who are connected with the supply group, either because they have a relationship with one or more of the supplies in the group or have been created as a contact in this Manage Users section, but who have not yet been sent an invitation email.
From here you can do one of four things:
- Create a new contact record for a person you wish to invite by clicking Add New Contact. Go to Step 2.
- Send an invitation to a person who has not yet been sent one. Go to Step 5.
- Resend an invitation to a person who has lost the invitation, or it has expired. Go to Step 7.
- Manage which supplies an existing user can see and what they can do with those supplies. You can also grant or remove administrator rights, determining who can and cannot manage supplies. Go to Step 9.
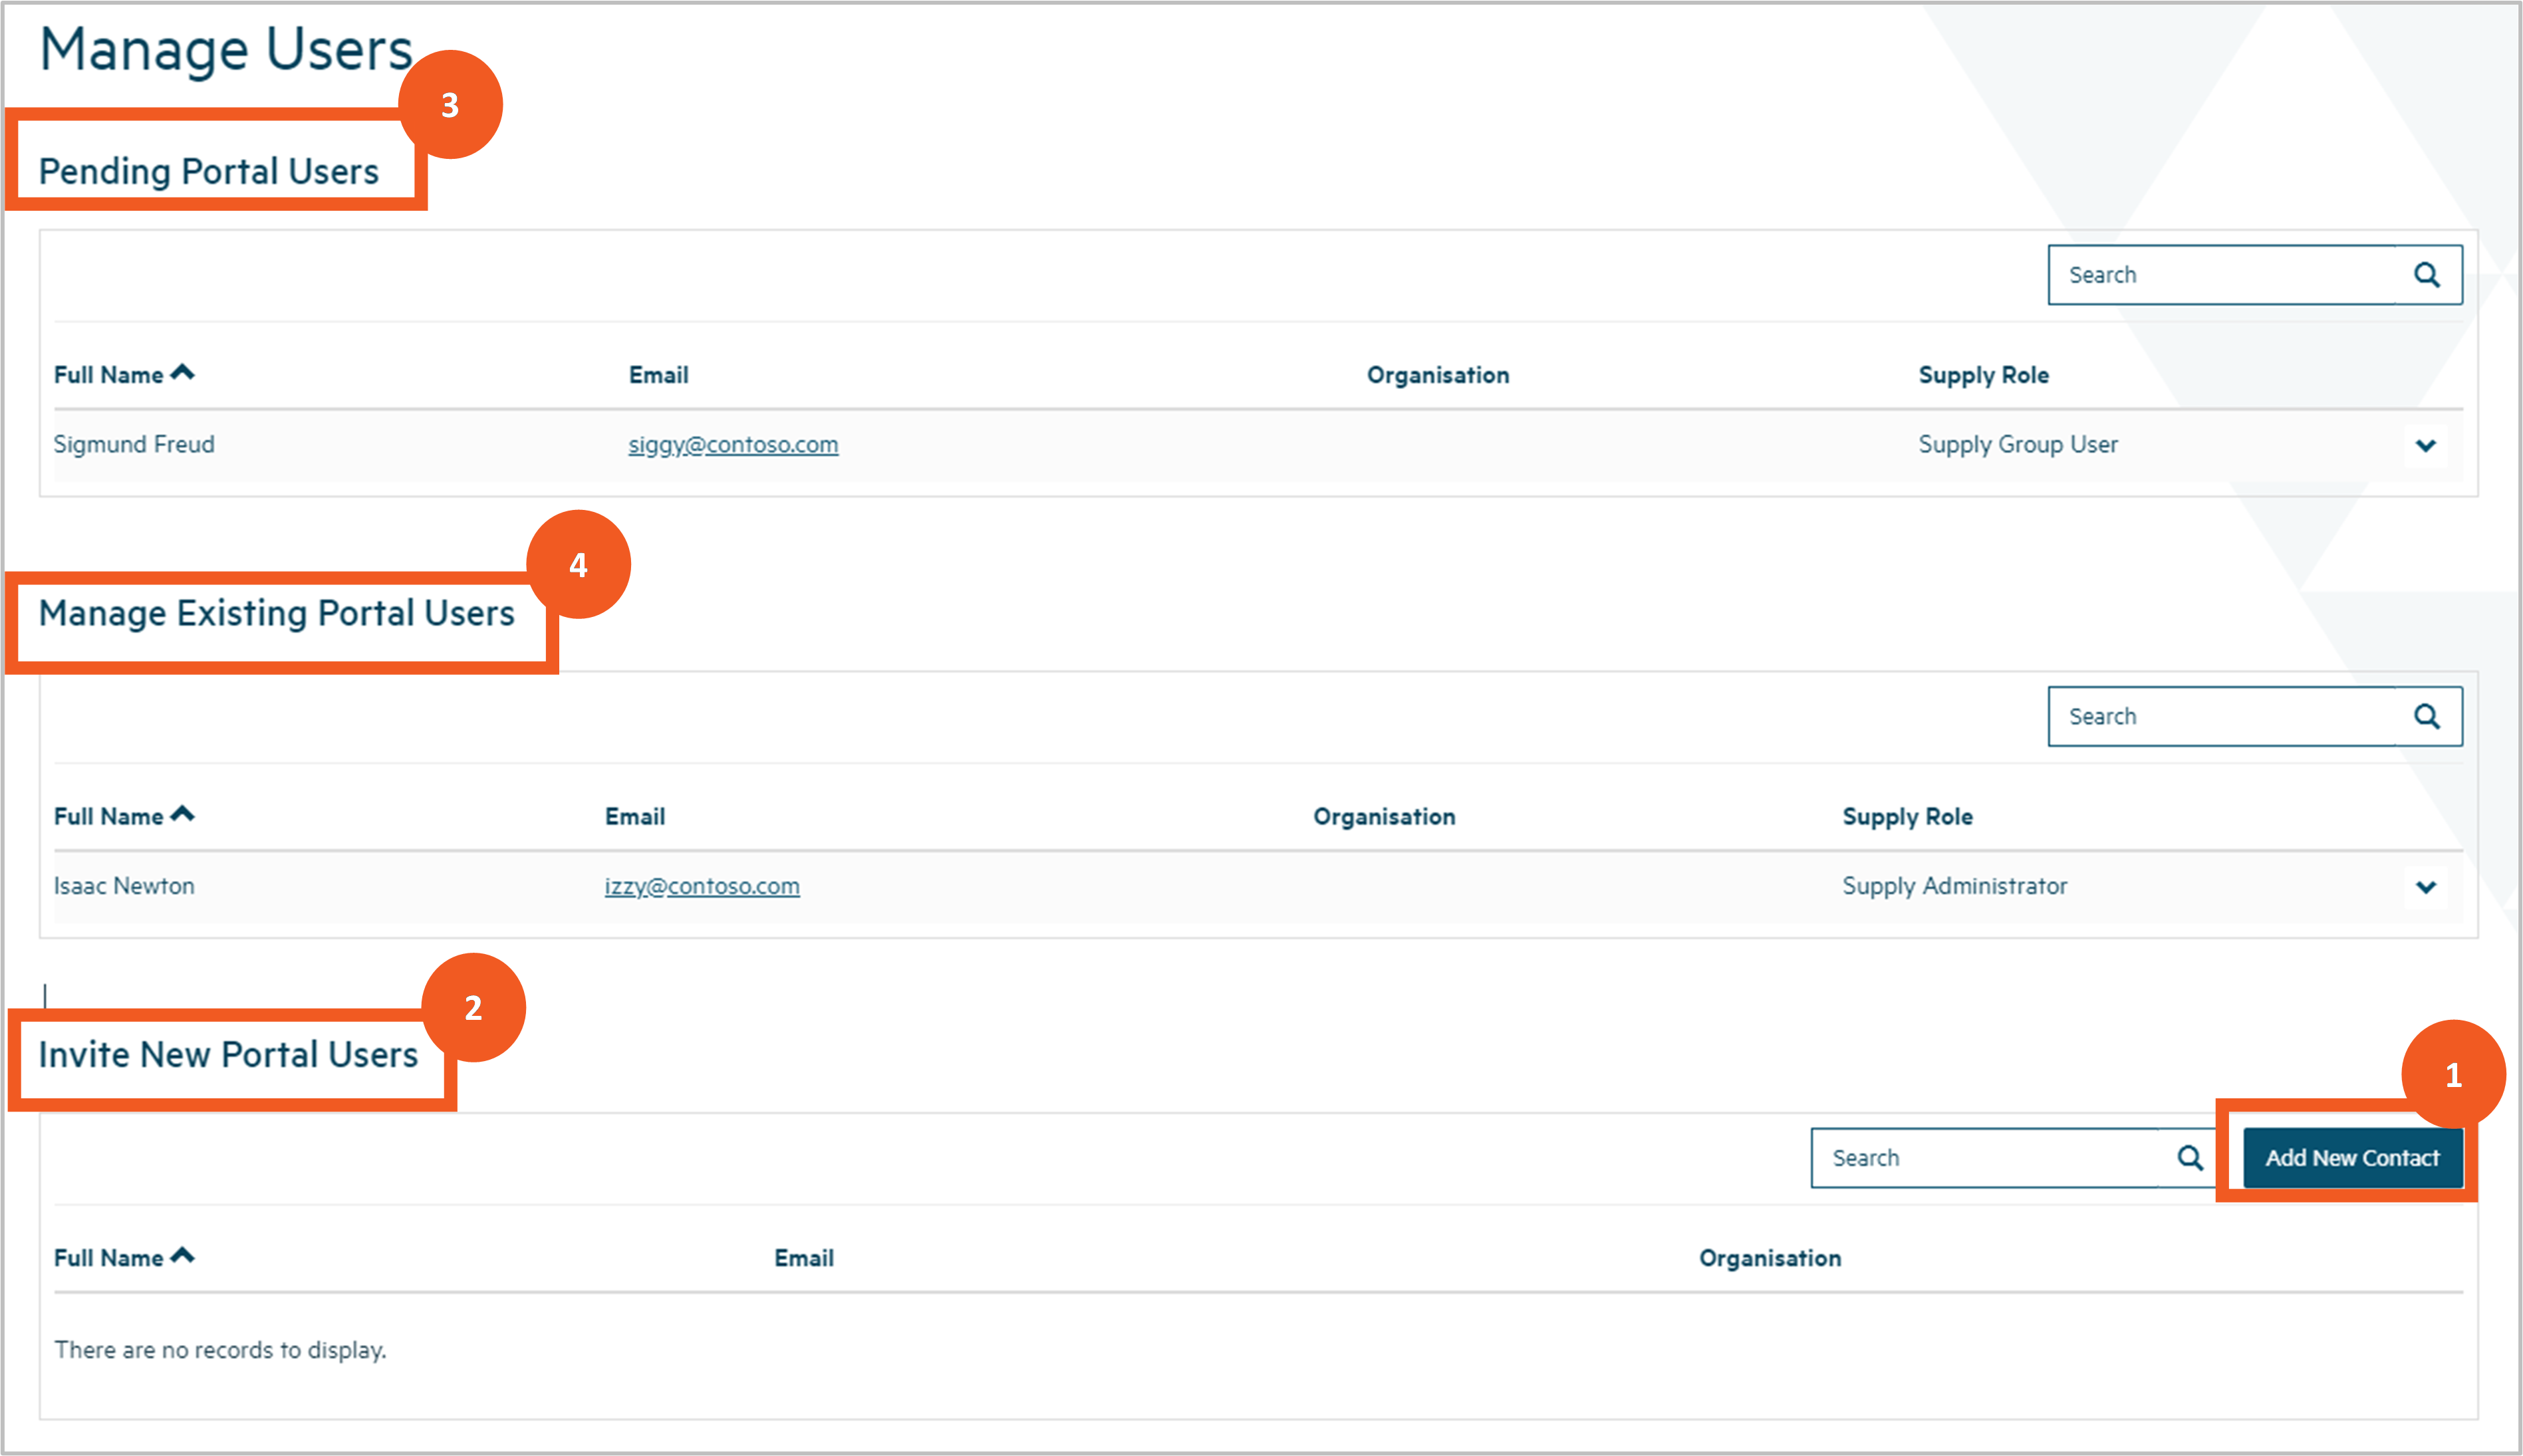
Create a new contact
Step 2
To add a new person to your supply group and invite them to set up a portal account, click Add New Contact.

Step 3
You’ll be taken to a screen where you can enter the contact details of the person, including their name, email address, phone number and physical and/or postal addresses.
Assign a supply role for the user - either:
- Supply Group Administrator, giving them the same rights as you: being able to update any data or submit any records to the Authority and invite and manage other users, for any supply within the supply group.
- Supply Group User, giving them the rights to update data and submit records to the Authority, but not to manage users, for any supply within the supply group.
- Supply Read Only, allowing them to view data withing the supply group but not update it.
Complete the details and click Next. Any errors (e.g. missing mandatory data or data in an invalid format) will be displayed, allowing you to correct the errors and click Next again.
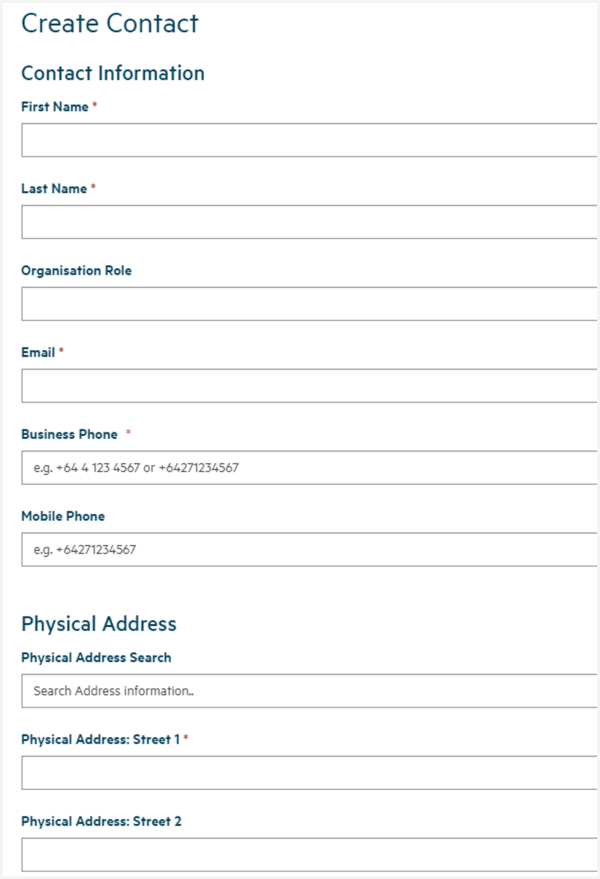
Step 4
You’ll be taken to a screen where you can confirm the access requirements for your new contact.
Confirm (and correct if necessary) their name and supply role, then add or remove supply groups that the new contact will have access to.
Click the Invite and Assert Identity checkbox. In doing so you are asserting that the person whose email the invitation is being sent to is the person you want to grant access to. This means the person will not need to confirm their identity when they set up their user account, which is a step that will be added to Hinekōrako in the future.
Click Submit and an invitation email will be sent to the person’s email address, including a link that, when clicked, will start the process by which they will create their user account.
You'll be returned to the Manager Users page and should now see the person in the Pending Portal Users list.
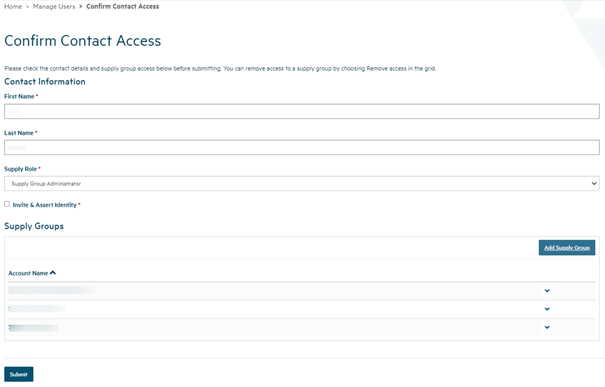
Invite a new portal user
Step 5
Contacts who have one or more supply group relationships in the current supply group or supply relationships with one or more supplies in the current supply group, but don't have a Hinekōrako user account, can be invited to create a user account. These contacts are shown in the Invite New Portal Users list.
Find the person you want to invite to become a portal user and then click Invite User from the dropdown arrow at the end of their row in the list they appear in.

Step 6
You’ll be taken to a screen where you can see the contact details of the person and the option to choose which role the user will have once they have set up their portal account.
1. If you want the user to have access to all of the supplies in the supply group you administer, give them one of the following roles:
- Supply Group Administrator, giving them the same rights as you: being able to update any data or submit any records to the Authority and invite and manage other users, for any supply within the supply group.
- Supply Group User, giving them the rights to update data and submit records to the Authority, but not to manage users, for any supply within the supply group.
- Supply Read Only, allowing them to view data within the supply group but not update it.
Select which supply groups you want them to have access to by adding or removing supply groups you are administrating.
2. If you want the user to have access to only certain supplies in the supply group you administer, give them one of the following roles:
- Supply Administrator, giving them the rights to update any data or submit any records to the Authority and invite and manage other users for the specific supplies you select.
- Supply User, giving them the rights to update data and submit records to the Authority for the specific supplies you select, but not to manage users.
- Supply Read Only, allowing them to view data for the specific supplies you will select but not update it,
Select which supplies you want them to have access to in the portal by adding or removing supply access using the dropdown arrow at the end of each supply row. The supplies listed are only those the person has a supply relationship with.
3. Click the Invite and Assert Identity checkbox. In doing so you are asserting that the person whose email the invitation is being sent to is the person you want to grant access to. This means the person will not need to confirm their identity when they set up their user account, which is a step that will be added to Hinekōrako in the future.
4. Click Submit.
This will send an invitation email to the person’s email address, including a link that, when clicked, will start the process by which they will create their user account.
You'll be returned to the Manage Users page where you should now see the person in the Pending Portal Users list.
Supply roles
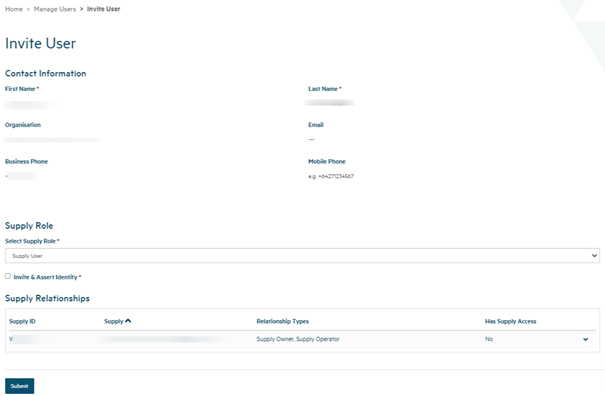
Supply group roles
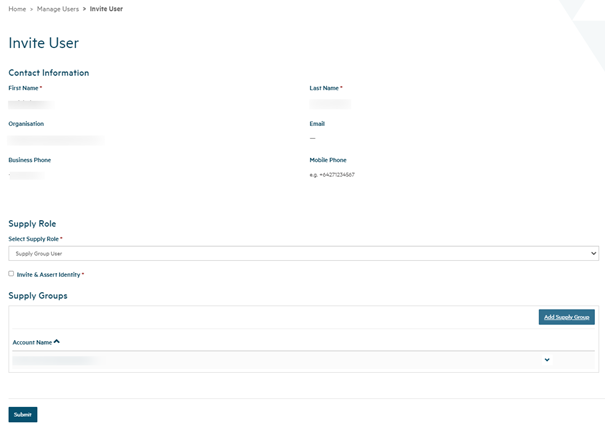
Resend an invitation
Step 7
If a person you've invited to create a portal account has lost their email invitation or has been unable to set up their account because the invitation has expired, you can resend the invitation by choosing Resend Invite from the dropdown arrow at the end of their row in the Pending Portal Users list. Invitations expire after 14 days.

Step 8
You’ll be taken to a page where you can:
- Check and change the role you want to give them. See Step 6 above for information on the roles.
- For roles of Supply Administrator, Supply User and Supply Read Only, check and change the supplies they have access to. They can access only supplies they have a supply relationship with.
- For roles of Supply Group Administrator, Supply Group User and Supply Group Read Only, check and change the supply group(s) they will have access to. Only supply groups administered by the requesting Supply Group Administrator can be added to the invited user.
- Click Submit to send the new invitation email.
Managing existing users
To manage the access of an existing portal user, on the Manage Users page click on the dropdown arrow at the end of that user’s row in the Manage Existing Portal Users section and choose Edit Access.

Step 9
You’ll be taken to a page where you can do a number of things:
- View the contact details for the person. You cannot change their details here.
- Change the supply role OR supply group role for the user (see Step 6 for an explanation of each role).
- For the roles of Supply Administrator, Supply User and Supply Read-only, check and change the supplies they have access to. They can access only supplies they have a supply relationship with.
- For roles of Supply Group Administrator, Supply Group User and Supply Group Read Only, check and change the supply group(s) they have access to. Only supply groups administered by the Supply Group Administrator can be added or removed.
Make the required changes and click Submit. To remove the user’s access entirely remove each supply or supply group.

Viewing and managing your water carrier service information
Renewing registration of your water carrier service
Download a pdf of this guidance: Renewing registration of a drinking water supply
When you log into the Hinekōrako portaloutbound, a blue banner at the top of the screen will alert you to any renewals due in the next 30 days and any overdue annual renewals.
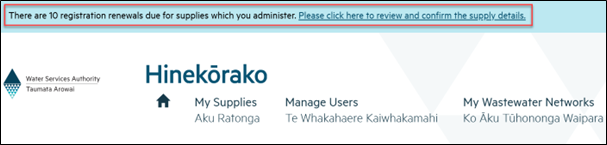
Use either of the processes described below to renew your registration.
Accessing the annual renewal form
If you don't have a drinking water safety plan (DWSP) already saved to Hinekōrako, make sure you have one ready to upload before you start your renewal.
Option 1
If you want to view the supplies that have renewals due, click the link in the blue banner to view the renewals table.
Use the dropdown menu at the end of the supply row to select Complete Registration Renewal.
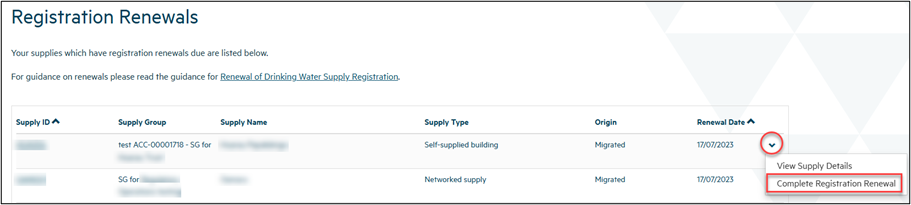
Option 2
The In Progress Supply Registrations and Registered Supplies table also has the same dropdown menu for each supply. The Complete Registration Renewal option will be visible only for supplies that are within 30 days of their renewal date or are overdue for renewal.
Note that this option is not available for supplies showing in the Other Supplies table. If a renewal is due for any supply that has a supply status of Submitted, please use Option 1.
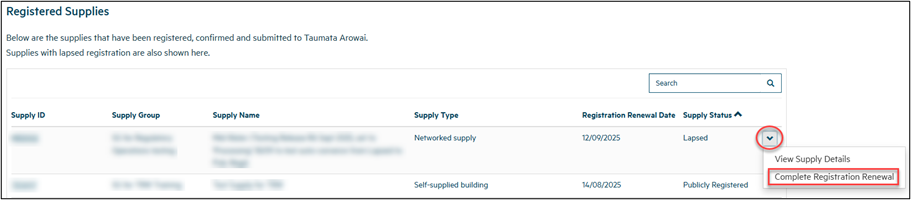
Completing the renewal form
Review the information in the renewal form. If you need to make updates, you can do this by editing the fields on this page as you go.
Any field marked * is a required field.
Editing supply components and relationships
If there have been any changes to your drinking water supply components (sources, treatment plants, etc.) or supply relationships, use the dropdown menu options to edit or remove records, or add new ones using the Add New buttons in the renewals form.
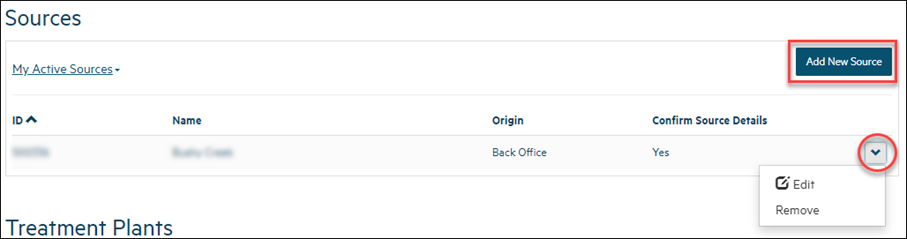
The Add New buttons will pop out another form for you to complete with the new details. Once you click Submit at the bottom of the form it will close and you will be able to continue with the annual renewal.
Editing your drinking water safety plan (DWSP)
Use the dropdown menu to view the existing DWSP or upload additional documents. If you need to upload a new DWSP, use the Add New Drinking Water Safety Plan button.
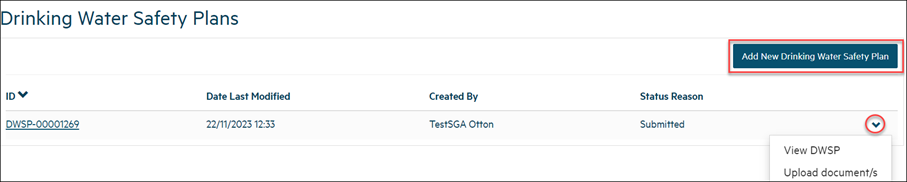
If details of your supply have been withheld from the public register of drinking water supplies and you would like that to continue, select Yes.

Confirming the renewal
You'll need to confirm (by checking the boxes) that the DWSP and supply registration details are accurate and up to date in the Confirmation section.
Click Submit.
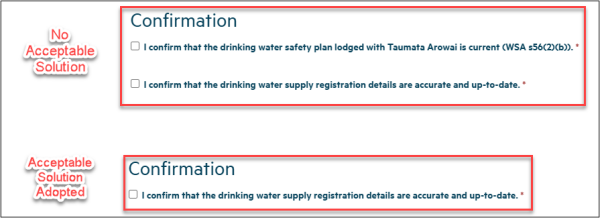
Managing your drinking water safety plans
Download a pdf of this guidance: Managing drinking water safety plans
This guide explains how to provide and then view the drinking water safety plan (DWSP) for your supply in Hinekōrako.
Before you provide your DWSP you'll need to have either confirmed your migrated supply or registered your new supply with the Authority. Your supply details need to be up to date - so please check before starting the process.
There are a number of details to enter, as prompted, before uploading and submitting your DWSP documents.
Starting the process
Step 1
Log in to Hinekōrakooutbound then find the supply for which you want to provide your DWSP from the list on the My Supplies home page.
Choose View Supply Details from the dropdown menu at the end of the supply row in the list.
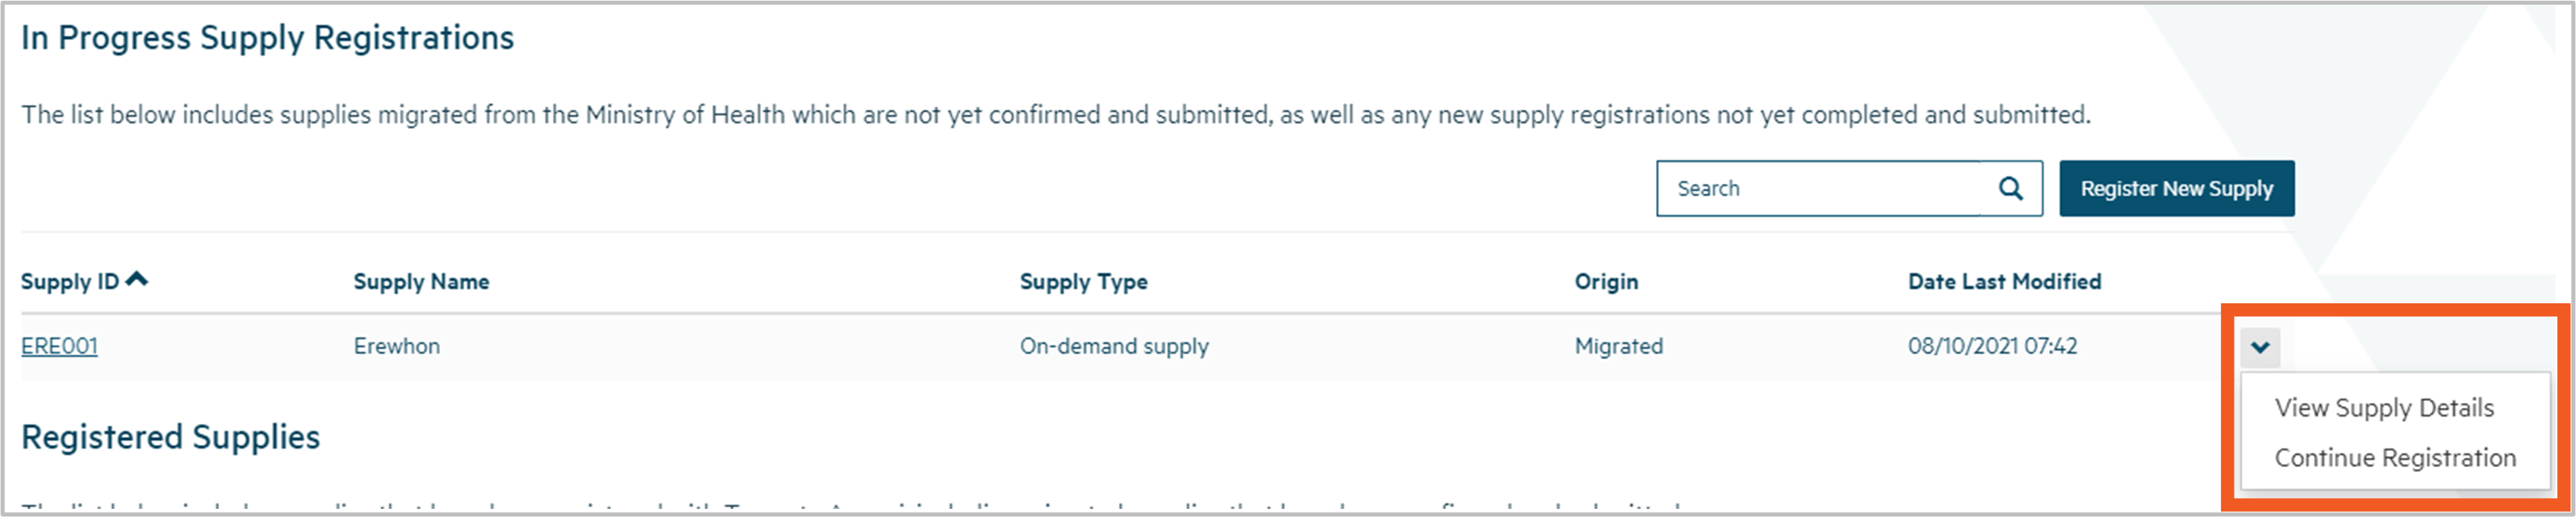
Step 2
You'll be taken to the View a Supply screen. Select View/Add Drinking Water Safety Plans from the menu on the left.
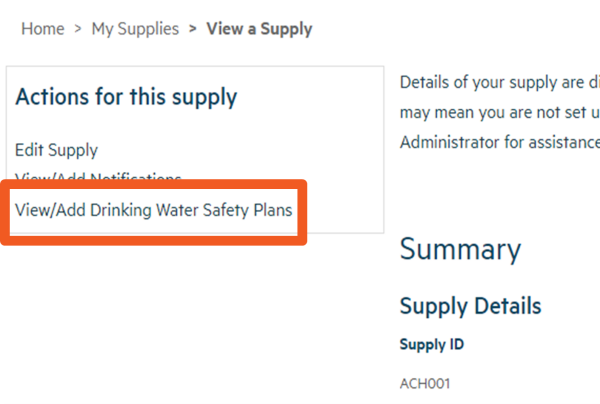
Step 3
You'll be taken to the Drinking Water Safety Plans page. On this page, there are three categories:
- Draft Drinking Water Safety Plans
- Submitted Drinking Water Safety Plans
- Superseded Drinking Water Safety Plans.
Any items listed in Draft Drinking Water Safety Plans can be viewed, edited or deleted by clicking on the small down arrow at the end of the row and making the appropriate selection.
Any items listed in Submitted Drinking Water Safety Plans can be viewed, have documents uploaded or closed and superseded by clicking on the small down arrow at the end of the row and making the appropriate selection.
On this page, you can also choose to Add New Drinking Water Safety Plan for your supply.
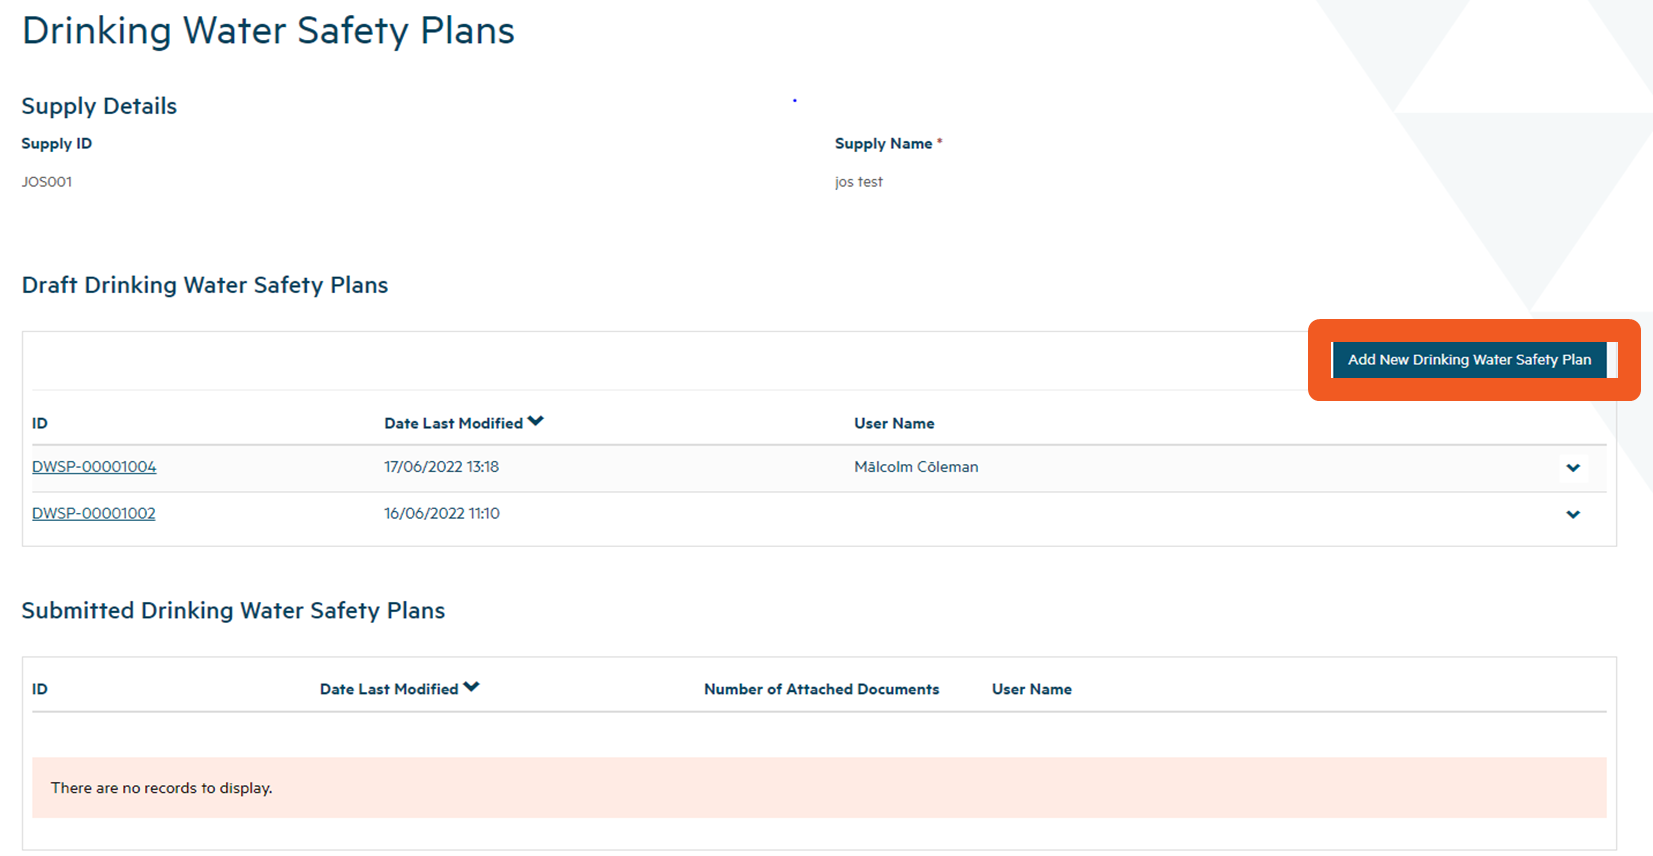
Creating a DWSP
Step 4
On this page, you provide some details about your DWSP and click Next to upload the DWSP documents.
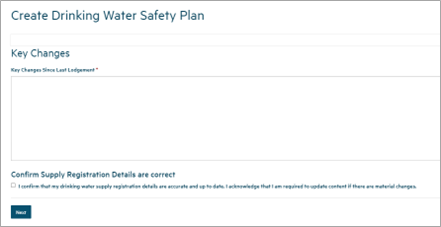
Document upload
Step 5
Follow these steps to upload the DWSP and supporting documents:
- Click Upload Document. This will open a pop-up screen where you can enter details of the document.
- Choose the type of document. Choose Drinking Water Safety Plan Supporting Document if no other type fits. You need to upload at least one document with the type 'Drinking Water Safety Plan'.
- Describe the document (optional) if you think it will help us better understand its contents.
- Click Choose File and then browse to find and upload the files you want to add. Some file types can't be uploaded for security reasons and the maximum file size is 30Mb.
- Click Submit.

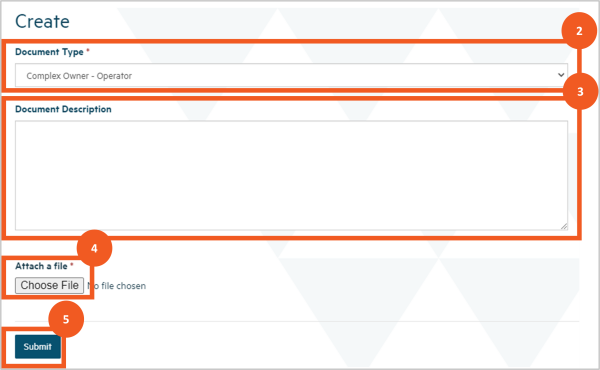
Once you’ve uploaded the first file you can repeat the process to add other documents, if need be.
Once you’ve uploaded a document you can:
- view its details by clicking the link in the Title column.
- remove it by choosing Remove Document from the dropdown at the end of the row or update the document details by choosing Edit Document Details from the dropdown at the end of the row.
If you accidentally upload the incorrect document, you'll first need to choose Remove Document and then click Upload Document to fix the problem.

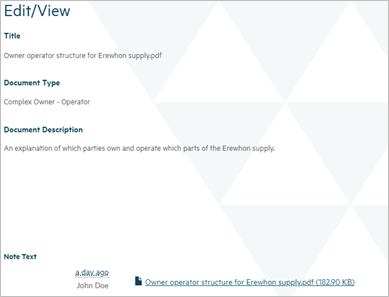
Step 6
Once you've completed all the information on this screen and uploaded your documents, click Submit. You’ll be taken back to the Drinking Water Safety Plans screen.
You can return to the My Supplies screen by clicking the menu option at the top of the page. From there you can select another of your supplies to Create Drinking Water Safety Plan.

Monitoring and reporting
Monitoring water quality - supply summary table
Download a pdf of this guidance: Monitoring water quality - supply summary table
A supply summary table is available for each of your supplies. The information in the table aims to help you meet your drinking water quality obligations. You might see a banner at the top of the Hinekōrako homepage advising that a supply summary table is available to view.
![]()
To access the supply summary, either click the link in the banner or click the dropdown arrow next to Reporting and select Supply Summary.

The supply summary table shows the following, for each of your supplies:
- Status of the drinking water safety plan (DWSP).
- Presence or absence of protozoa and bacterial barriers.
- Whether residual disinfection is used.
- Confirmation of any submitted rules reports.
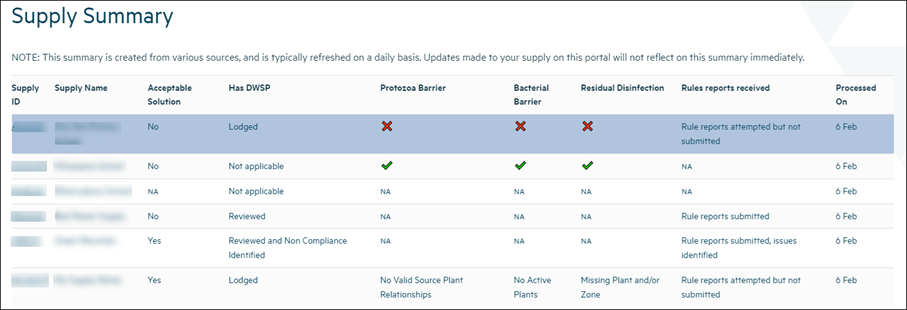
The information in the supply summary may be used to report on your supply in our annual Drinking Water Regulation Report. It's therefore important to ensure all your information in Hinekōrako is correct and up to date.
Information in each column
This section describes what each column in the supply summary table means. You can display further information by hovering over a tick or cross in the table.
Note:
- a 🗸 generally indicates that a requirement applies and is satisfied
- a × generally indicates that a requirement applies and is not satisfied
- NA (not applicable) generally indicates that the application of a requirement, or whether a requirement is satisfied, can’t be determined on the basis of the current registered information for the supply.
Acceptable Solution
This column shows whether a supply is registered as having adopted an Acceptable Solution. This is displayed as Yes, No or NA (Not Applicable – General Exemption applies).
Drinking water safety plans (DWSP)
This column shows the status of your DWSP and is displayed as one of the following:
- Lodged. The supply has an active DWSP.
- Not Lodged. No active DWSP could be found for the supply. This will show as × in the table.
- Reviewed. The supply has an active DWSP that has been reviewed by the Water Services Authority - Taumata Arowai.
- Reviewed and Non-compliance Identified. The supply that has been reviewed by the Water Services Authority - Taumata Arowai and non-compliance was identified. If you need further information on the nature of the non-compliance, contact us at info@taumataarowai.govt.nz.
- Not Applicable. A DWSP does not appear to be required as the supply is using an Acceptable Solution or a General Exemption is in place.
Protozoa barrier
This column indicates whether your supply is registered as having or lacking a protozoa barrier and is displayed as one of the following:
- Has protozoa barrier. All sources that appear to require protozoal treatment have source-plant relationship/s with treatment plant/s which have at least one form of treatment which may be suitable for removal of protozoa. This will show as a 🗸 in the table. This status does not reflect determination of compliance nor the effectiveness of the treatment plant to achieve the required protozoal removal.
- Lacks protozoa barrier. At least one source that appears to require protozoal treatment has been identified as having a source plant relationship to a treatment plant that does not appear to have a treatment process suitable for removal of protozoa. This will show as a × in the table.
- No valid source plant relationships. There are no active source-plant relationships recorded against the supply or the supply does not have a source-plant relationship with components owned by other supplies.
- Not applicable. The supply relies on either an Acceptable Solution or a General Exemption, or is a water carrier or linked supply, or all source/s of this supply do not appear to require protozoal treatment, e.g., source/s registered as Class 1 or Interim Class 1 according to the Drinking Water Quality Assurance Rules (the Rules). The supply may or may not require treatment of protozoa, but this cannot be determined from the registered information for the supply and the summary records this requirement as not applicable. This will show as NA in the table.
Bacterial barrier
This column indicates whether your supply is registered as having or lacking a bacterial barrier and is displayed as one of the following:
- Has bacterial barrier. All treatment plants associated with the supply appear to have chlorination, UV or ozone treatment. This will show as a 🗸 in the table. This status does not reflect determination of compliance nor the effectiveness of the treatment plant to achieve the required bacterial removal.
- Lacks bacterial barrier. At least one treatment plant does not have chlorination, UV or ozone treatment. This will show as a × in the table.
- No active plants. An active treatment plant could not be found to evaluate.
- Not applicable. The supply relies on either an Acceptable Solution or General Exemption, or is a water carrier or linked supply. The supply may or may not require treatment of bacteria, but this cannot be determined from the registered information for the supply and the summary records this requirement as not applicable. This will show as NA in the table.
Residual disinfection
This column indicates whether your supply is registered as having or lacking residual disinfection and is displayed as one of the following:
- Has residual disinfection. All treatment plants associated with the supply have chlorination and all distribution zones have implemented residual disinfection. This will show as a 🗸 in the table. This status does not reflect determination of compliance nor the effectiveness of the residual disinfection that has been implemented.
- Lacks residual disinfection. At least one treatment plant does not have chlorination or a distribution zone has not implemented residual disinfection. This will show as a × in the table. Some supplies may have a residual disinfection exemption. This status does not reflect whether a residual disinfection exemption has been granted.
- Missing plant and/or zone. An active treatment plant or distribution zone could not be found to evaluate.
- Not applicable. The supply has either an Acceptable Solution or a General Exemption, or is a water carrier, linked supply, community drinking water station or self-supplied building. The supply may or may not require residual disinfection, but this cannot be determined from the registered information for the supply and the summary records this requirement as not applicable. This will show as NA in the table.
Drinking Water Quality Assurance Rules (the Rules) reports received
This column indicates whether or not you have submitted a report on the Rules.
Read the Rules to understand more about your requirements to report here: Drinking Water Quality Assurance Rules.
- Rule reports submitted. Rule reports have been submitted for the previous year. This status does not reflect a determination of compliance with the requirements of the Rules.
- Rule reports submitted, issues identified. Rule reports have been submitted for the previous year, but issues related to completeness, consistency and/or data quality have been identified. Please check that all applicable Rules have been reported on as outlined in the Drinking Water Quality Assurance Rules.
- Rule reports attempted but not submitted. Our record of submissions indicates you have attempted to submit Rule reports but none has been successfully submitted.
- No Rule reports submitted. No Rule reports have been submitted in the previous year and no attempts are shown in our record of submissions. Note: Some supplies are required to follow the Rules but do not have any reporting requirements.
- Not applicable. The supply either uses an Acceptable Solution or is under a General Exemption. This will show as NA in the table.
How to update this information
Updating supply information
Click on the Supply ID to navigate to the supply. From there, select Edit from menu on the left and update your supply details.
Submitting DWQAR reports
From the Hinekōrako dashboard, click on the Reporting tab at the top of the screen and select DWQAR Reporting.
Notifications
Creating and submitting a supply notification
Download a pdf of this guidance: Creating and submitting a supply notification
This guidance is for all Hinekōrako users except read-only users. It explains how to submit a notification to the Authority relating to one of your drinking water supplies.
There are two categories of supply notification:
- Risk to drinking water safety or quantity.
- Stop, limit or reduce supply or change ownership.
Choose the notification category
Step 1
Go to the list of notifications relating to the supply for which you need to submit a notification. For guidance on how to do this, see Find and view a notification.
Click Create above the list of draft notifications.
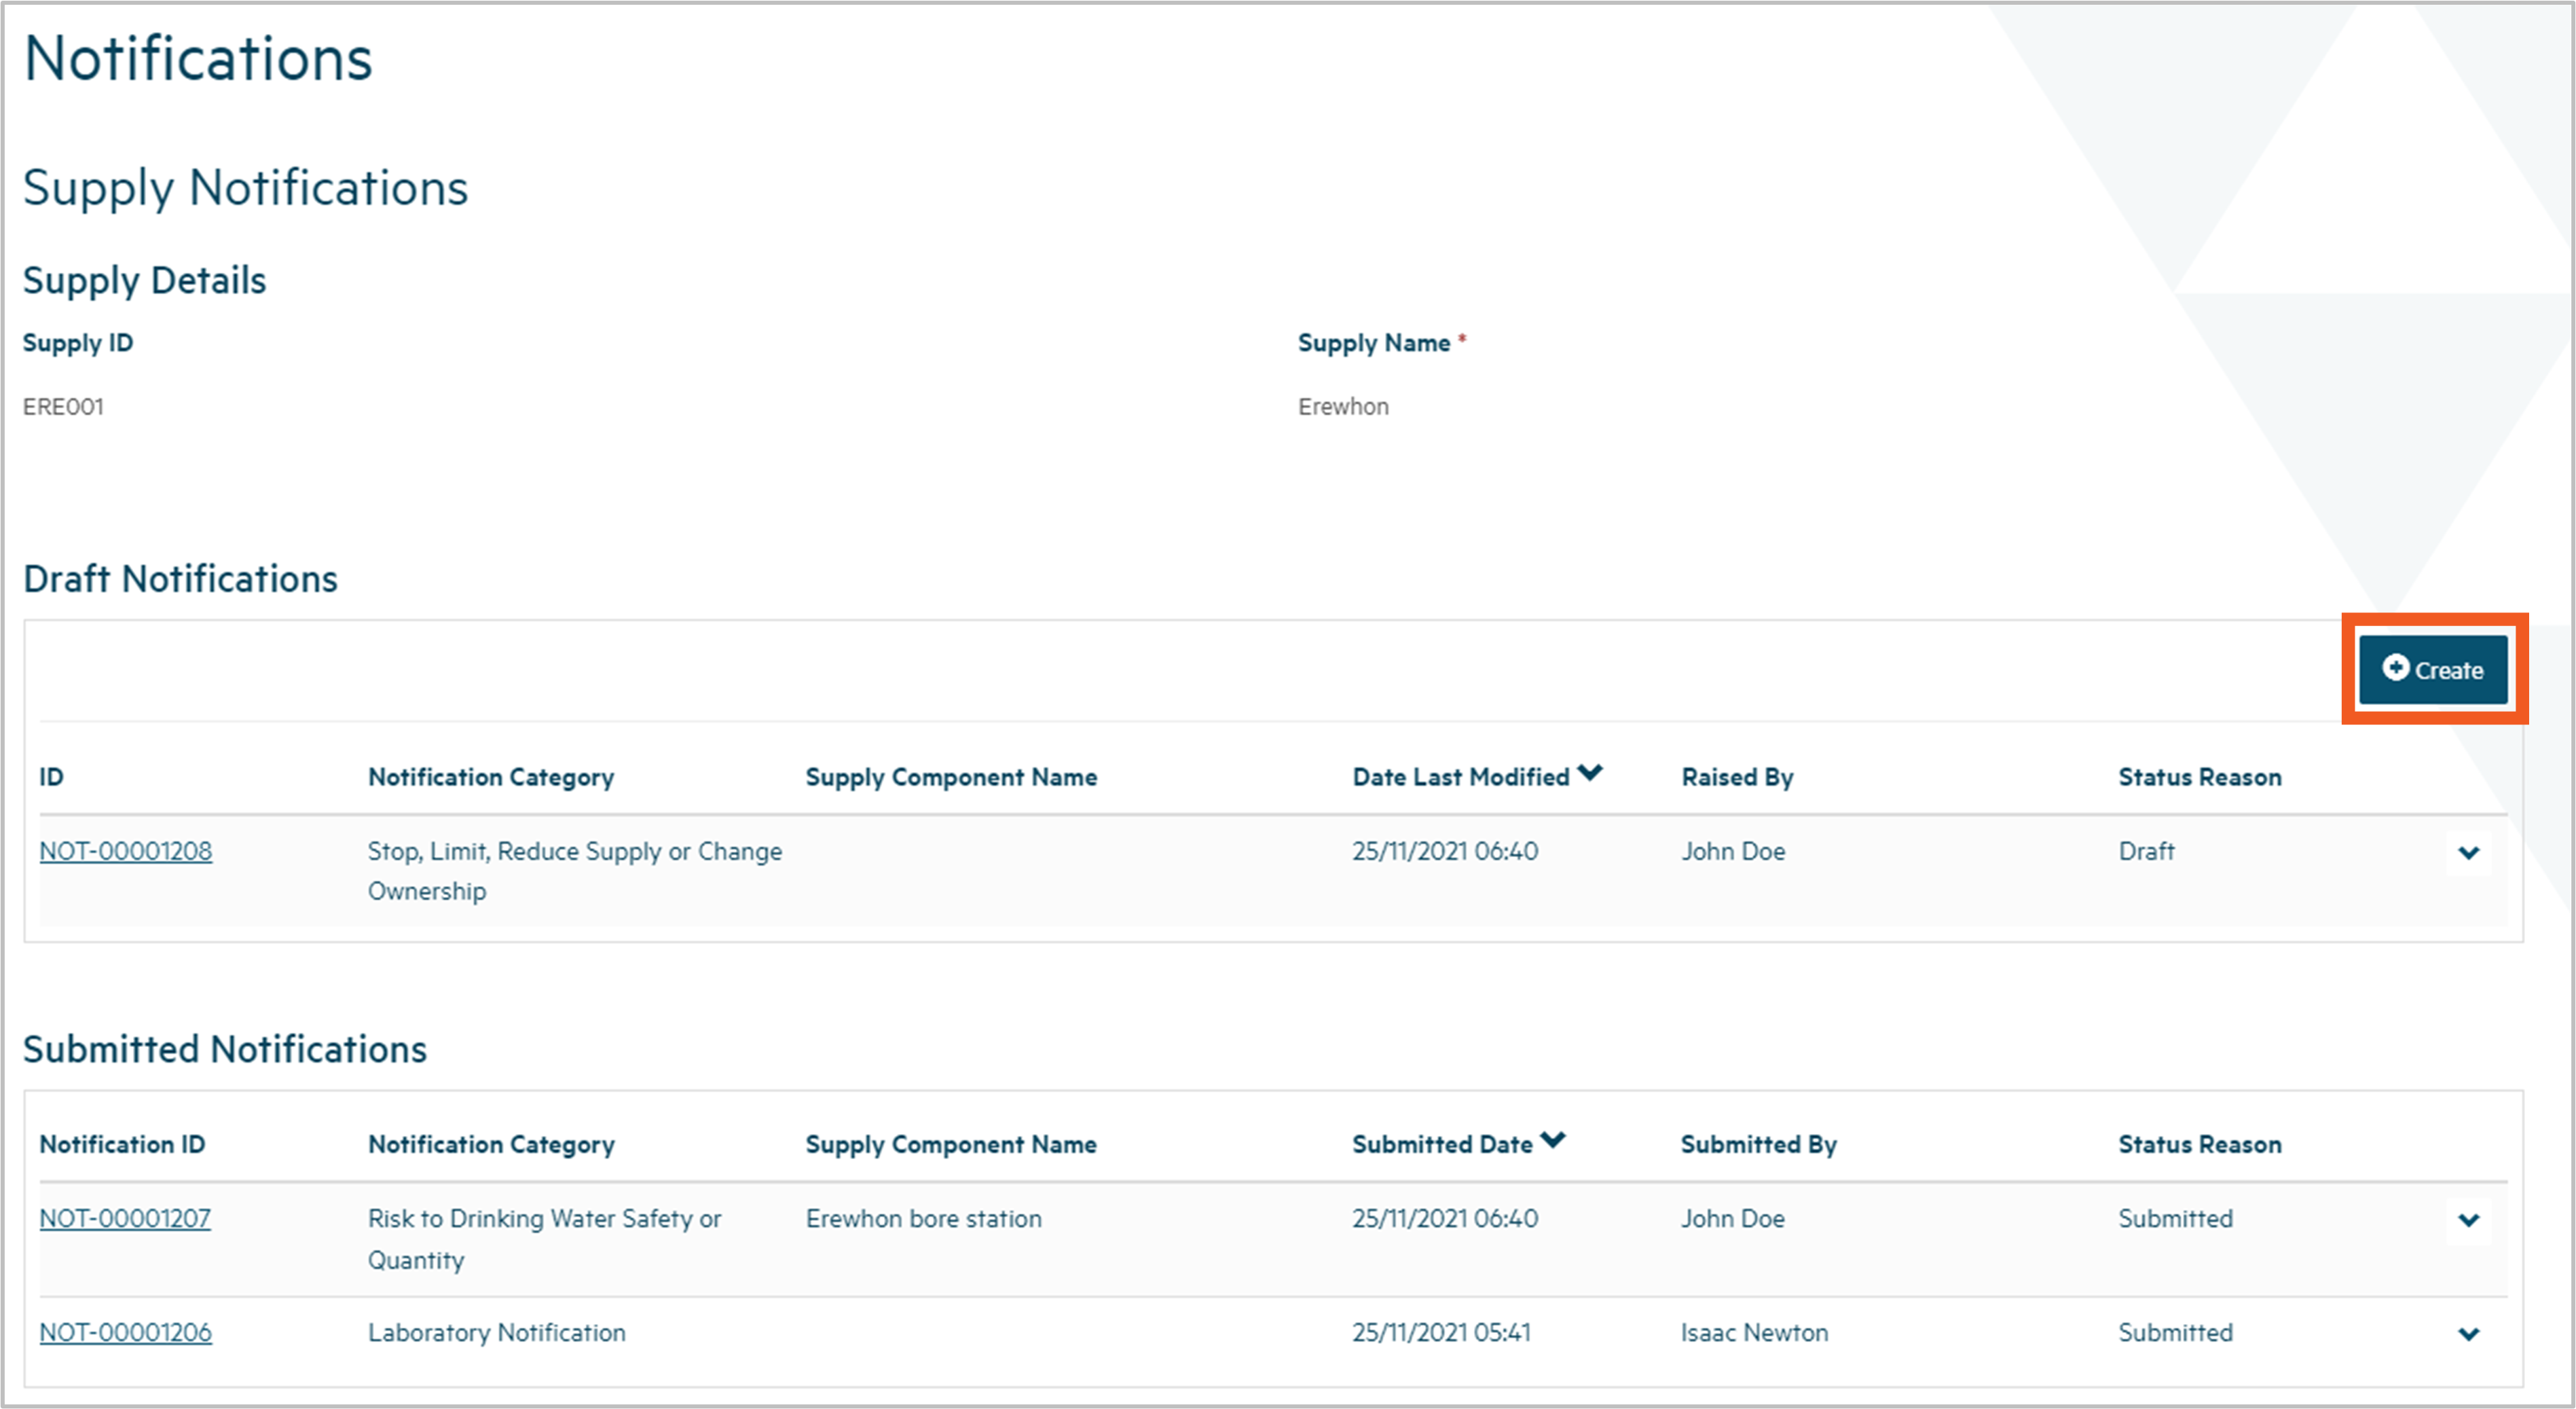
Step 2
You'll be taken to a screen that allows you to choose which of the two supply notification categories your notification is for:
- Risk to drinking water safety or quantity: A notification of one or more of the following:
- Drinking water doesn’t comply with Standards, including MAV exceedance as found by a laboratory test.
- Drinking water is, or may be, unsafe.
- Ability to maintain sufficient water is at imminent risk.
- Planned restriction or supply interruption longer than 8 hours.
- Unplanned restriction or supply interruption longer than 8 hours.
In future, once the Authority’s list of Notifiable Risks and Hazards is confirmed, this notification category will include notification of one or more of those risks or hazards.
- Stop, limit or reduce supply or change ownership: A notification of one or more of the following:
- The intention to stop supplying drinking water.
- The intention to limit connections to a supply.
- The intention to reduce or limit volume supplied.
- The intention to change ownership of a supply.
To proceed:
- select the appropriate category for your notification
- add your own reference for the notification, if you wish
- click Next.
If you've chosen the notification category Risk to drinking water safety or quantity, go to Step 3. If you've chosen the notification category Stop, limit or reduce supply or change ownership, go to Step 10.
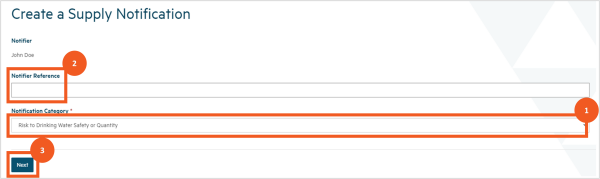
Complete the details for a risk to drinking water safety or quantity notification
Step 3
You'll be taken to a screen where you can complete the details for a risk to drinking water safety or quantity notification.
At the top of the page is a list of check boxes:
- Water is Non-Compliant.
- Drinking Water is or May Be Unsafe.
- Ability to Maintain Sufficient Water at Imminent Risk.
- Unplanned Restriction or Interruption Longer than 8 Hours.
- Planned Restriction or Interruption Longer than 8 Hours.
The core of the notification will be sections containing:
- your explanation of the event that has given rise to the need for the notification
- your explanation of the response you have planned for that event.
Depending on which of the above boxes you check, other sections may be added:
- If you check Water is Non-Compliant, a section appears in which you can detail the non-compliance.
-
If you check Unplanned Restriction or Interruption Longer than 8 Hours, a field appears in which you can record the duration of the restriction.
- If you check Planned Restriction or Interruption Longer than 8 Hours, a field appears in which you can record the duration of the restriction.
Check the boxes that apply to your notification.

Step 4
Scroll down the screen and complete:
- the Event Description, providing enough information for us to understand what happened and how it caused the issues you are notifying us about
- the Event Date and Time, specifying exactly when the event occurred.
To specify the date and time:
- click on the calendar icon to the right of the field
- select the month and date from the calendar that pops up
- click on the clock icon at the bottom of the calendar
- select the time and click Enter.
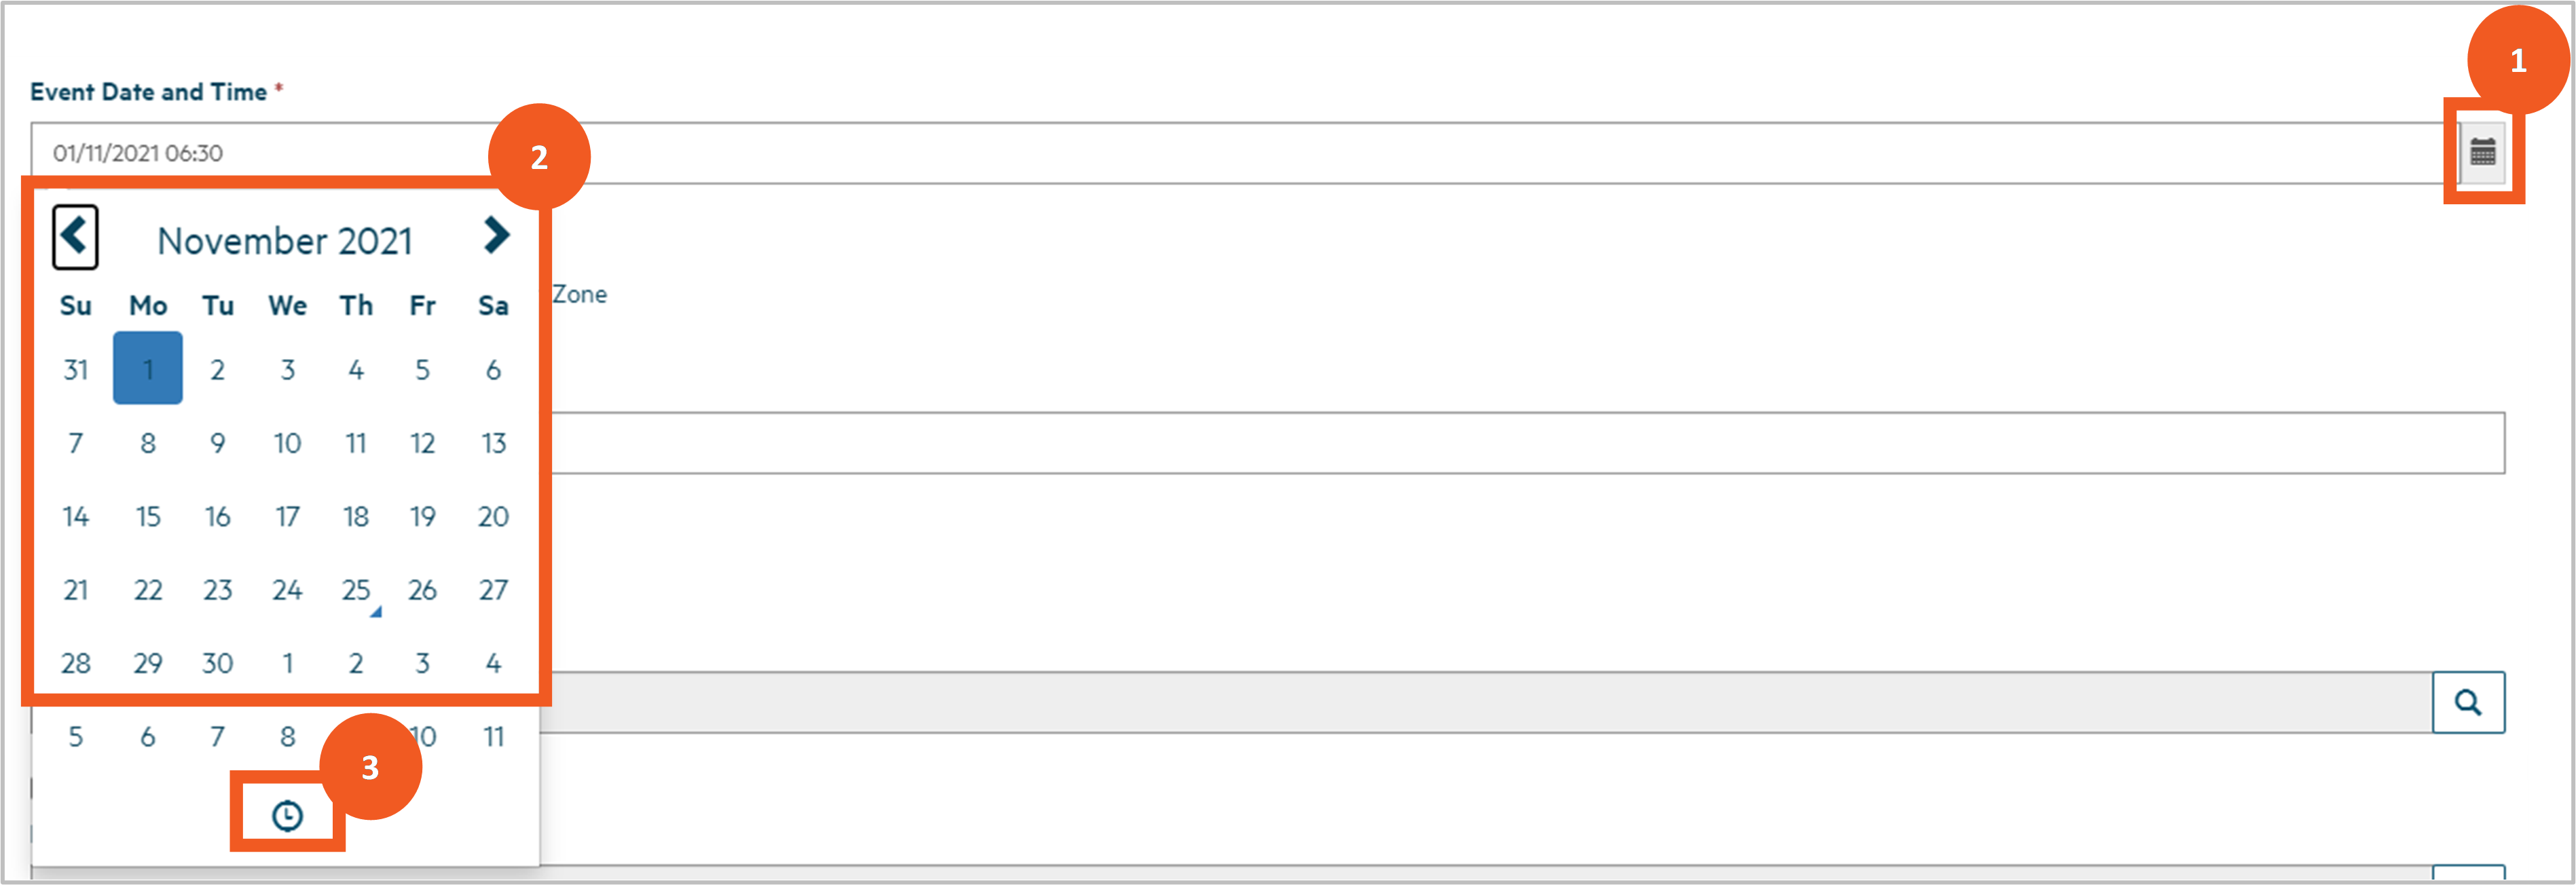
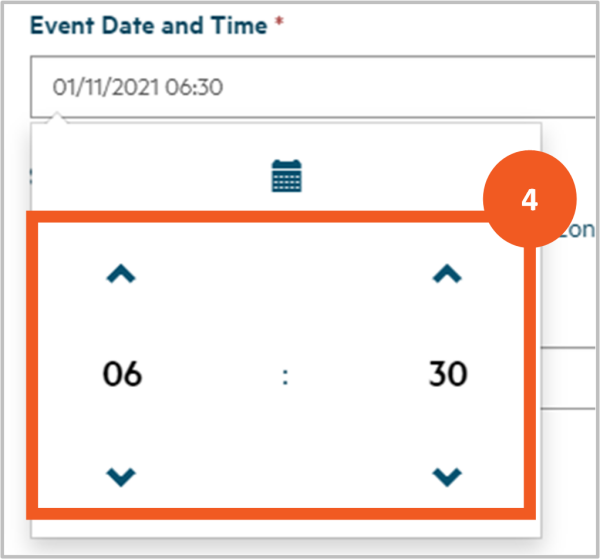
Step 5
Scroll further down to advise the component of the supply where the event occurred:
- Choose either Source, Treatment Plant or Distribution Zone.
- A field allowing you to look up the source, treatment plant or distribution zone will appear. Click on the magnifying glass and select the relevant component from the list in the pop-up window.
- If there are many components of the type you select, you can filter by entering the component ID or the first few letters of its name in the search field and clicking the magnifying glass.
If the event occurred in more than one component, indicate the the primary location and detail the other components in the Event Description field.
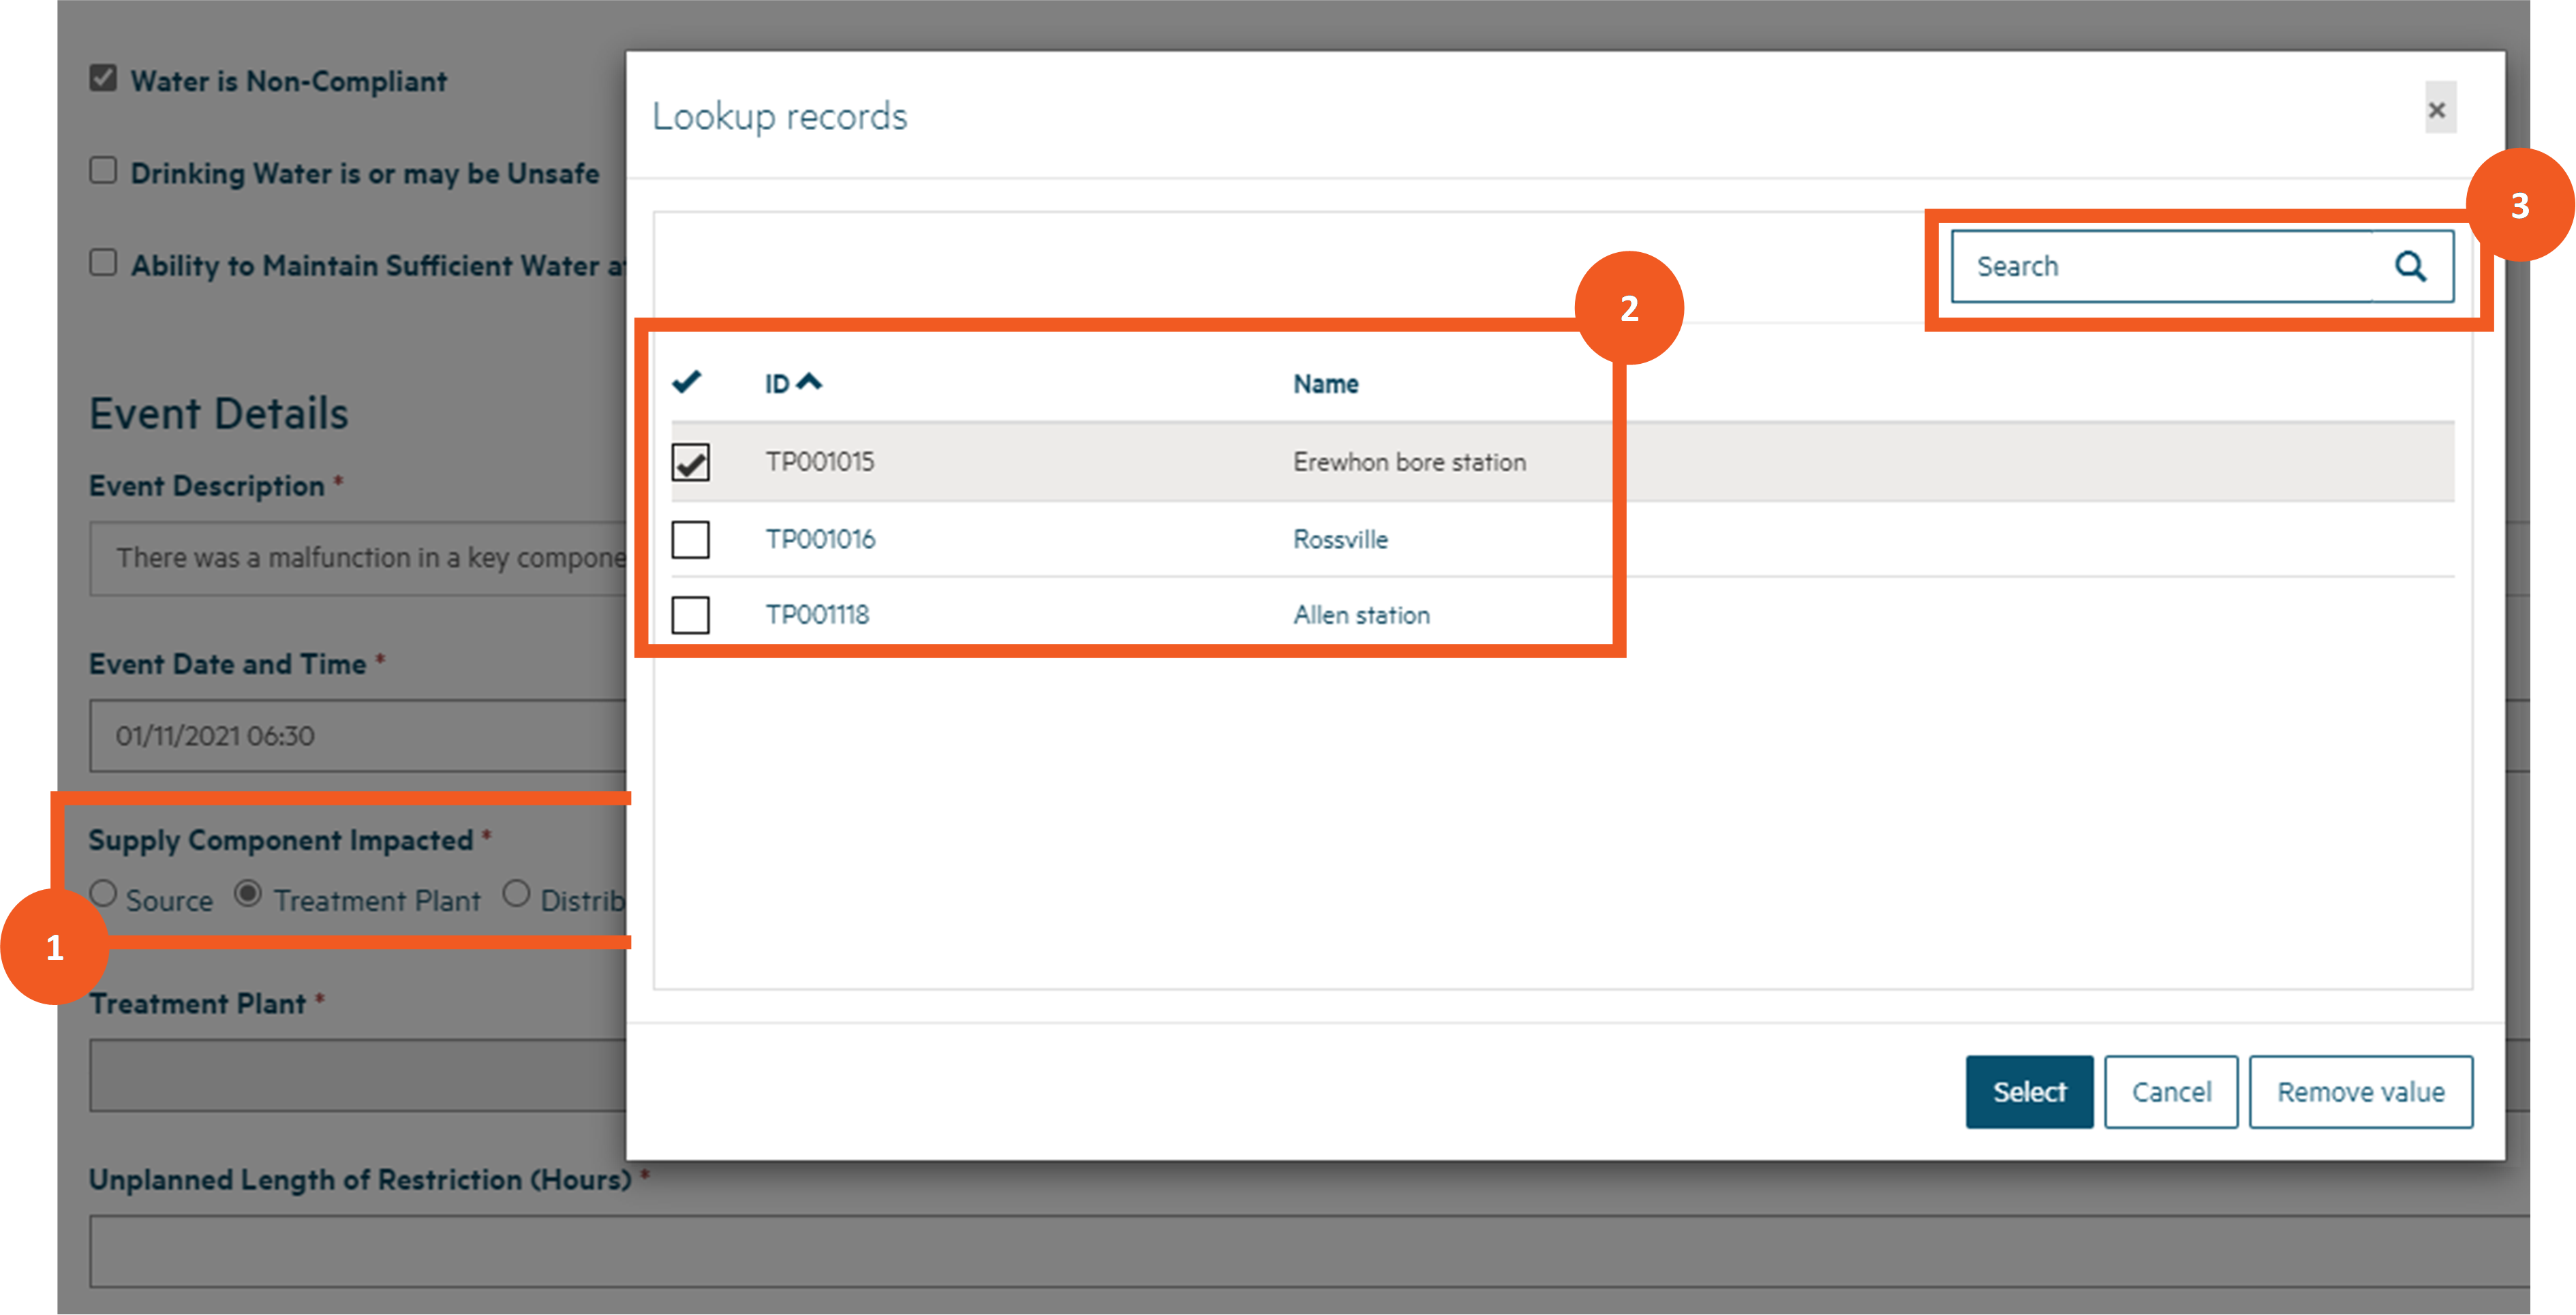
Step 6
Scroll down further to complete other details relating to the event based on the boxes you checked (e.g. populate the duration of the unplanned restriction if you checked that box and complete the Water Non-Compliant Details section if you checked that box).
The Water Non-Compliant Details section caters for three scenarios:
- A laboratory has already notified the Authority that their test results have shown that a sample of water from your supply contains levels of determinands that exceed the Maximum Acceptable Value (MAV). This is the default scenario.
- You have received test results from the laboratory but the laboratory has not notified the Authority.
- You know that your water is non-compliant but there are no laboratory results to support this.
In the case of the first scenario:
- Look up the testing laboratory by clicking on the magnifying glass and then selecting the lab from the list displayed. You can filter the list by typing the first few letters of the laboratory's name in the search field and clicking on the magnifying glass.
- Keep the Laboratory has Notified the Authority box checked.
- Look up the laboratory notification submitted by the lab for this event by clicking on the magnifying glass and then selecting the notification from the list submitted by the laboratory you selected for this supply.
- Add any comments relating to the non-compliance of your water. You can expand the Comments field by clicking and dragging the grey triangle at the bottom right of the field.
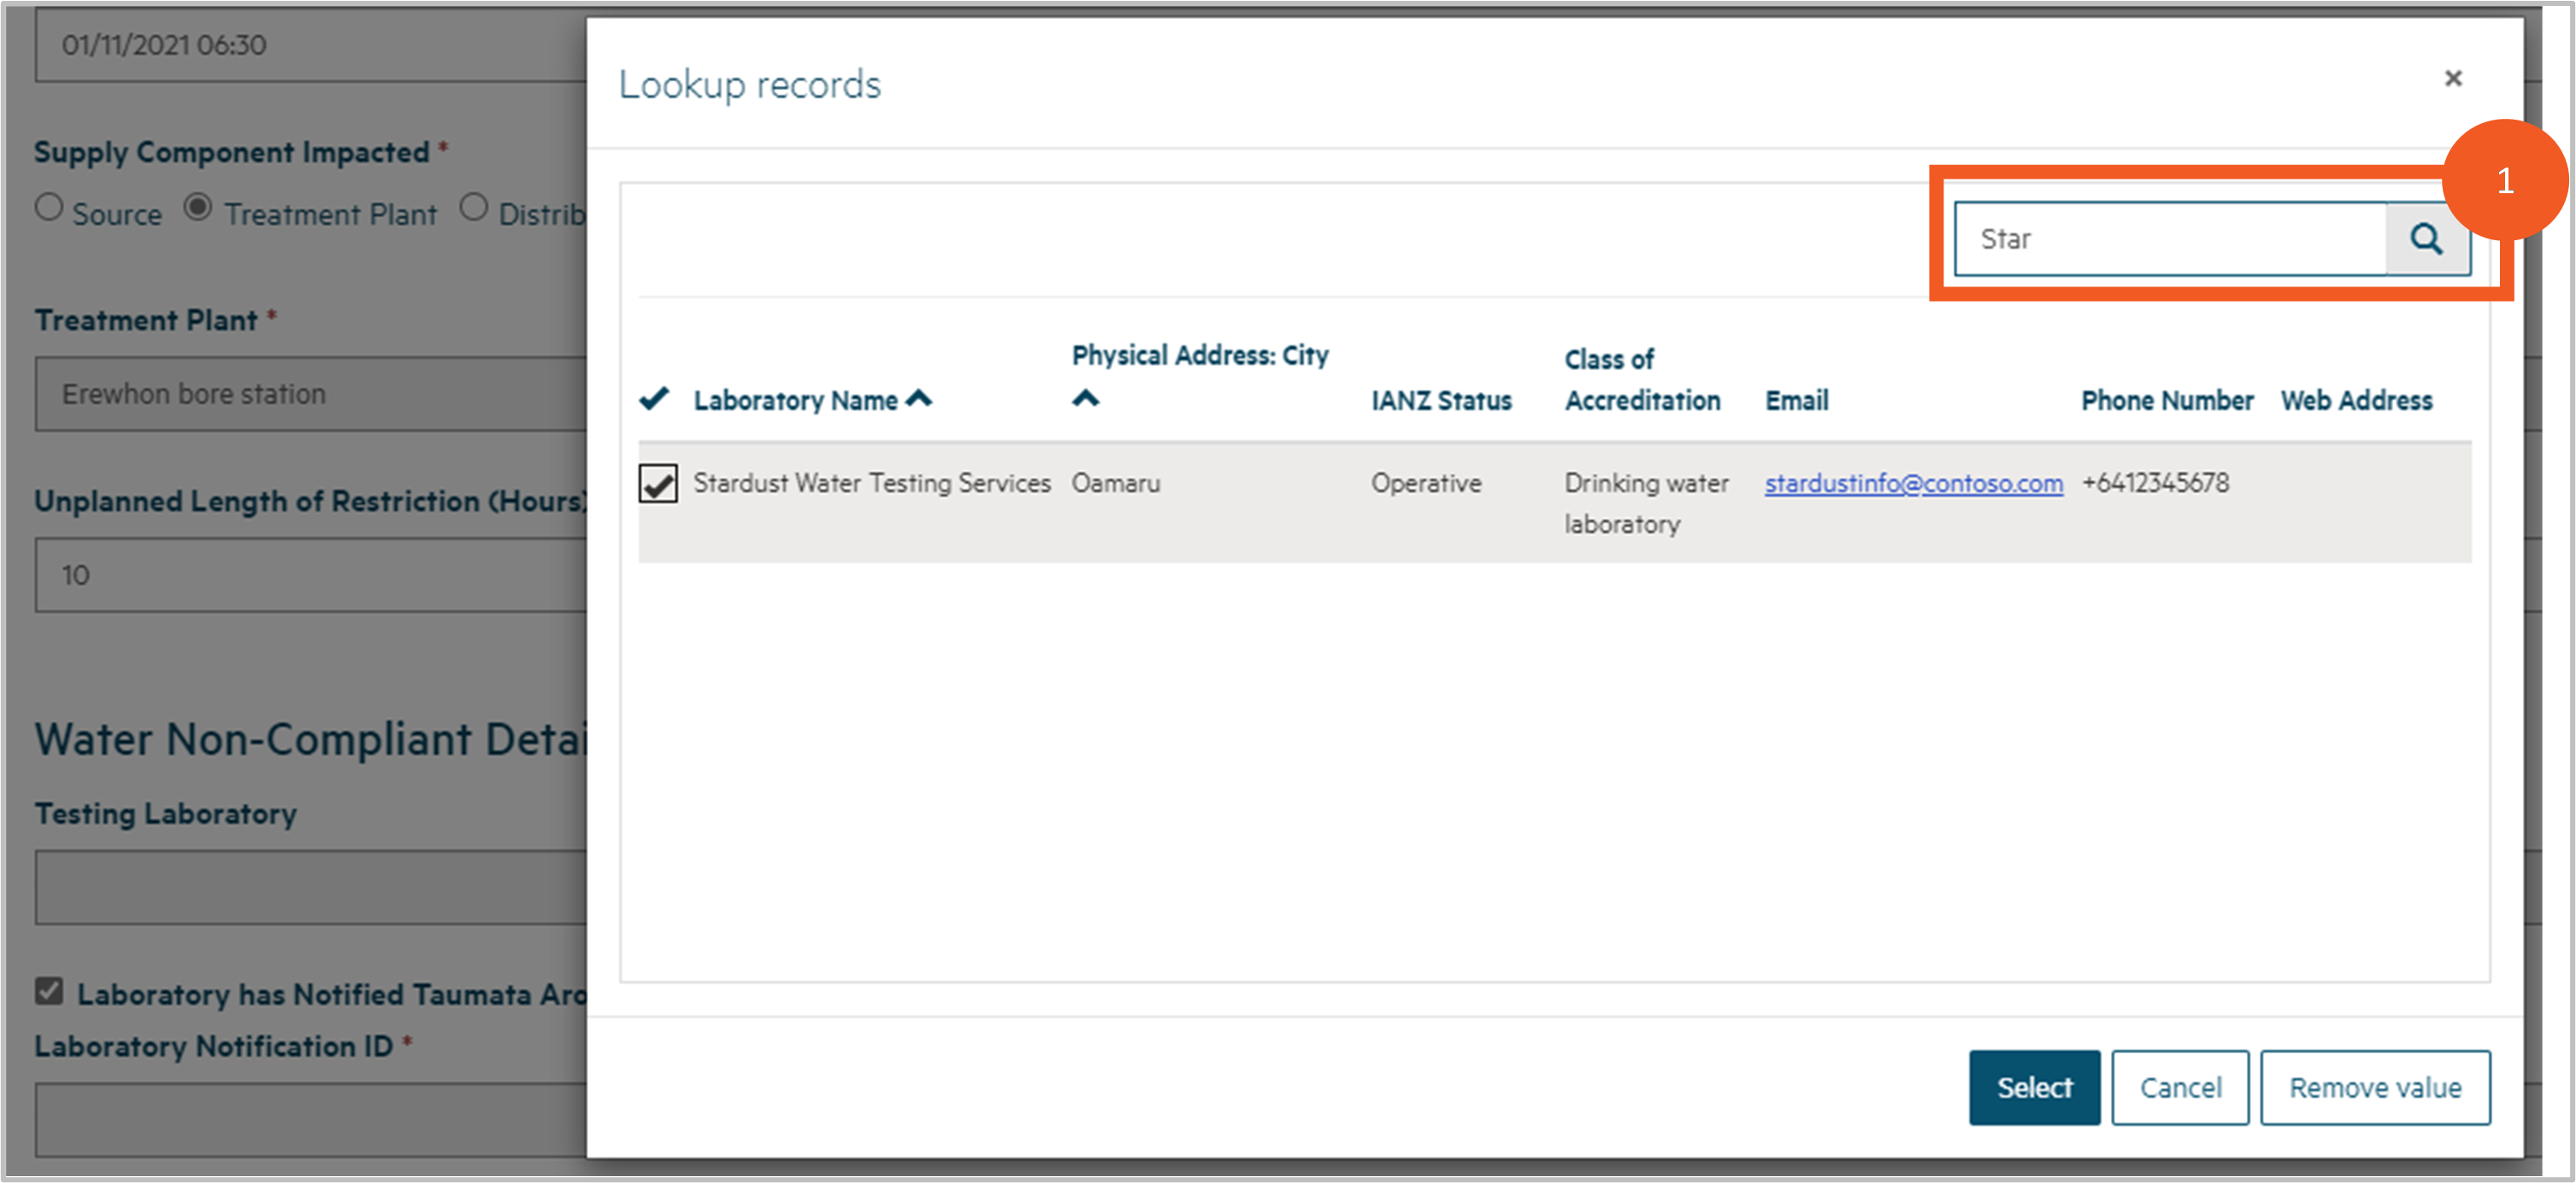
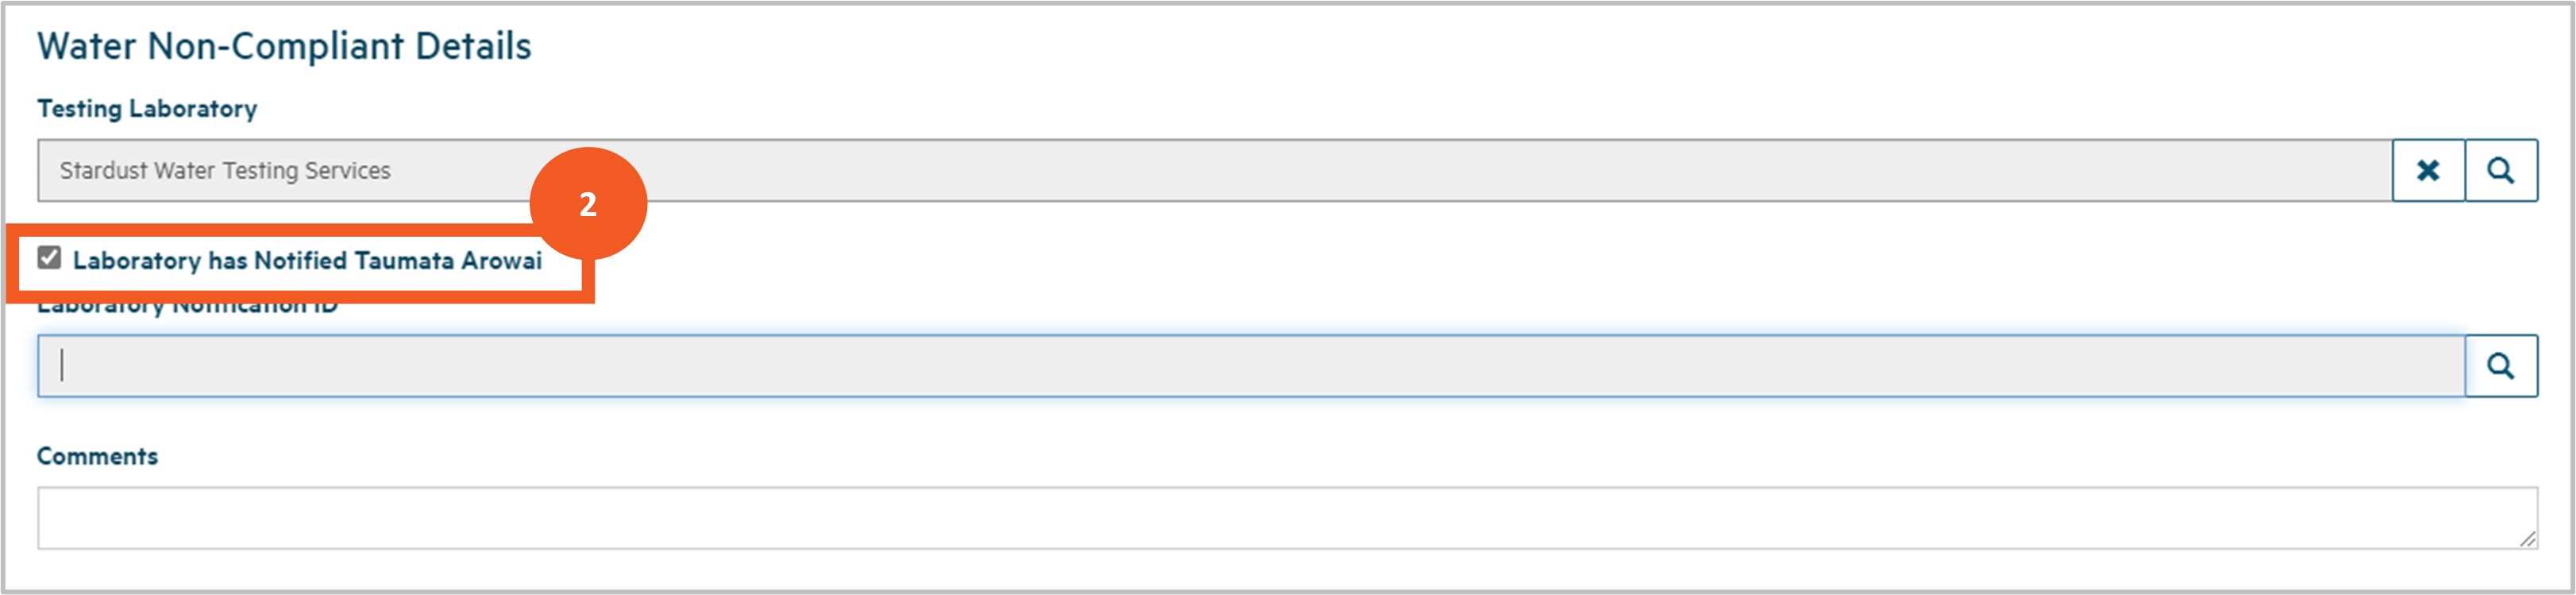
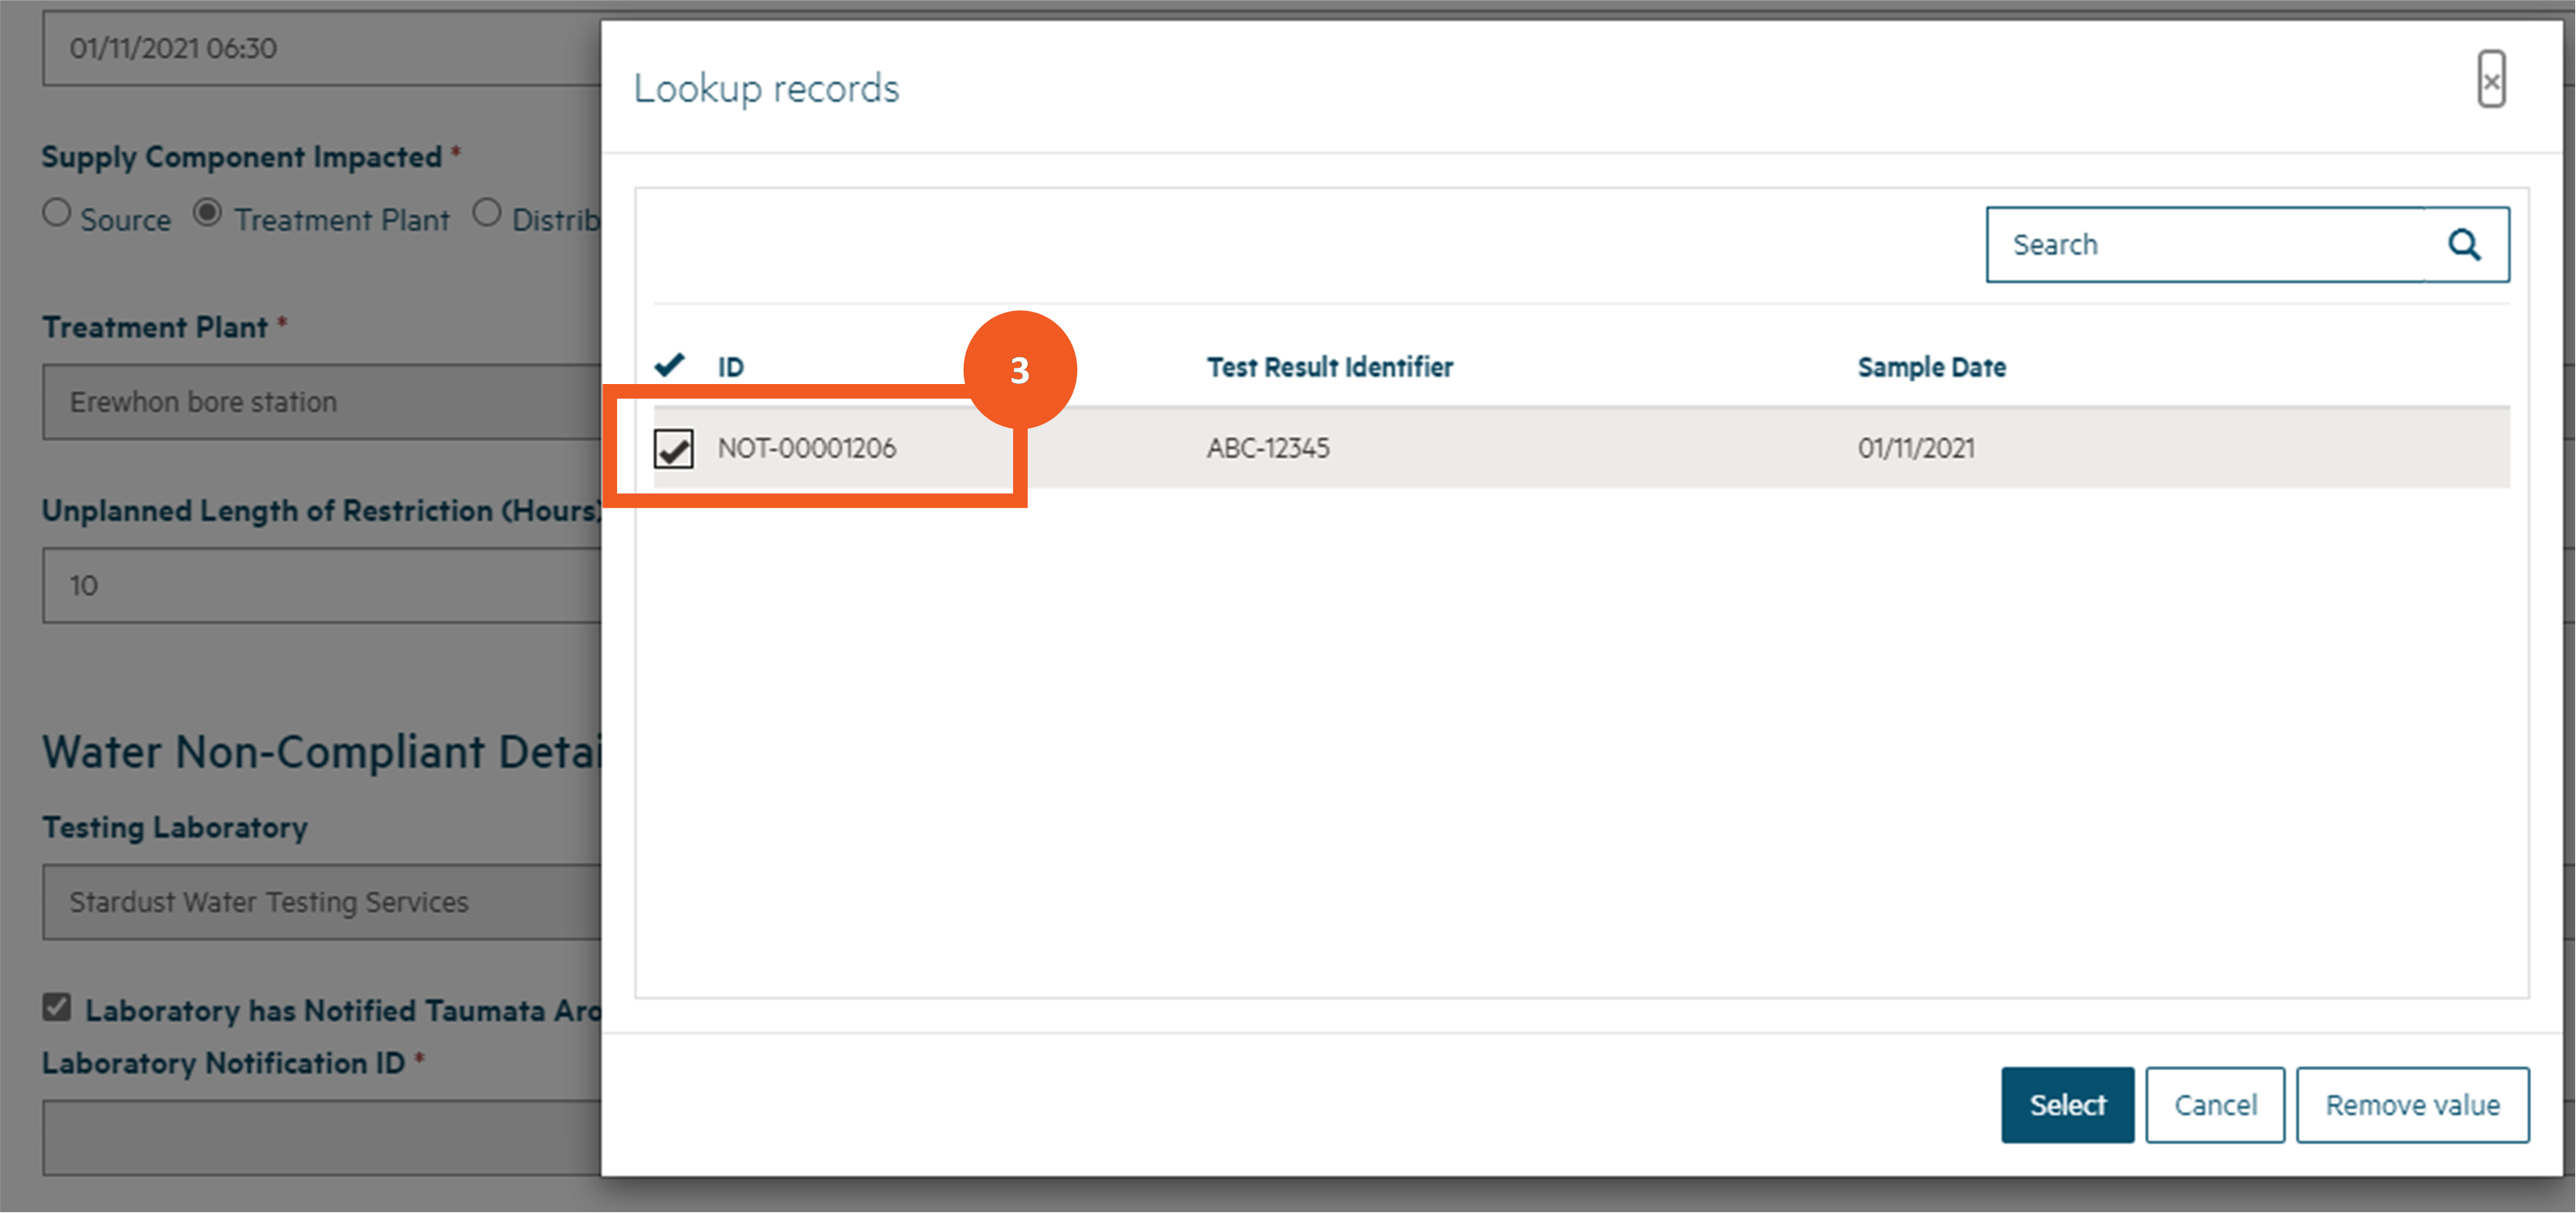

Step 7
If the lab has not notified us, but you have the test results:
- look up the Testing Laboratory by clicking on the magnifying glass and then selecting the lab from the list displayed
- uncheck the Laboratory has Notified the Authority box checked but keep the I have Laboratory Test Results box checked
- add the lab’s Test Result Identifier and the Sample Date.
For each test result you want to include: - click on Add Result
- look up the Determinand by clicking on the magnifying glass at the right of that field, then selecting the determinand from the list and clicking Select. You can filter the list by typing the first few letters of the determinand name in the search box and clicking that magnifying glass. Start your search text with a * to search for text in the middle of the determinand name
- enter the test result Value for the determinand
- click Submit. If there's any problem with the data you have submitted, one or more messages will be displayed at the top of the screen (e.g. missing mandatory data). If this happens, correct the errors and click Submit again.
In particular, Hinekōrako checks the test result value to determine these factors:
-
- Whether the value is below the Maximum Acceptable Value for the determinand. If it is, this message will be displayed: "The Determinand MAV was not exceeded and notification is not required in this case". The Authority does not need to be notified of this result, although Hinekōrako will not prevent the result being included in your notification.
- Whether the value is above the threshold for the notification to be considered critical. If it is, this message will be displayed: “This lab result is assessed as critical and urgent response will be actioned". This is a chance for you to check that the value entered is correct, because if the test result is submitted, Authority staff will be alerted and a critical priority response will be triggered.
- Whether the value is above the MAV and below the critical threshold. If it is, this message will be displayed: "This lab result is above the Determinand MAV and is notified".
Note: The heading ‘The form could not be submitted …’ is standard. In the case of the above three checks, they are warnings or confirmations only. If you click Submit again the test result will be saved.
8. Add any comments relating to the non-compliance of your water. You can expand the Comments field by clicking and dragging the grey triangle at the bottom right of the field.
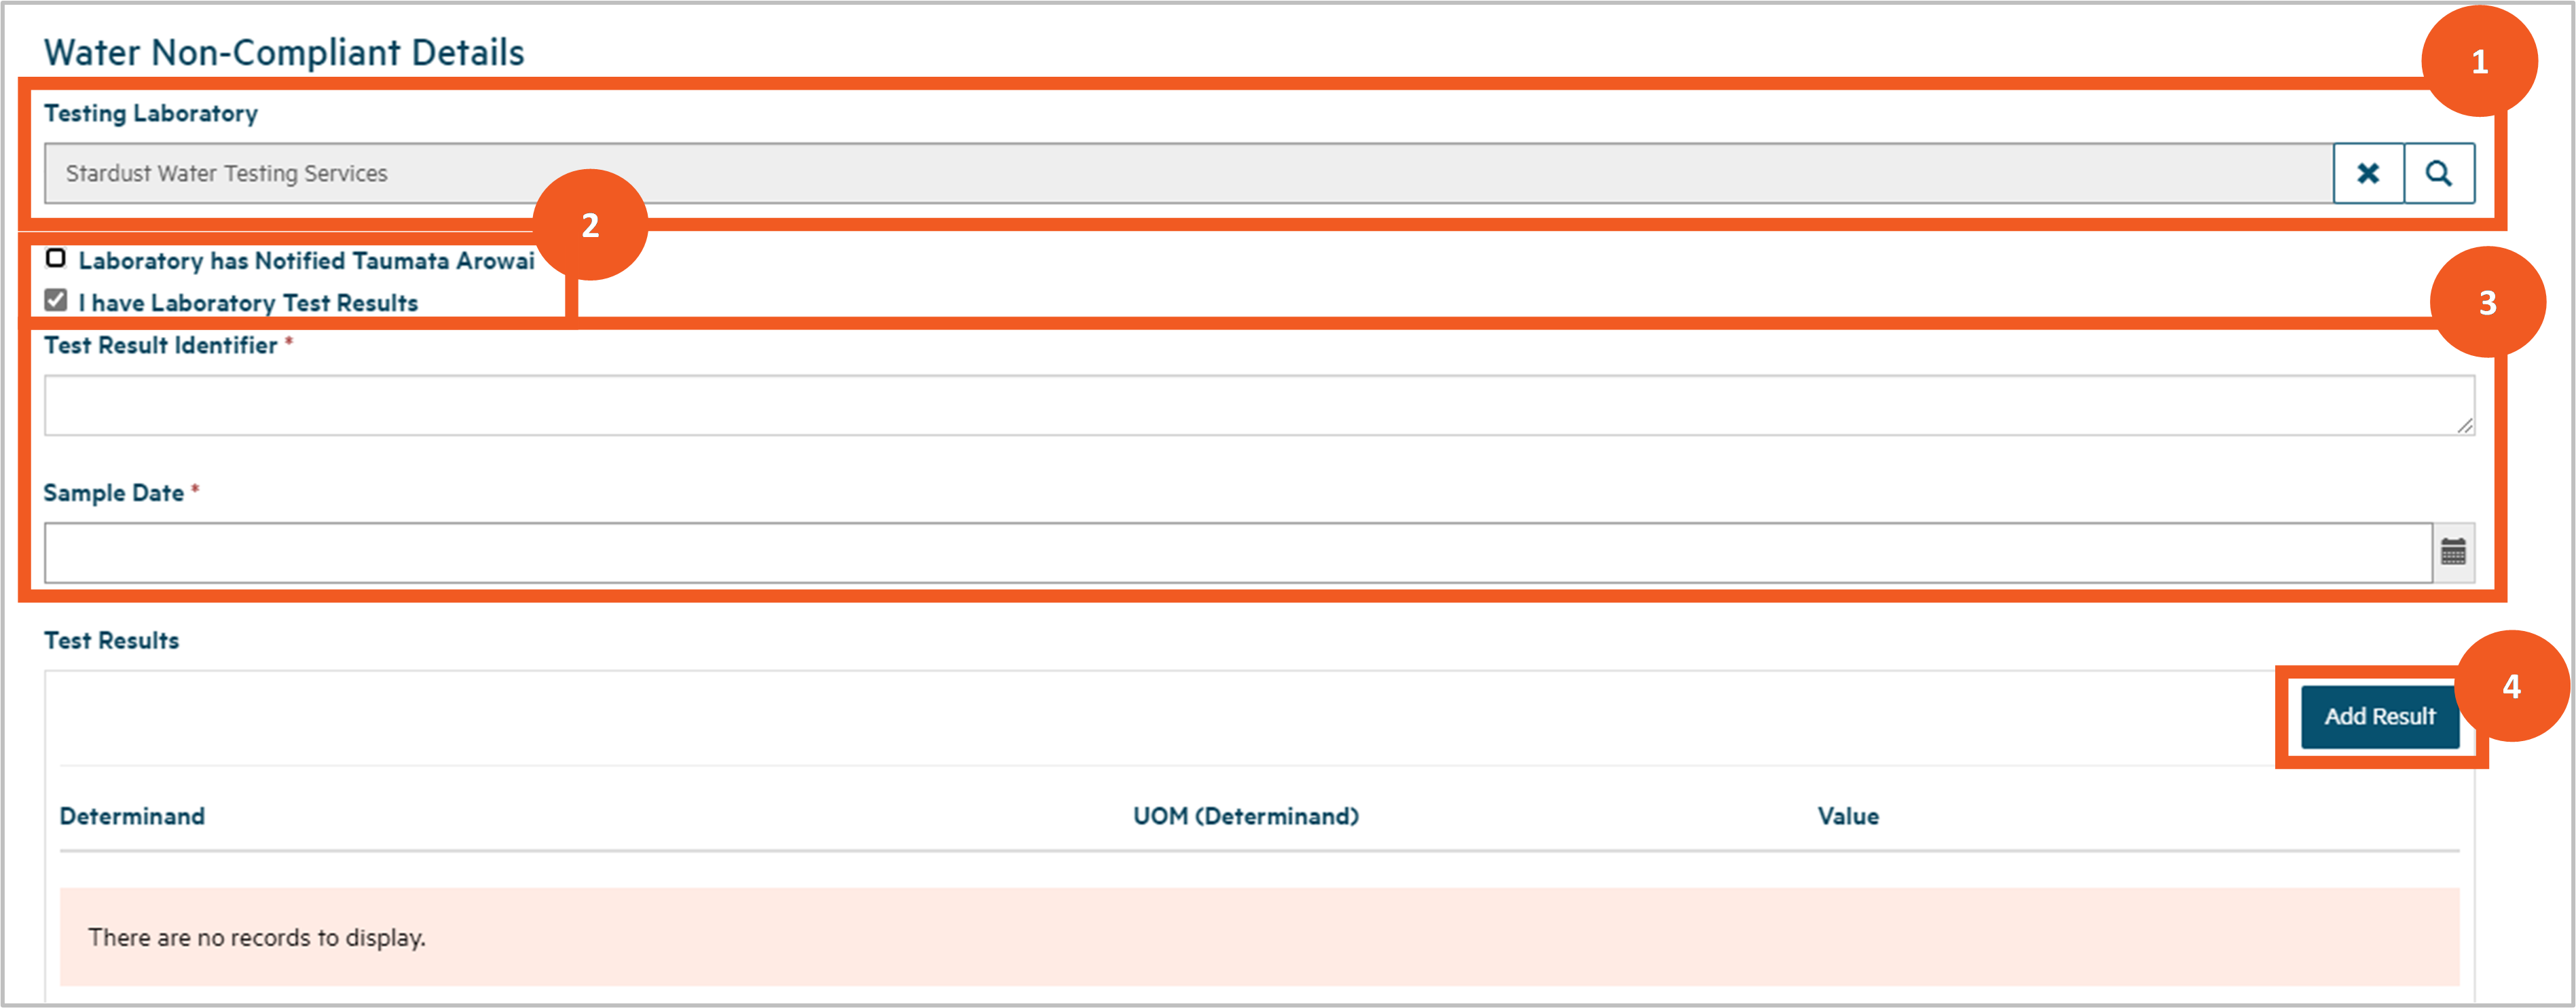
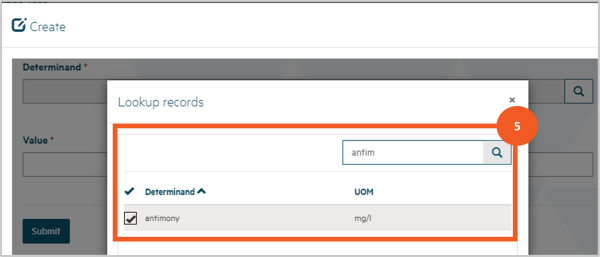


Step 8
If the lab has not notified us and you do not have laboratory test results:
- look up the Testing Laboratory if you have sent a sample to them or leave it blank if you have not
- uncheck the Laboratory has Notified the Authority and I have Laboratory Test Results boxes
- provide the details of the non-compliance in the Comments field. You can expand the field by clicking and dragging the triangle at the bottom right of the field.

Step 9
Scroll down further to complete the details of your planned response to the event:
- Provide an explanation of your response, referencing your Drinking Water Safety Plan, in the Planned Response Description field. You can expand the field by clicking and dragging on the triangle at the bottom left of the field. Check Planned Response Includes an Unplanned Supply if you intend providing drinking water to consumers via an otherwise unplanned supply.
- If you checked the Planned Restriction or Interruption Longer Than 8 Hours box at the top of the screen, add the planned duration of that restriction.
- Click Next.
Hinekōrako will check for any errors (e.g. missing mandatory data) and display relevant messages at the top of the screen.
Correct the data and click Next again.
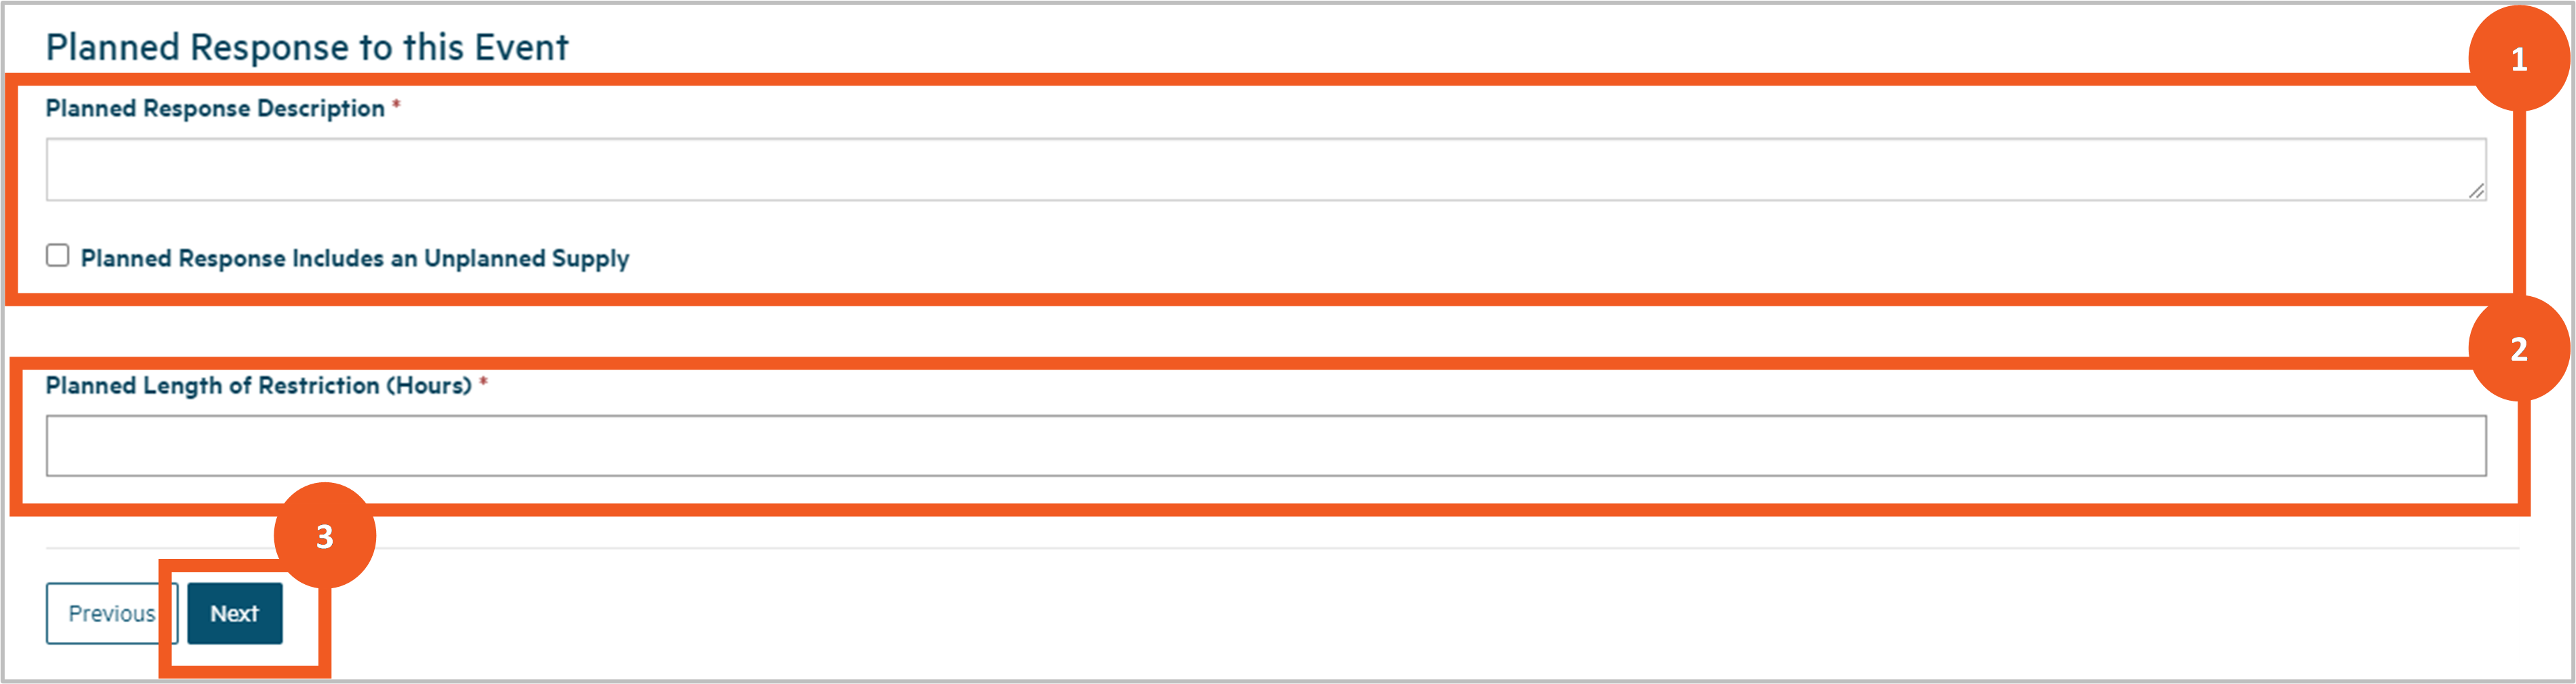
Complete the details for a Stop, Limit or Reduce Supply or Change Ownership notification
Step 10
If you chose the Stop, Limit or Reduce Supply or Change Ownership notification category, you'll be taken to a screen where you can complete the relevant details.
At the top of the page is a list of check boxes:
- Intention to Cease Water Supply to Customers.
- Intention to Cease Being Owner of Supply.
- Intention to Limit Connections to Supply.
- Intention to Reduce or Limit Volume Supplied.
Check the boxes that are relevant to your notification.
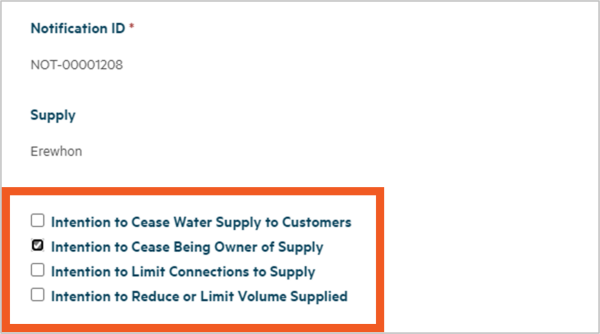
Step 11
Scroll down to complete the details of the change:
- Your explanation of the intended changes in the Change Description field.
- The date the intended change will occur in the Change Date field.
- If you checked the Intention to Cease Being Owner of Supply box, the Ownership Being Transferred box is displayed. If the ownership of the supply is being transferred to someone else, check this box.
- If you checked the Ownership Being Transferred box, the New Supply Owner Details box appears. Provide all the details you have of the intended new owner, including contact details.
Click Next. Hinekōrako will check for any errors (e.g. missing mandatory data) and display relevant messages at the top of the screen. Correct the data and click Next again.

Step 12
When you've completed the details of either category of notification you'll be taken to the final screen where you can upload relevant documents.
Some file types can't be loaded for security reasons and the maximum file size is 30Mb.
Follow these steps to upload a document:
- Click Upload Document in the Supporting Documents section.
- Select the document type - either Supplementary Notification Documents or Laboratory Notification Drinking Water Test Results.
- Provide a description of the document (optional) if you think it will help us understand its contents better.
- Click Choose File and then browse to find and upload the files you want to add.
- Click Submit.
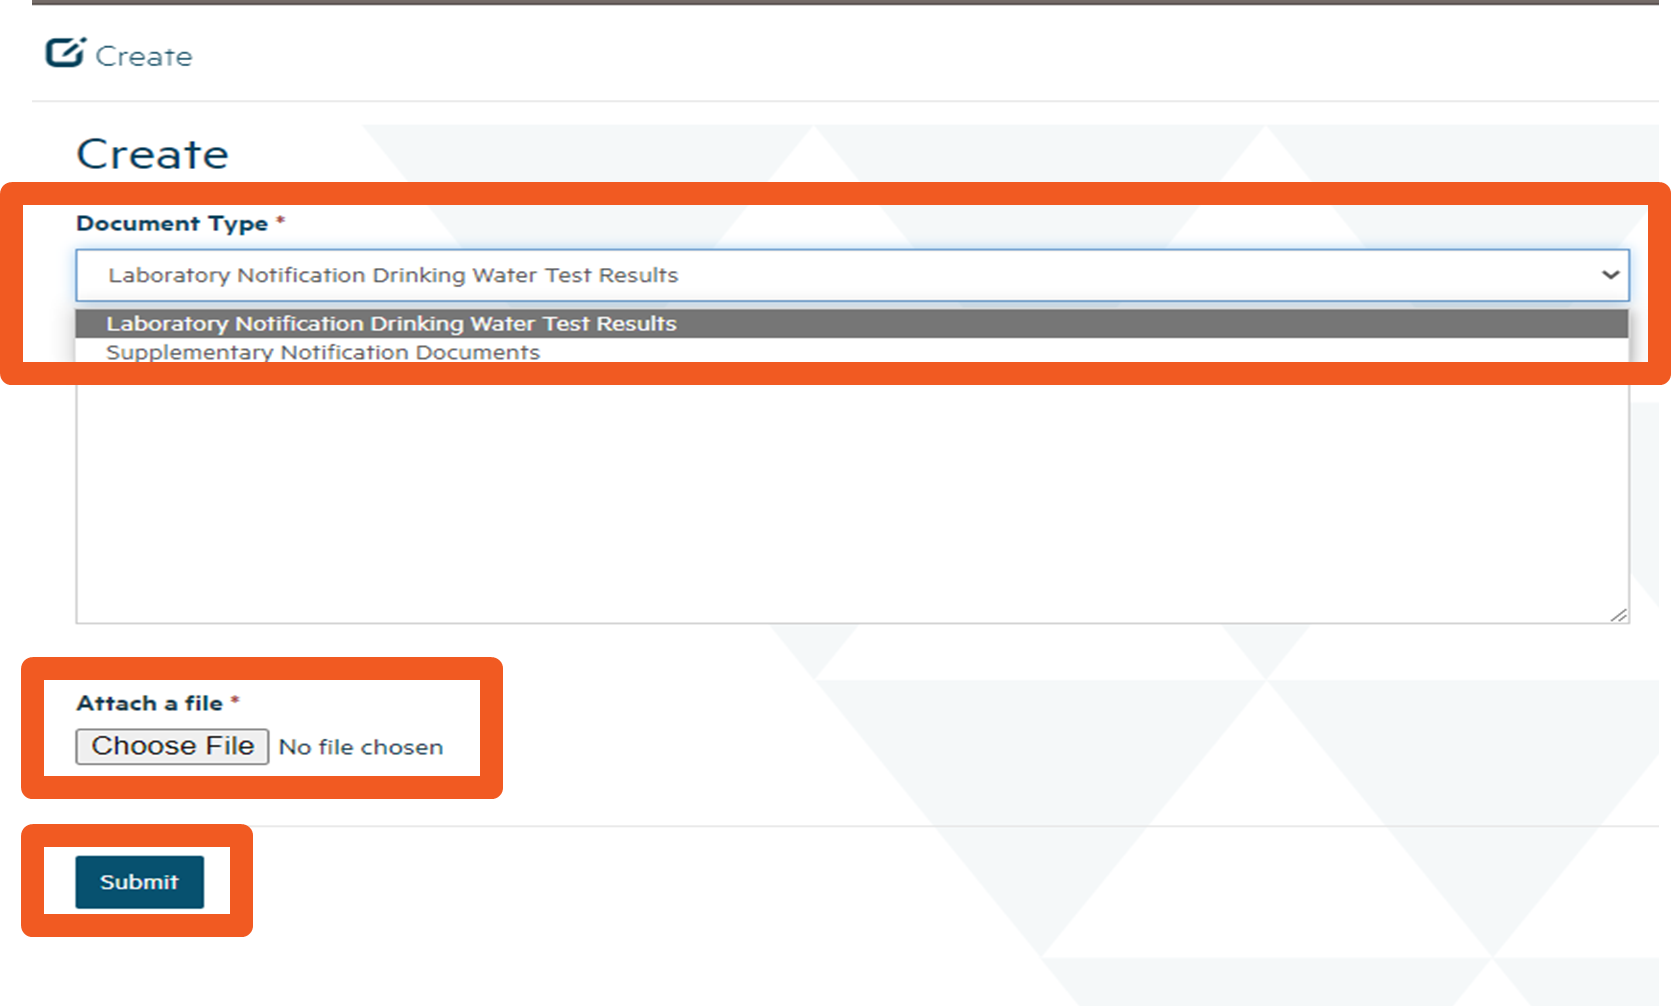
Step 13
Once you’ve uploaded the first file you can repeat the process to add other documents, if need be.
If you upload the wrong document, select Remove Document from the dropdown list at the end of the document row and then click Upload Document to add the correct one.
If you want to update the document description, choose Edit Document Details, which will open the Upload Document pop-up screen again and allow you to make the change.
When Editing Document Details, you'll see the read only Malware Scan field showing the results of our virus check. If the virus check detects a problem, a message to that effect will be displayed here and the document will have been removed. You cannot save the notification when there's a document record with no document, so you'll need to remove the document record before saving.


Step 14
Once you've uploaded all the documents you wish to include, click Submit. You’ll be returned to the Notifications screen with the notification included in the list of Submitted Notifications
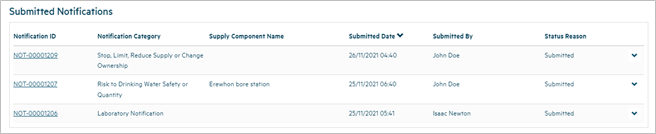
Log in again if you have timed out
Step 15
For your security, Hinekōrako will time out after 30 minutes of inactivity.
If you return to a Hinekōrako screen after it has timed out, as soon as you attempt to move to a different page Hinekōrako will send you to RealMe® to log in again. If you're in the middle of completing the notification form, if you attempt to keep working on that form you may receive error messages relating to permissions and other system related issues.
If you experience these errors, click on any top menu option and then log in again via RealMe®. Unfortunately, although the notification will be saved as a draft (see the next section), Hinekōrako will not have saved any changes you made to the page you were on. You should therefore be prepared to complete the notification without taking any breaks of 30 minutes or more. Have all the information you need at the ready, including any documents you need to upload.
Manage a draft notification
Step 16
If at any point in the process of creating or editing a notification you leave the screen, or if you are timed out of Hinekōrako due to 30 minutes of inactivity, the notification will have been saved as a draft.
Draft notifications are displayed in the first list on the Notifications screen. Continue working on a draft by clicking on the dropdown menu at the end of the row and choosing Edit Notification.
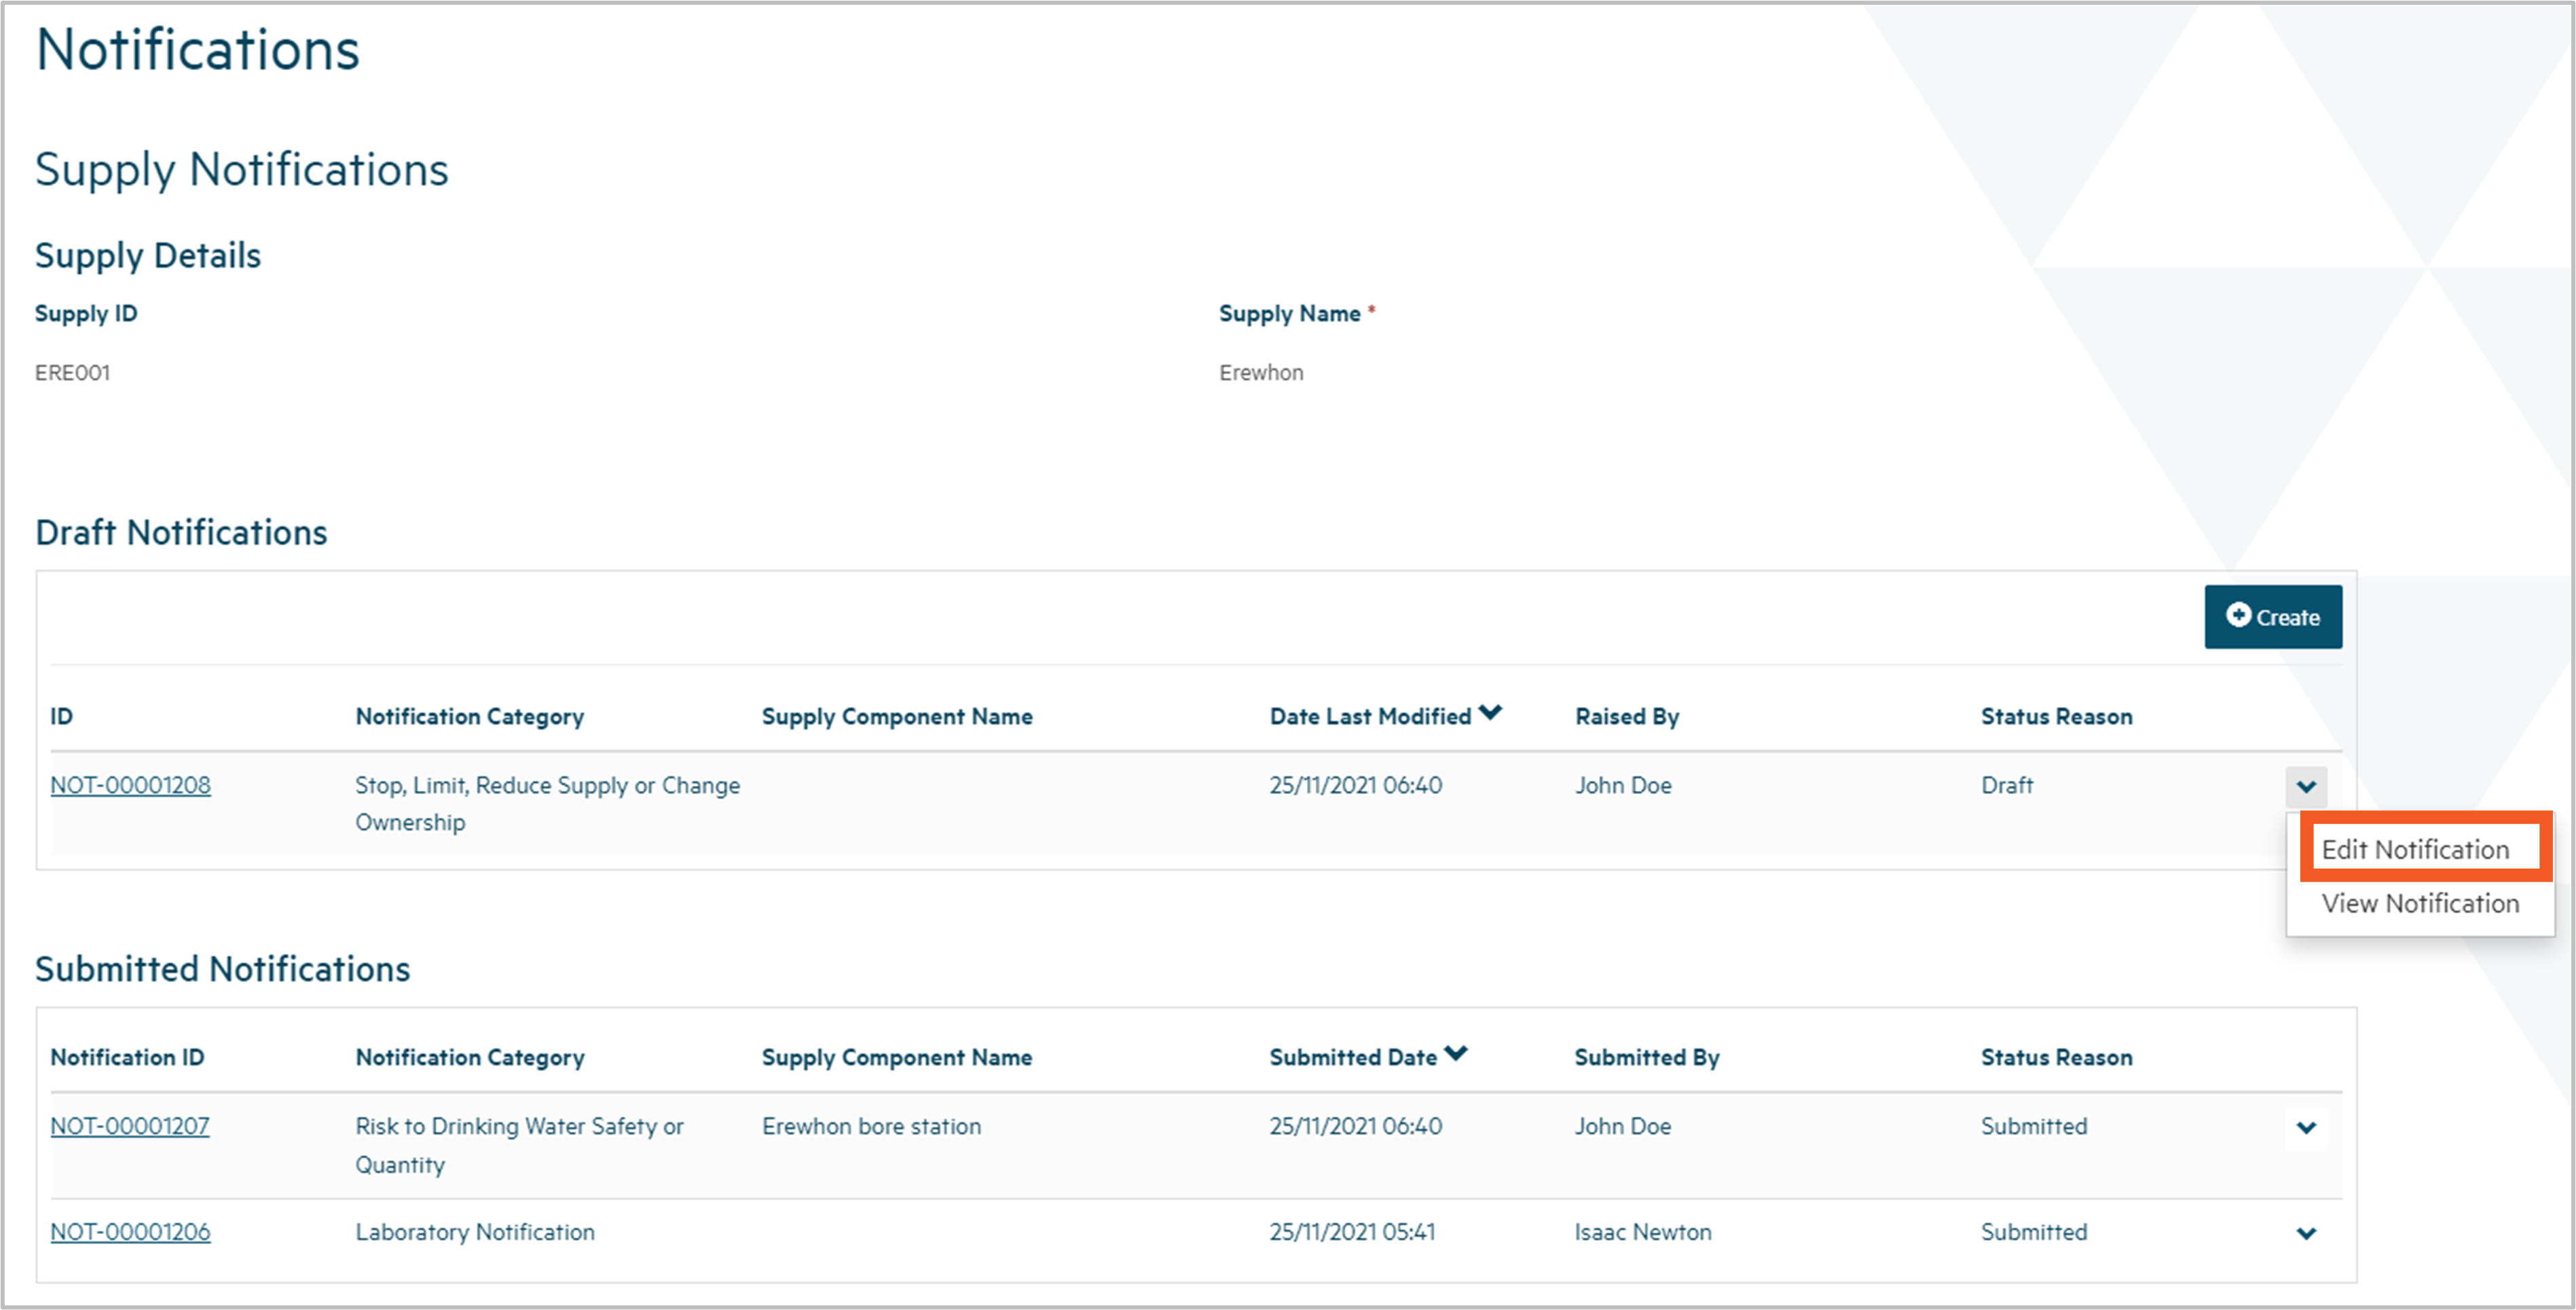
Step 17
If you Edit a notification, the system takes you to the first in a series of screens in the process of completing a notification. You can proceed through the screens as you would when creating a new notification, but the data entered previously will be showing.
Complete the data and submit the notification as described in the steps above.
The notification should now appear in the Submitted Notifications list.
Finding and viewing a supply notification
Download a pdf of this guidance: Finding and viewing a supply notification
This guidance explains how to find and view a notification made to the Authority relating to one of your drinking water supplies. The notification may have been submitted by a drinking water testing laboratory or by someone related to your supply.
Notifications have three categories:
- Laboratory notification.
- Risk to drinking water safety or quantity.
- Stop, limit or reduce supply or change ownership.
View the list of notifications related to a supply
Step 1
Log in to Hinekōrakooutbound to see a list of your supplies on the My Supplies page. If you're not on the My Supplies page you can go there by clicking My Supplies in the menu at the top of the page.
Your supplies will be in one of three lists:
- In Progress Supply Registrations, for all registrations migrated but not yet confirmed or started and not yet finished.
- Registered Supplies, for all confirmed migrated registrations and submitted new registrations.
- Other Supplies, for registrations with any other status (e.g. de-registered supplies).
Find the supply for which you wish to view notifications and select View Supply Details from the dropdown menu at the end of the row.

Step 2
You'll be taken to a screen showing the details of the supply. There will be one or more actions you can take in relation to the supply showing in a list to the left.
Click View/Add Notifications.
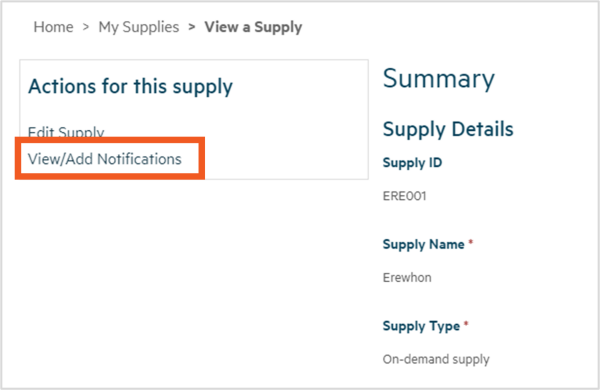
Step 3
You'll be taken to a screen that lists any previously submitted notifications relating to the supply.
The list will include notifications submitted by you or someone else with access to your supply, as well as notifications submitted by a laboratory with test results for a sample from your supply.
The notifications are organised into two lists:
- Draft notifications that you or someone with access to your supply have started but not yet submitted.
- Supplier and laboratory notifications that have been submitted to the Authority.
You can view a notification from either list by clicking on the dropdown menu at the end of the relevant row and selecting View Notification.
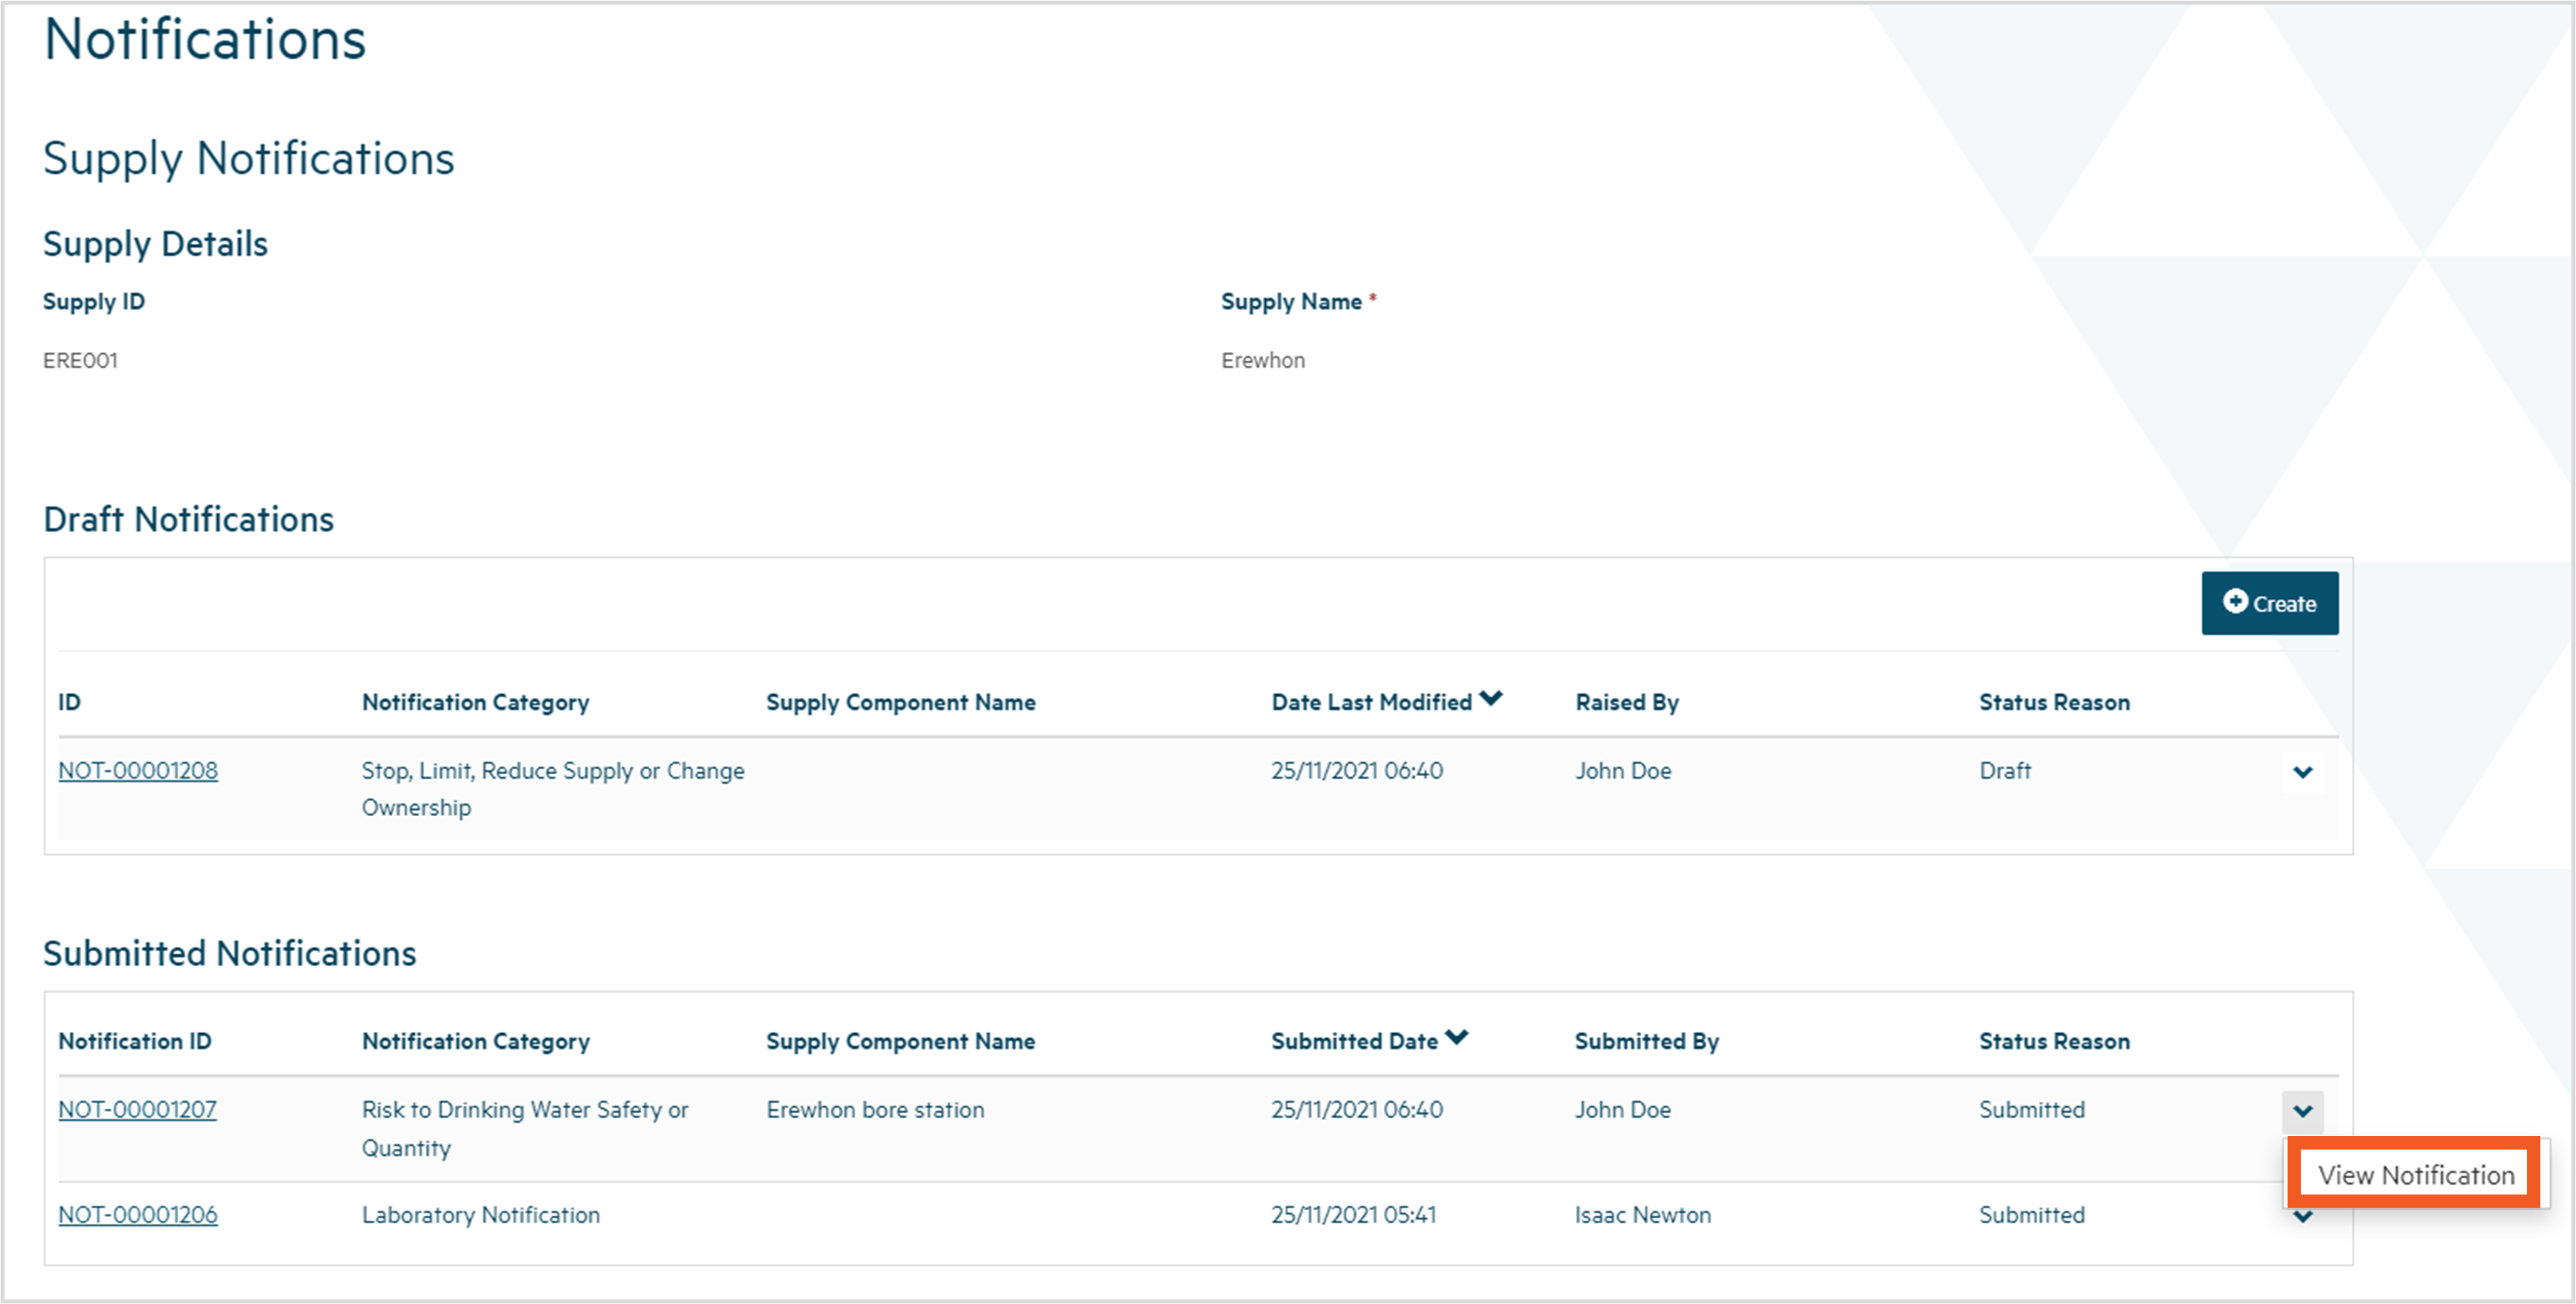
Step 4
You'll be taken to a screen showing the details of the notification. The details listed may differ depending on the options selected in the submission of the notification. For example, if you indicated that the laboratory has already notified the Authority of non-compliant water, the Notification ID of the laboratory notification will be displayed. However, if you provided the laboratory test results yourself, those test results will be displayed.
Scroll down to see all details.
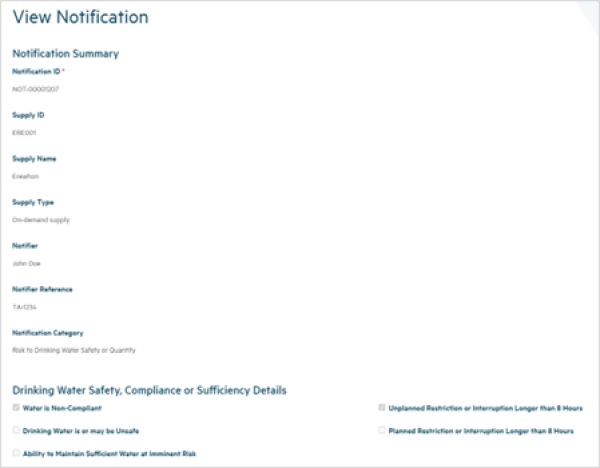
If any documents have been uploaded with the notification, you can view the record of one of those documents by:
- clicking the document title in the list of documents, or
- opening the dropdown menu at the end of the row and choosing View Document Details.
This will open a pop-up screen displaying the document details, including a link to the document itself. If you click on the link the document will download, allowing you to open it.


Step 5
When you've finished, you can return to the list of notifications by clicking your browser back button. Clicking on Notifications in the breadcrumb will not work in this instance due to the nature of the notification list page.