Temporary supply for planned event
What you need to know if you’re organising an event like a festival, sports event or fair and intend to set up a temporary drinking water supply.
Key things you need to know as a provider of a temporary drinking water supply for a planned event can be found on this page.
Who needs to register and apply?
Information in this section will help you decide whether you need to register and apply to set up a temporary drinking water supply.
What is a planned event?
A planned event is an event on privately or publicly owned land that is generally:
- open to any member of the public, or
- a ticketed event, whether free or paid for, advertised to the general public (e.g. music festival, sports event), or
- an event that is advertised for members of any group or participants in an activity whether or not it is advertised outside that group (e.g. sheep dog trials).
Not included are events that would normally be held on private property for whānau and friends (for example, birthday parties, small weddings) where the attendees are known to the property owner.
What is temporary?
A temporary drinking water supply is one that operates for the finite duration of a planned event. It will generally be a short-term supply (typically 4 – 7 days) that may set up once or several times but isn’t intended to be ongoing.
Do I need to register and apply?
You’ll need to register your temporary drinking water supply with us if you intend to source water from either:
- an unregistered drinking water supply, including:
-
-
a supply that was supplying drinking water to consumers immediately before the commencement of the Water Services Act on 15 November 2021, but which is not yet registered under the Act.
-
an unregistered water carrier.
-
-
a supply that is not required to be registered under the Act, such as a domestic self-supply that usually supplies water to a single dwelling.
-
any other source not covered elsewhere in this section (for example, water supplies that are not intended to be used for drinking water – such as running a hose from a rainwater tank used for gardening).
You don’t need to register and apply if your drinking water will be sourced from a supply that is already registered (such as a town water supply), a registered water carrier service (i.e. a water tanker) or you will be supplying bottled water.
How to register and apply
To register your proposed temporary drinking water supply, complete our online application formoutbound.
The form asks for:
-
your contact details
-
the type of event
-
the event date(s) – including set up and close-down (if the drinking water supply will be available to workers and other consumers during these times)
-
expected number of people attending
-
number of consumers of the supplied drinking water, including workers at the event or other users such as food trucks
-
names and contact details of the people who will be operating the supply.
Once you’ve submitted the form, we’ll be in touch by email with instructions for setting up a user account in Hinekōrakooutbound (our online self-service portal), so you can complete the registration application form and attach a temporary drinking water safety plan (see below).
Here's some further guidance that will help you get started with Hinekōrako.
Establishing a RealMe® account and creating a user account in Hinekōrako
Download a pdf of this guidance: Establishing a RealMe® account and creating a user account in Hinekōrako
This guide takes you through the steps to create a user account in the Supplier Portal part of Hinekōrako. To access your Hinekōrako account you’ll need a RealMe® account. RealMe® is the New Zealand Government’s identity management service. Find out more hereoutbound.
If you don’t already have a RealMe® account, you’ll be able to create one during this process. Thereafter, you'll aways log in to Hinekōrako using your RealMe® account.
If you already have a RealMe® account that you use to access work and/or personal services, you can use it here. You don't need a new one. Your RealMe® account is only tied to your Hinekōrako account for the purposes of making sure it's really you who's logging in.
Email invitation
Establishment of your Hinekōrako user account begins when you receive an email from us with a link inviting you to create an account.
Step 1
Click on the link in the email.

Step 2
You’ll be taken to the Hinekōrako portal and from there transferred to RealMe®.
The transfer might take a moment. If it does, you may see this page. Please wait until you're redirected.

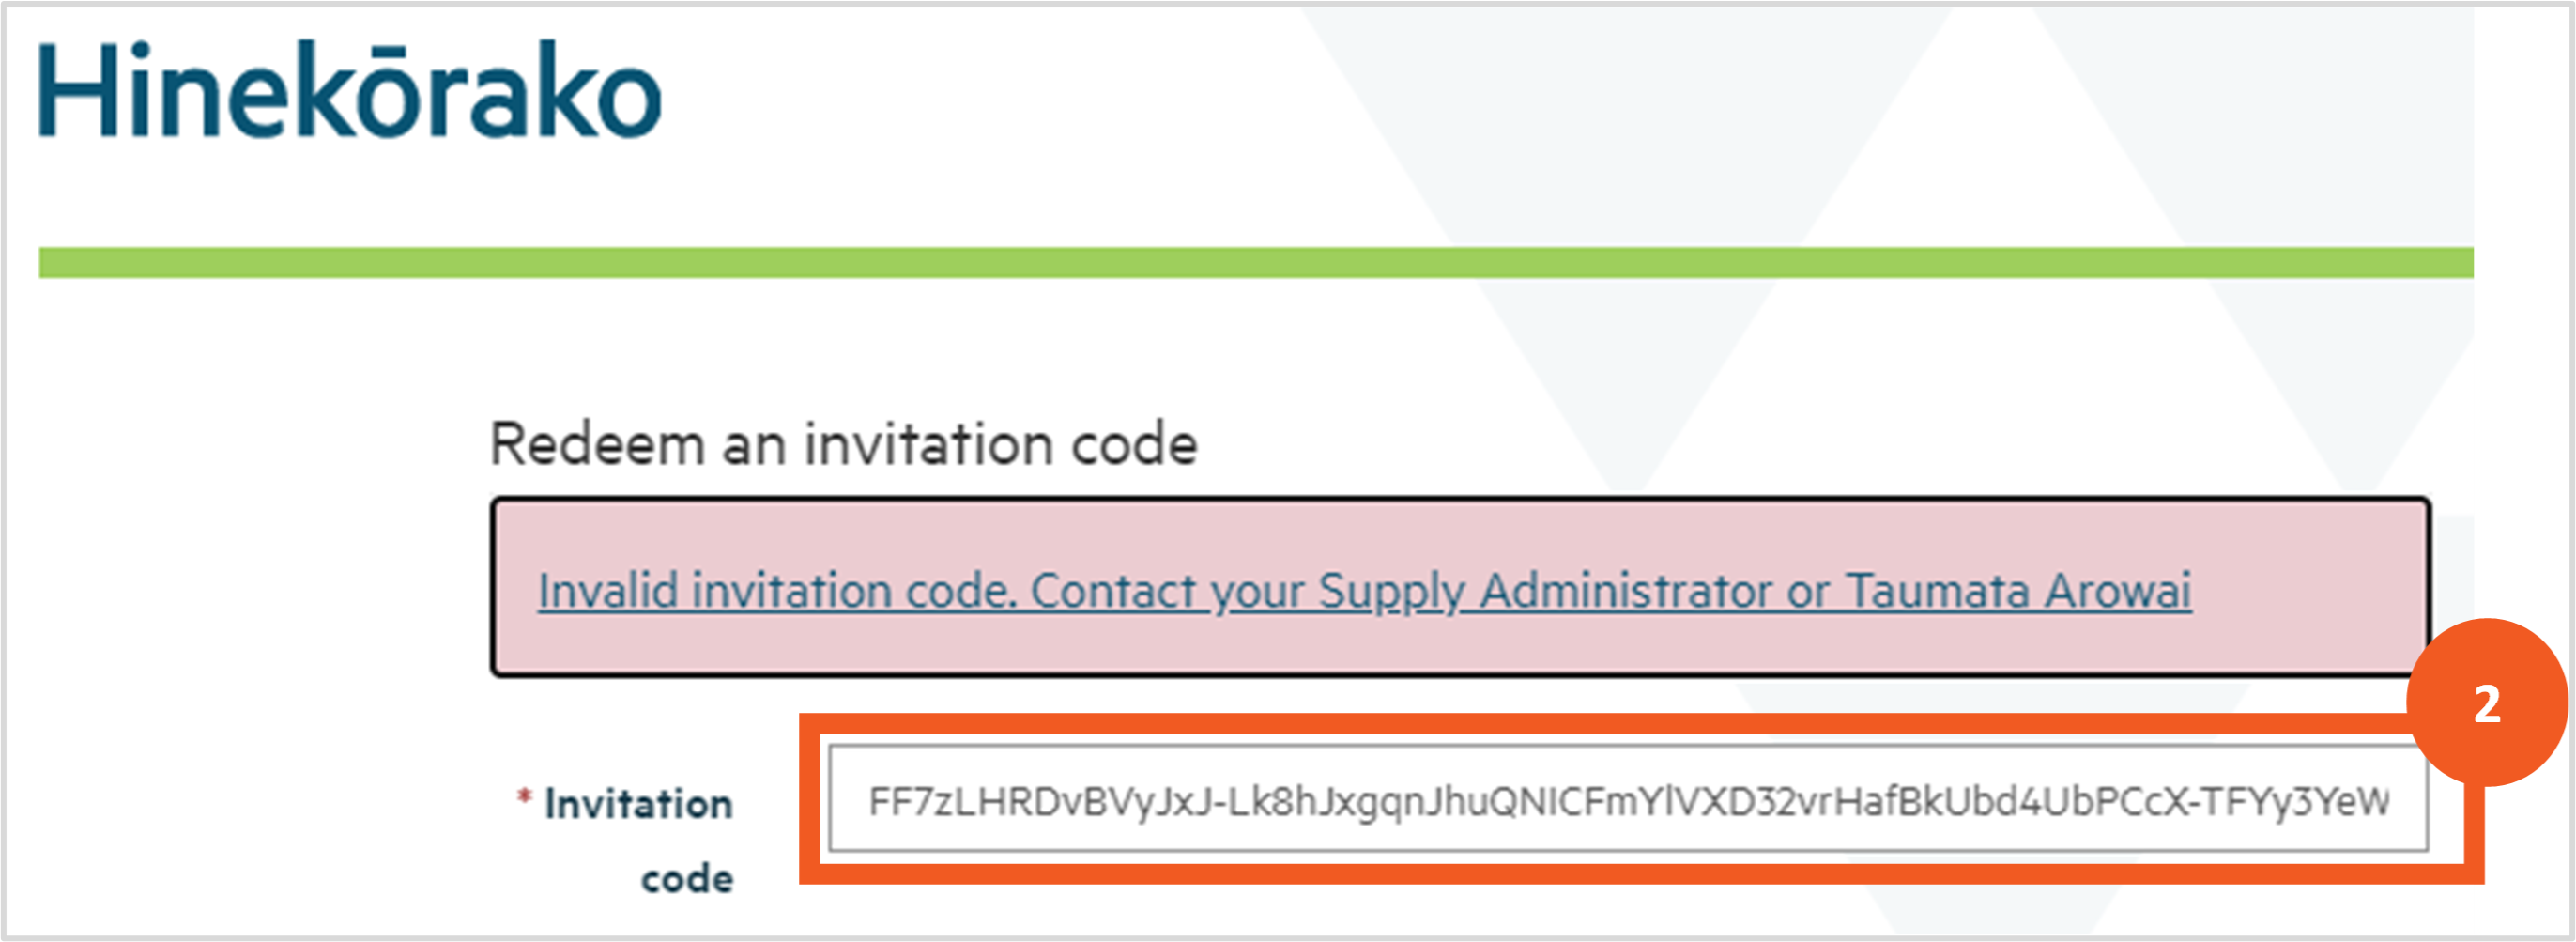
Step 3
It's possible that, for your protection, your email platform may have encrypted the link in the email and then unencrypted it when you clicked on it, changing the invitation code in the link in the process. In this case you may receive an Incorrect Invitation Code error.
If you do:
- Go back to the invitation email and select and copy the invitation code included in it.
- In the Hinekōrako screen where the error is displayed, delete the current invitation code, paste in the invitation code copied from the email and hit Enter.
If you still experience an error, contact us at info@taumataarowai.govt.nz 
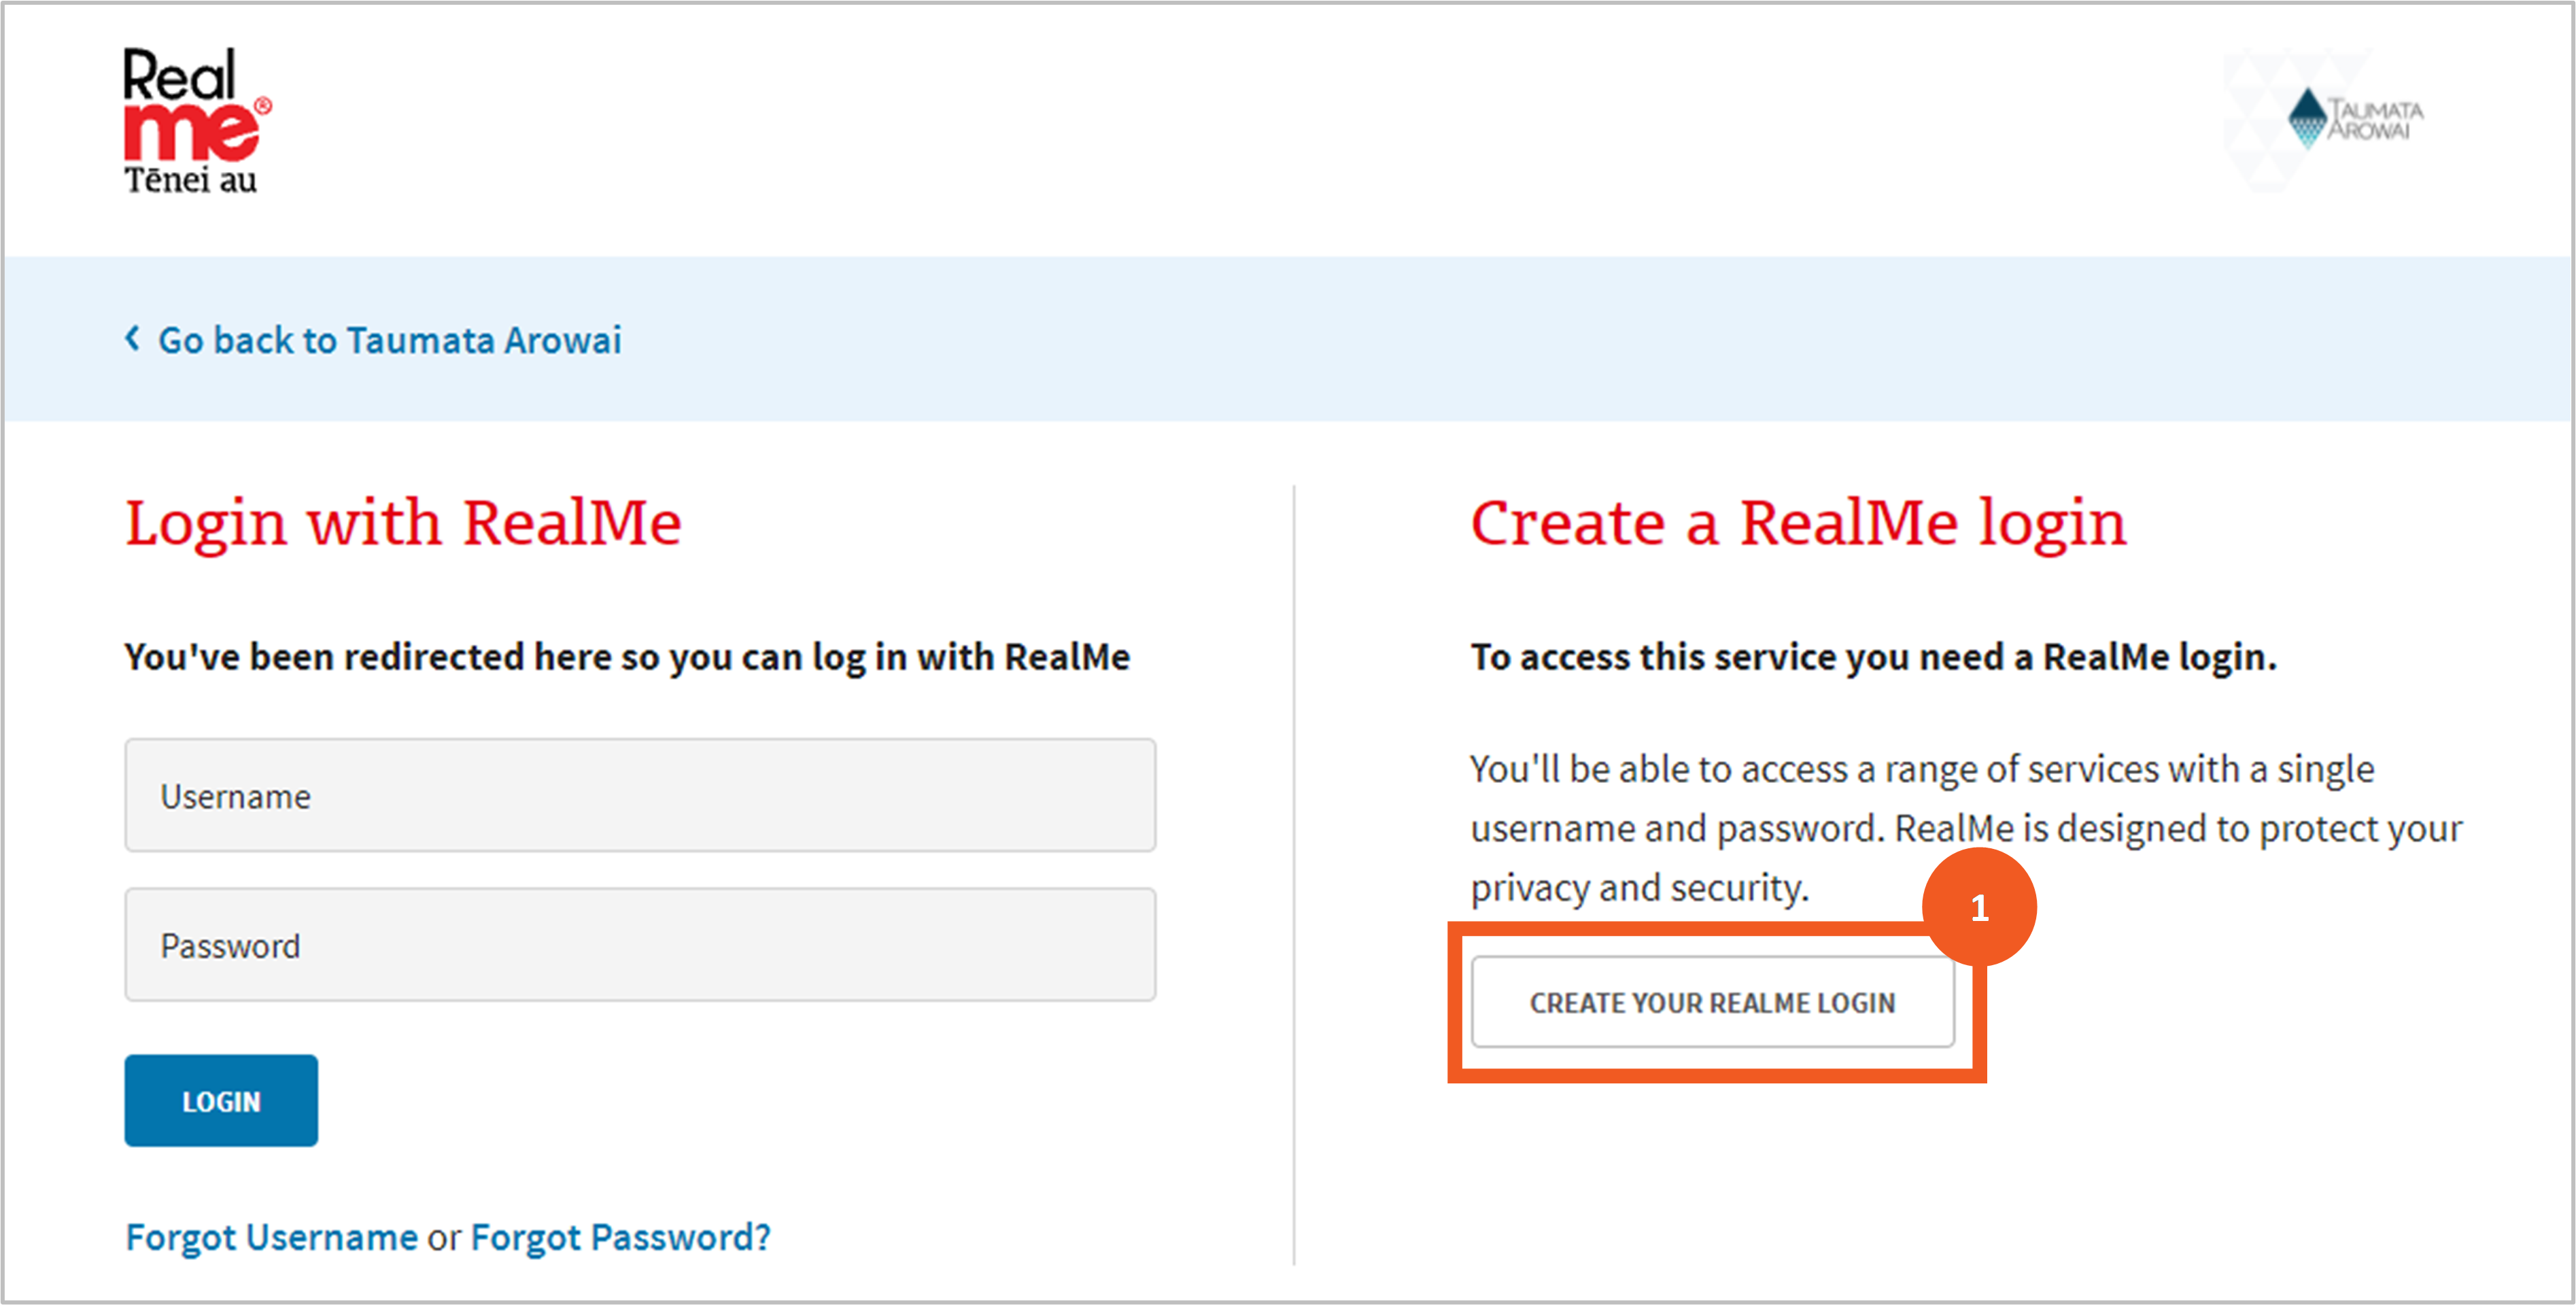
Once you're on the RealMe® page you have the following options:
- Create a RealMe® account. Go to Step 4.
- Retrieve your forgotten RealMe® username or password. Go to Step 9.
- Link an existing RealMe® account to your Hinekōrako account. Go to Step 10.
Creating a new RealMe® account
Step 4
Click on the Create Your RealMe® Login button.
Before you go further, we recommend you read the guidance for creating a new account on the RealMe®outbound website.
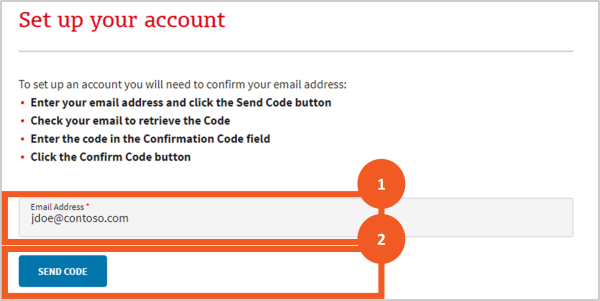
Step 5
You'll be taken to a page where you can set up your RealMe® log in details.
- Enter your email address. This does not have to be the same as the one on your Hinekōrako account. It will be the email address RealMe® uses to send you emails relating to forgotten passwords or usernames.
- Start the process of confirming the email address is yours by clicking Send Code.
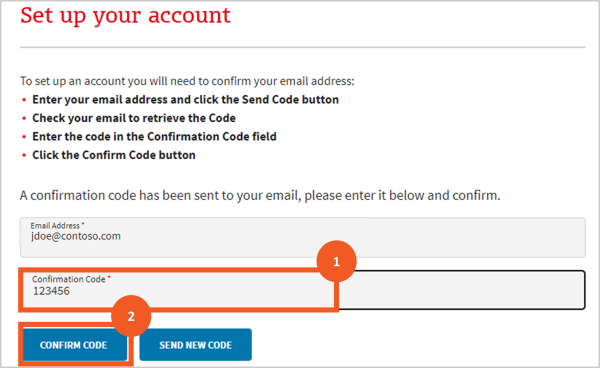
Step 6
A field will appear for entering the confirmation code sent to the email address you specified.
- Enter the code.
- Click Confirm Code.
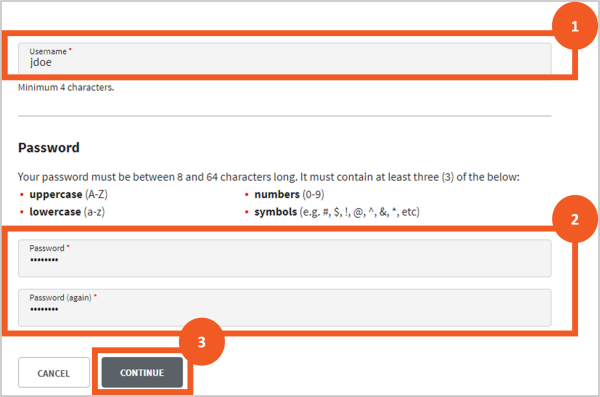
Step 7
Once you have entered the correct code:
- Enter a unique username. RealMe® will tell you if the name you have selected is already in use.
- Enter a password and then confirm that password. The passwords must match and meet the security requirements listed on the page.
Click Continue.
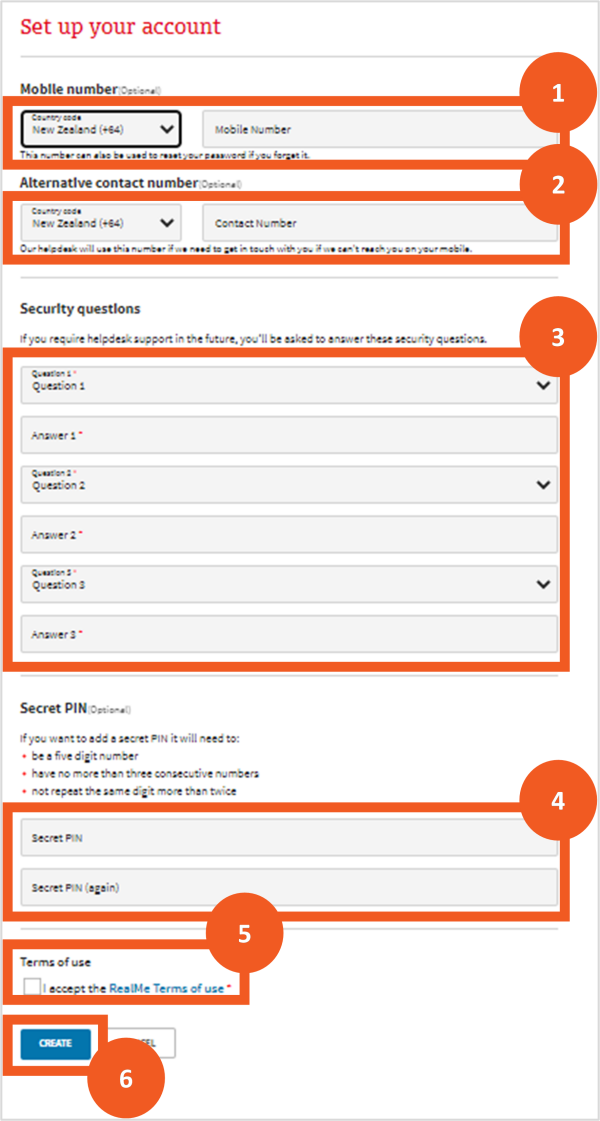
Step 8
You’ll then be taken to a page where you can provide additional security details. You can complete your account by:
- Optionally providing your mobile number. As with the password, you’ll be asked to click on Send Code and then enter the code received by text message in the field that appears.
- Optionally provide an additional contact number for RealMe® ’s helpdesk.
- Select and provide the answers to three security questions, which RealMe® ’s helpdesk will use to confirm you are who you say you are if you contact them.
- Optionally set up a 5-digit PIN as another option to confirm your identity with the helpdesk or when resetting your password.
- Read and accept the RealMe® terms of use.
- Click Create to create your account.
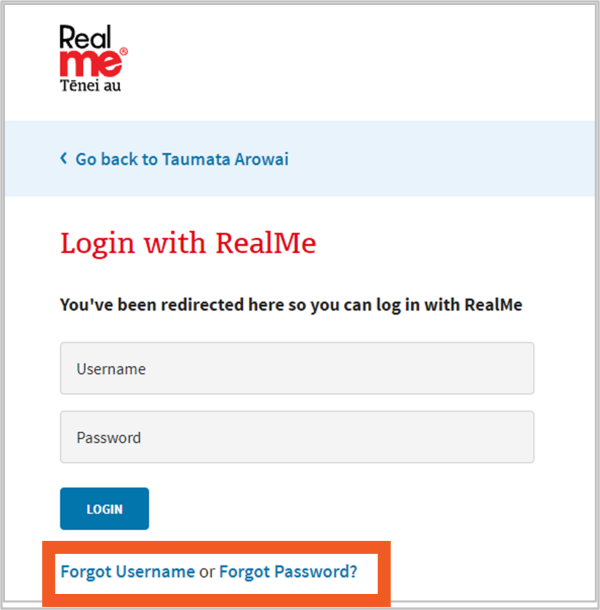
Retrieve your RealMe® username or reset your password
Step 9
If you have an existing RealMe® account you can use the links on the login page:
- Retrieve your RealMe® username if you've forgotten it, or
- Reset your RealMe® password if you've forgotten that.
For further instruction on how to do either, please refer to the RealMe® websiteoutbound.
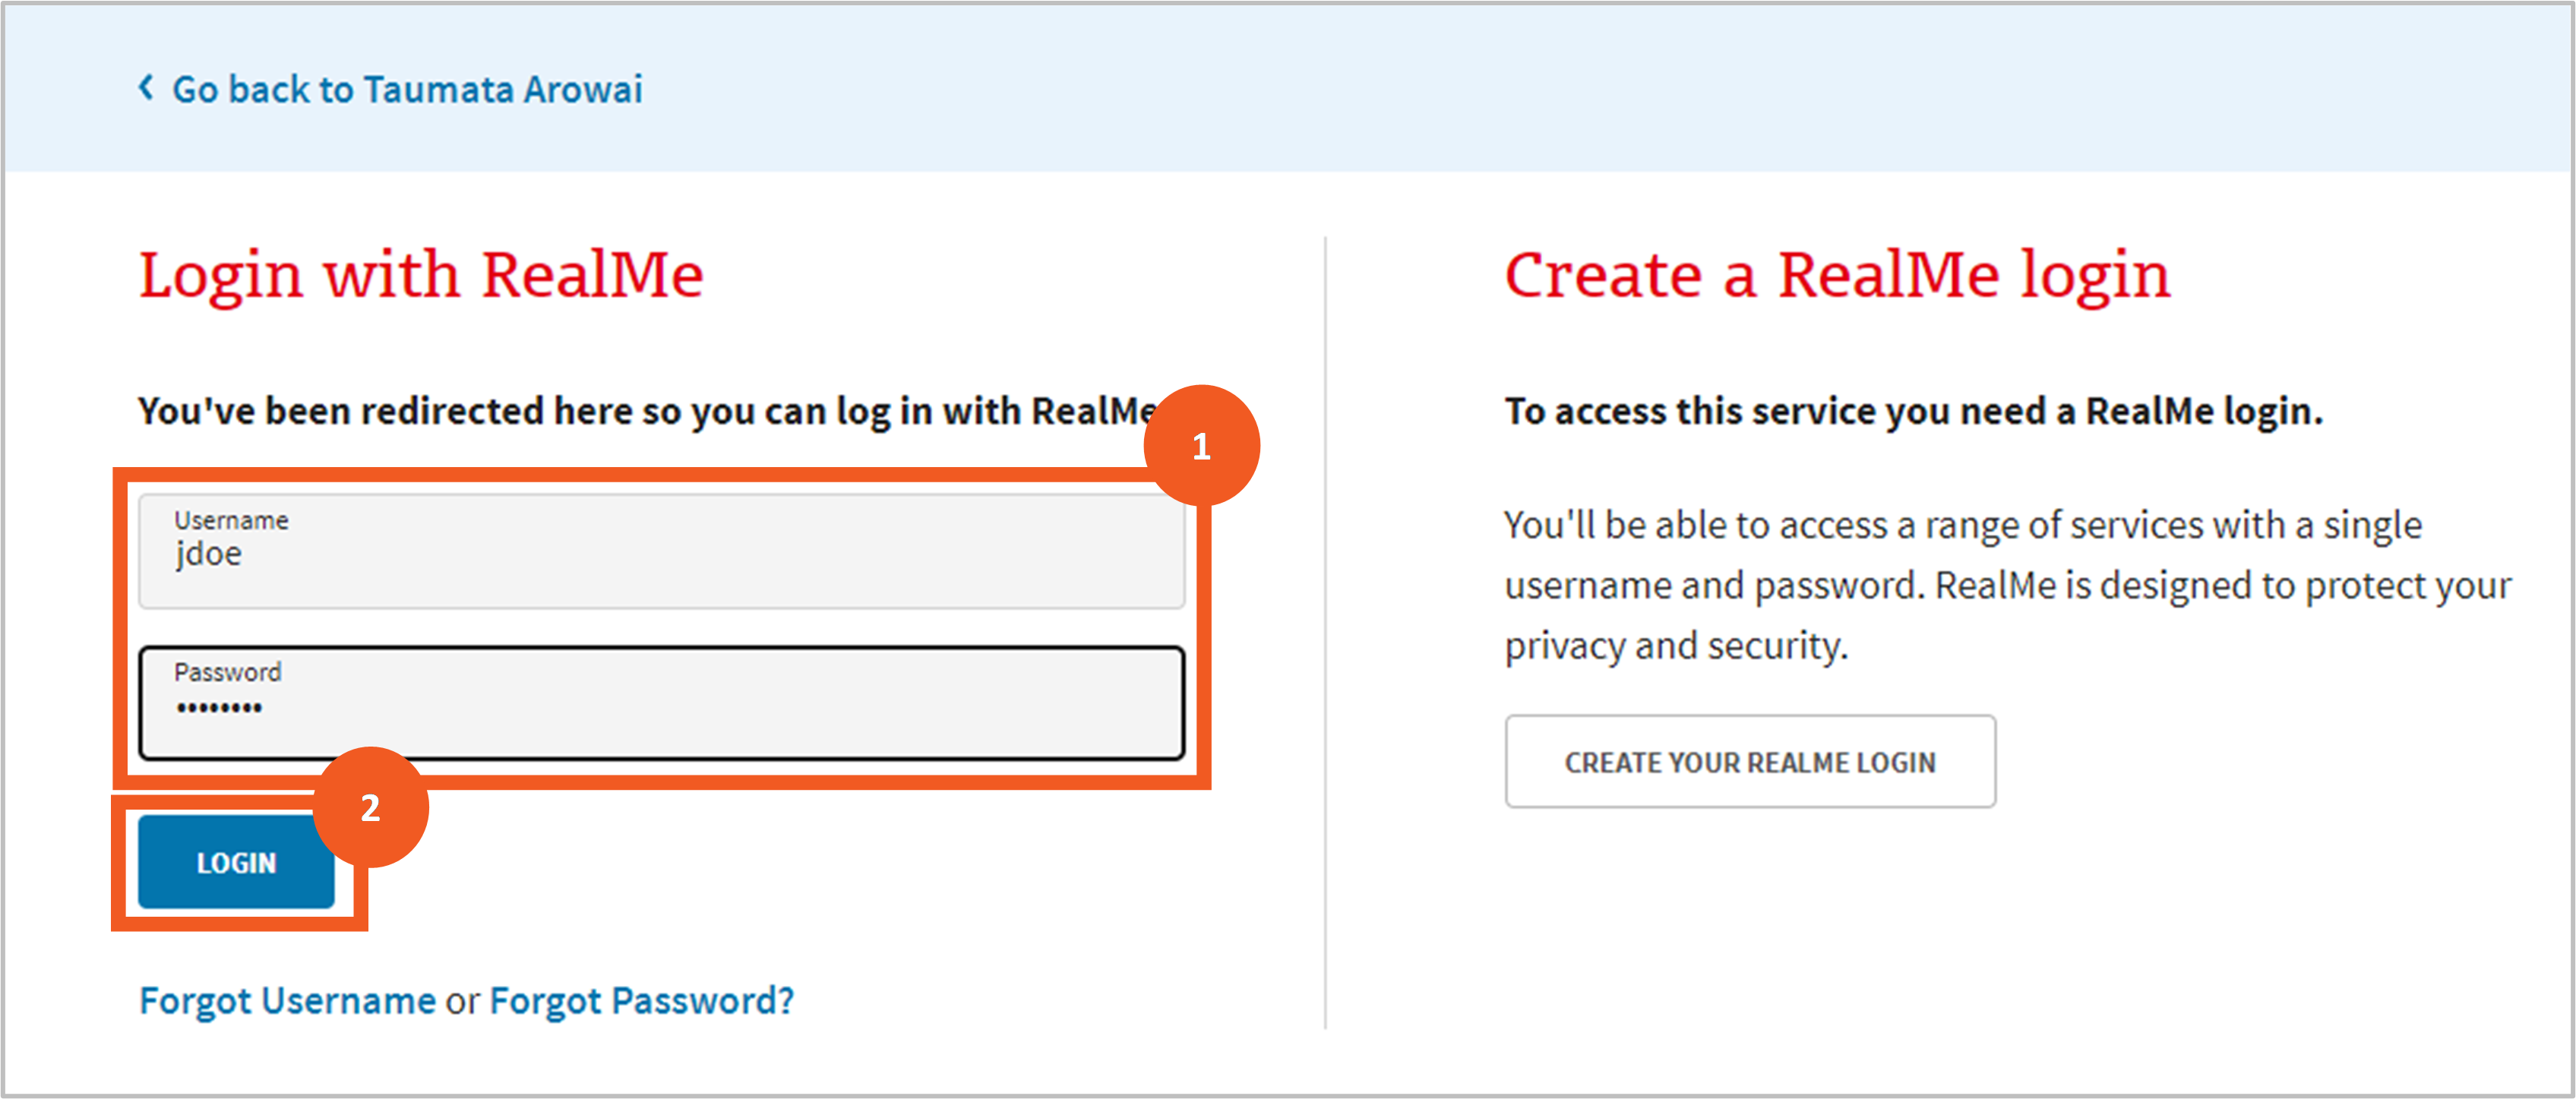
Link an existing RealMe® account to your Hinekōrako account
Step 10
To link your existing RealMe® account to your Hinekōrako account simply log in to RealMe® at this point by:
- entering your username and password
- clicking Login.
Read and accept the Hinekōrako terms of use and privacy statement
Step 11
Before you can access Hinekōrako you'll need to acknowledge that you've read and agree to comply with the Hinekōrako terms of access and privacy statement:
- Open and read the terms of access by clicking the Terms of Access link. The terms will open in a separate tab in your browser.
- Return to the acknowledgment page and open and read the privacy statement by clicking the Privacy Statement link. This also opens in a separate browser tab.
- Click in the acknowledgement checkbox.
- Click Continue.

Bookmark Hinekōrako for future logins
Step 12
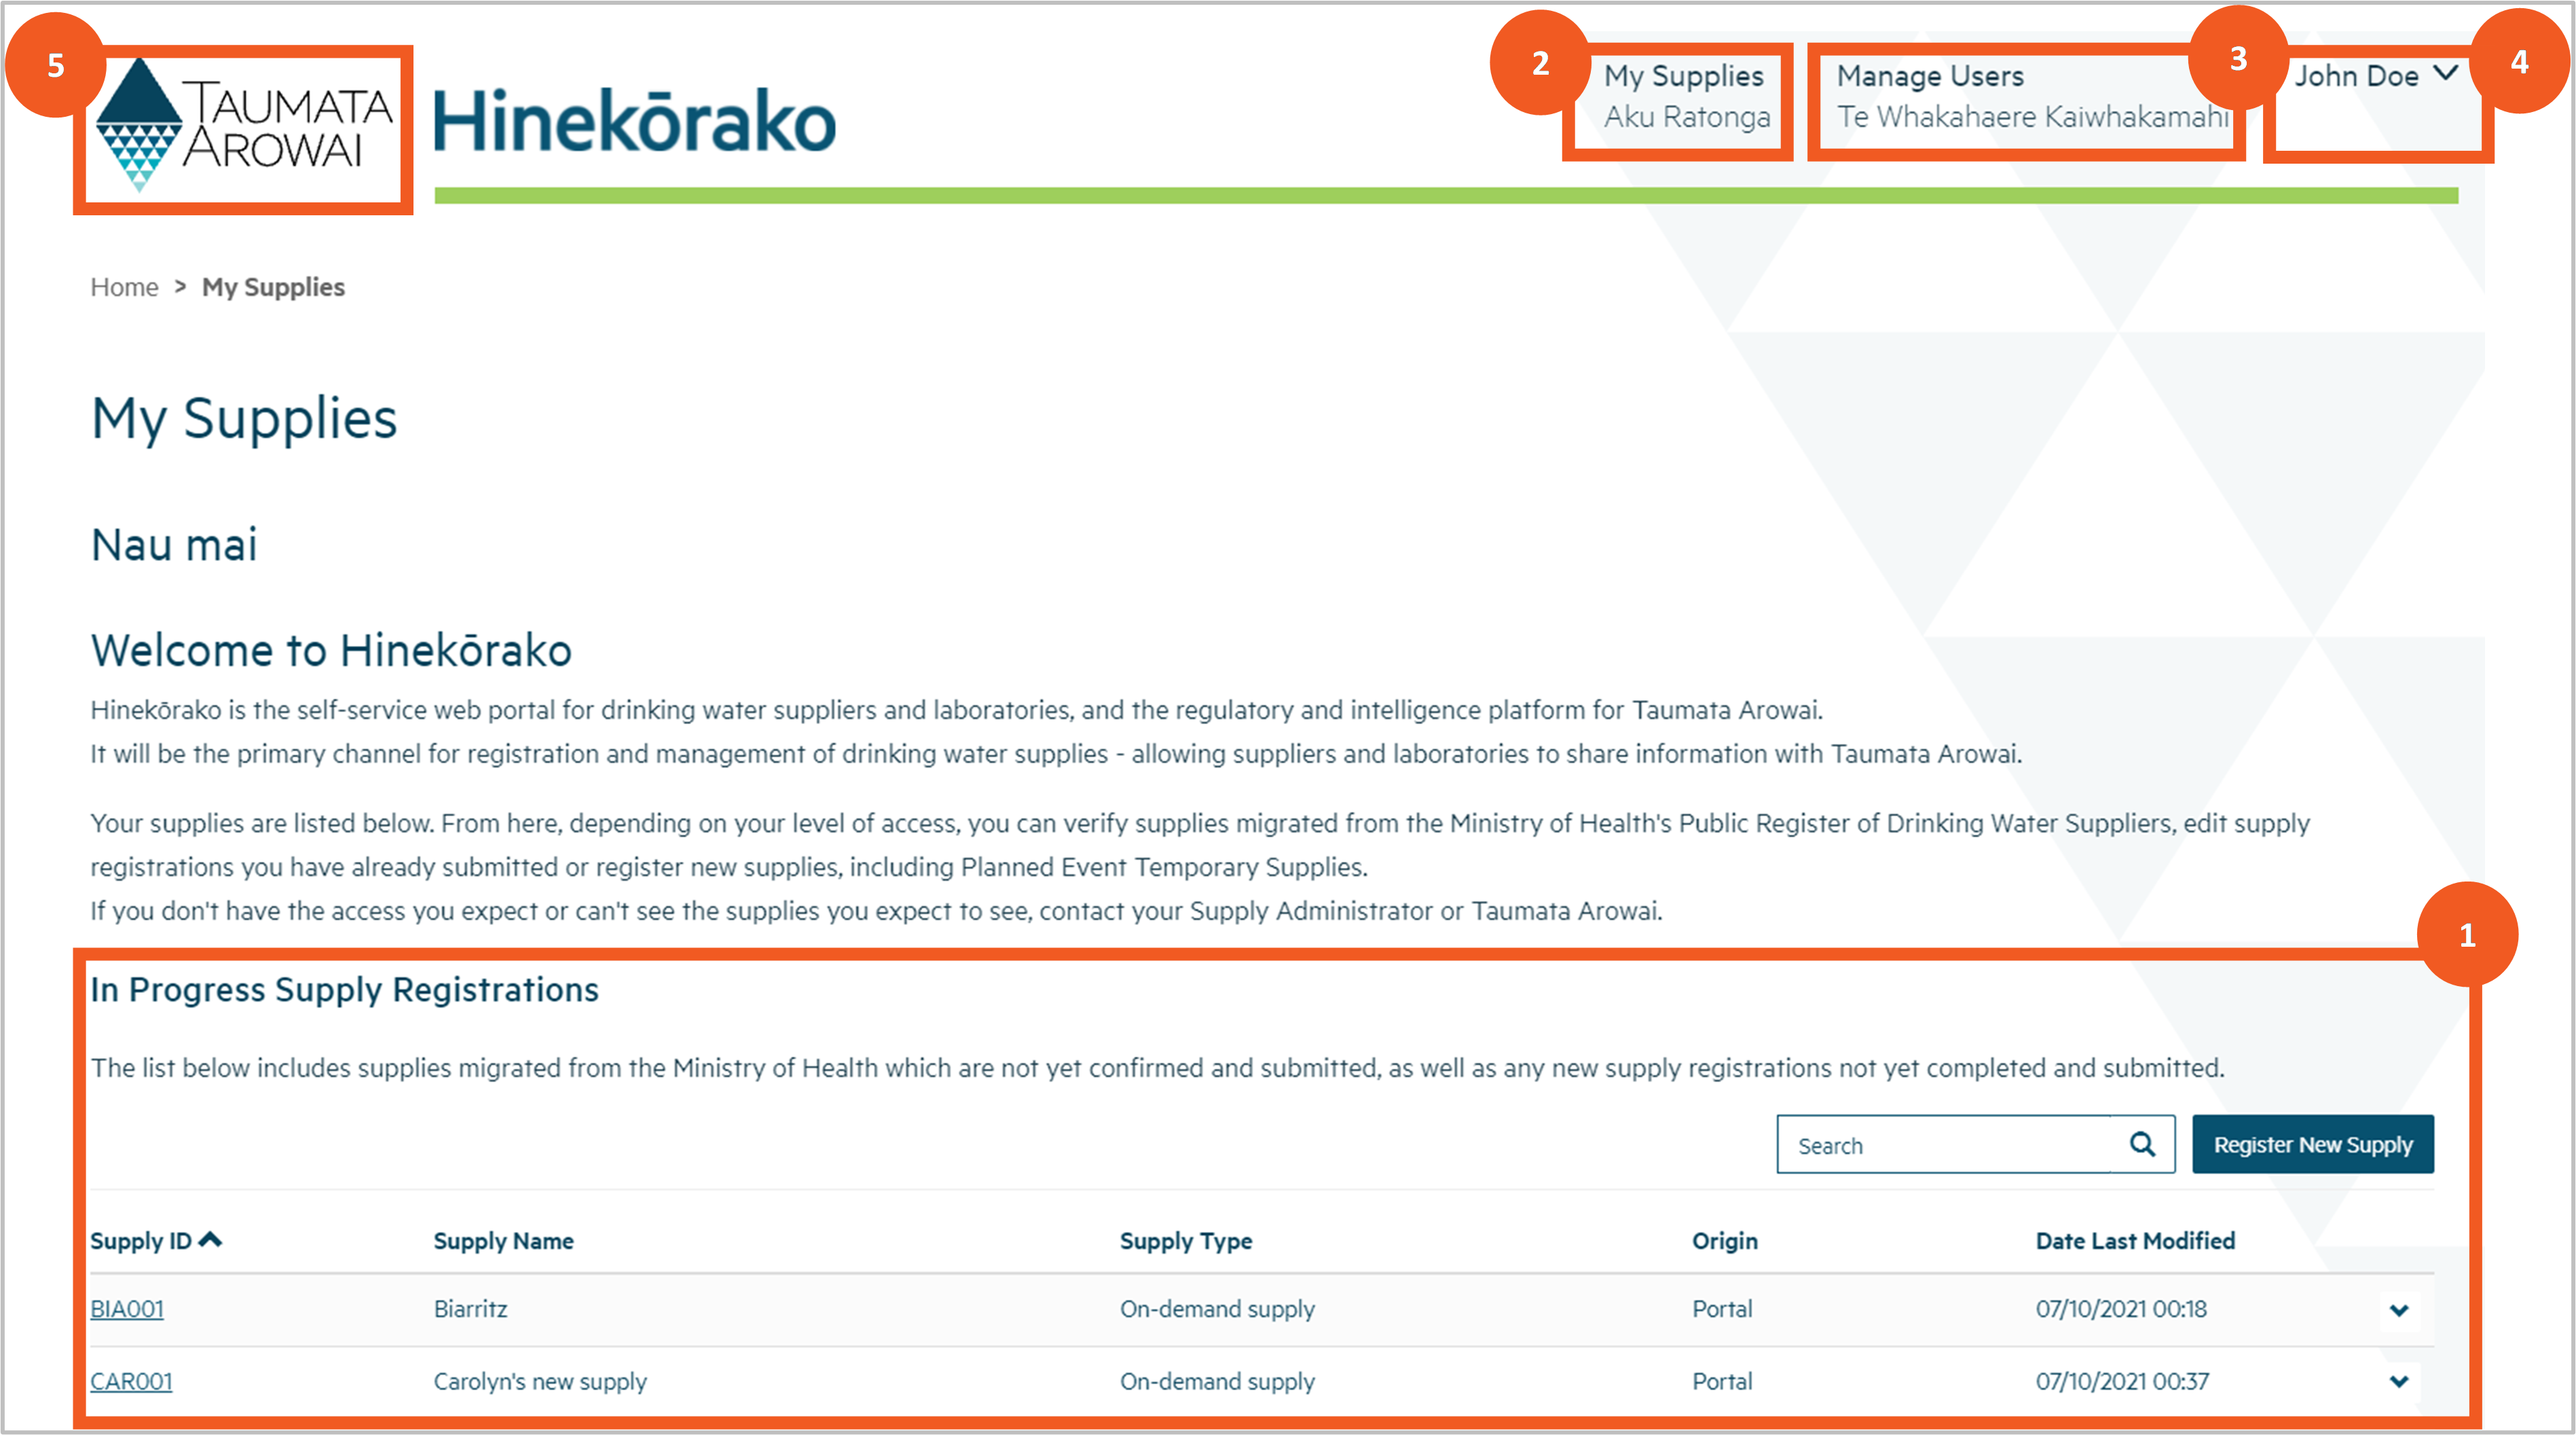
After acknowledging the terms of access and privacy statements, you'll be taken to the My Supplies page. This is your home page for Hinekōrako.
We recommend that you add this page to your list of browser bookmarks so you can return to it easily in future. Alternatively, you can return to Hinekōrako and log in at this URL: hinekorako.taumataarowai.govt.nz.outbound
Be aware of Hinekōrako timeouts
Step 13
For your security, Hinekōrako will time out after 30 minutes of inactivity.
If you return to a Hinekōrako screen after it has timed out and attempt to move to another page, Hinekōrako will send you to RealMe® to log in again. If you were in the middle of completing a form and attempt to keep working on it, you may receive error messages relating to permissions or other system-related matters.
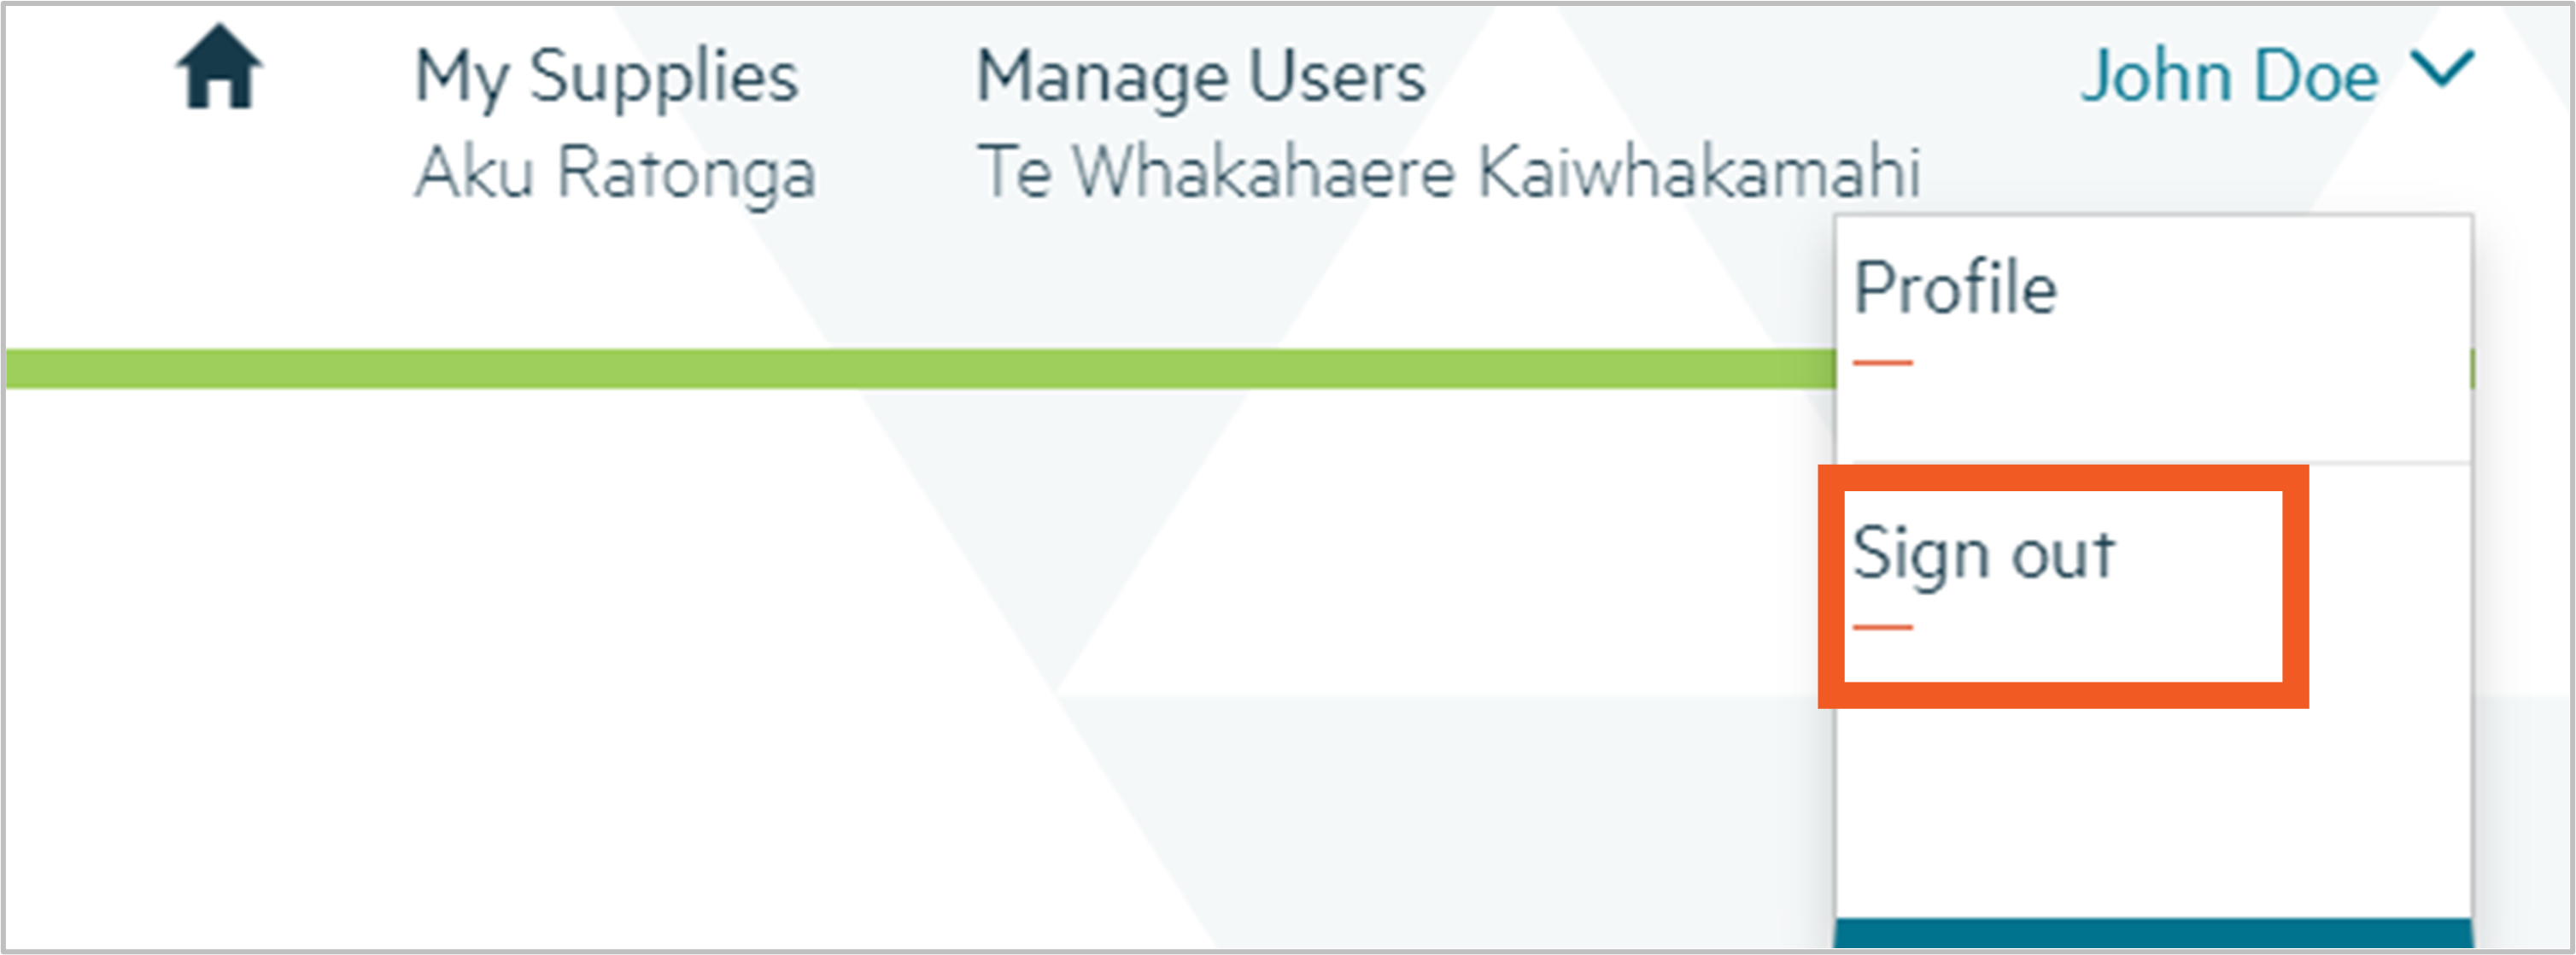
If you receive such messages, click Sign out on the dropdown menu by your name and then click on the RealMe® login button to log in again.
Familiarise yourself with the My Supplies page
Step 14
From the My Supplies page you can do a number of things:
- See your supplies and, depending on your level of access:
-
- click through to view the supply details, including all things related to the supply (e.g. any drinking water safety plans submitted to The Authority and any drinking water safety issues notified to The Authority)
- register a new supply or click through to an existing supply to view notifications related to the supply or submit a new notification. Previously unregistered supplies do not have to be registered for some time yet. Please ensure you have spoken to The Authority about your reasons for registering a new supply.
Exactly which supplies you see and what you can do with them will depend on the Hinekōrako user role you've been assigned. See the Understanding supply groups, supply relationships and Hinekōrako user roles guidance (in the expandable panel below) for further information.
The first time you log in as a supplier transferred from the Ministry of Health’s Register of Drinking Water Suppliers, you will see your supplies listed with the Origin of Migrated. These supply records are available for you to verify as complete and correct.
2. Return to this page, by clicking the My Supplies menu option at the top.
3. If you are a Supply Group Administrator or Supply Administrator, manage the supply portal access of other users to your supplies by clicking on Manage Users.
4. Sign out or update your own profile, including contact details, by selecting from the dropdown menu by your name at the top right of the screen.
5. Go to the Authority's website by clicking on the the Authority logo.
Understanding supply groups, supply relationships and Hinekōrako user roles
This guide explains supply groups, supply relationships and supply user roles in Hinekōrako, and how these things are related.
This is important information because it explains:
- for all users: why certain supplies can be seen but not others, and why certain actions can be taken in relation to those supplies but not others.
- for supply group administrators and supply administrators: how access to supplies works, informing decisions when managing user access.
Supply groups
Hinekōrako enables multiple supplies to be administered by one person by grouping supplies together into supply groups. Every supply is in a supply group and every supply group must have a Supply Group Administrator who maintains the registration details of the supplies and manages the access of other Hinekōrako users to the supplies in the group.
In simple supply set ups, the supply group may consist of a single supply and a single user who is the Supply Group Administrator. In complex supply set ups, the supply group may consist of multiple supplies and multiple users who have different levels of access to some or all of the supplies.
Supply relationships
The responsibilities and statuses of the people and organisations that have a relationship with a supply are captured on the registration record as supply relationships.
When creating a record of a supply relationship you can add a person or an organisation as a Contact, then indicate the nature of their relationship with the supply. For example, the person or organisation might be an Owner, Operator or Agent and the person might be the overall Supply Contact and/or Registration Contact.
Supply relationship records serve three purposes:
- They inform us of the people and organisations related to the supply and their responsibilities with respect to the supply.
- Some of the information is used to display on the public register of drinking water supplies for the benefit of consumers.
- They can be used to limit Hinekōrako user access to supplies.
Hinekōrako user roles
Often, when there are multiple supplies in a supply group, everyone connected with that supply group will have access to all supplies in it. In such cases, everyone will have one of the following Hinekōrako user roles:
|
User Role |
Explanation |
|
Supply Group Administrator |
The Supply Group Administrator is able to:
The Supply Group Administrator is also able to:
|
|
Supply Group User |
A Supply Group User can do all of the things that a Supply Group Administrator can do, except invite new users and manage existing user roles and access. |
|
Supply Group Read Only |
A Supply Group Read Only User can view the registration details of all supplies in the supply group and the details of all further information submitted to the Authority regarding those supplies (e.g. supplier notifications) but cannot register new supplies, update existing supply registrations, or submit further information and cannot invite or manage users. |
In some circumstances you may need to provide someone with access to your supply group but restrict which supplies they can see (e.g. if a person works for an operator of only one supply in your supply group or if you are an agent for multiple supplies and want to provide the owner of one of those supplies with access to only their supply).
In those cases you should give that person one of the following non-supply group roles:
|
User Role |
Explanation |
|
Supply Administrator |
The Supply Administrator is able to do everything a Supply Group Administrator can do, but only for those supplies the person has a Supply Relationship with. Supply Administrators can invite people to set up user accounts, but only those people that have a Supply Relationship with a supply that the Supply Administrator has a Supply Relationship with. When inviting or managing users, the Supply Administrator cannot allocate them any of the Supply Group roles. |
|
Supply User |
A Supply User can do all of the things that a Supply Group User can do, but only for those supplies the person has a Supply Relationship with. |
|
Supply Read Only |
A Supply Read Only User can do all of the things that a Supply Group Read Only User can do, but only for those supplies the person has a Supply Relationship with. |
Understanding the data held about your supply in Hinekōrako
Download a pdf of this guidance: Supply data (for planned event temporary supply)
This guidance explains the data recorded in Hinekōrako about a temporary drinking water supply for a planned event, such as a festival or sports tournament.
Overview
Data held about planned event temporary supplies is divided into three sections in the registration form. Each section is completed on a separate screen
Section |
Explanation |
| Supply details |
General details of the planned event temporary supply (e.g. its name, the type of event, the dates for the event). |
| Supply relationships |
Details of the organisations and people that have some kind of relationship with the event supply, including the nature of that relationship (e.g. Owner, Operator). |
| Final details |
Any documents related to the supply that have been uploaded (e.g. your drinking water safety plan). |
The following guidance explains the data able to be recorded in each of the above sections, including the allowable values and any other requirements. 'Mandatory field' means data is required in that field. Mandatory fields are indicated by a red asterisk:

There are different types of fields that provide different ways of recording data (see List of field types at the end of this guidance). If you attempt to move on from any screen and have not provided all the mandatory data, or there is some problem with the data you have provided, one or more error messages will be displayed indicating the problem. Where the problem is with a particular field, you can click on the error message link to go to that field.

Supply details
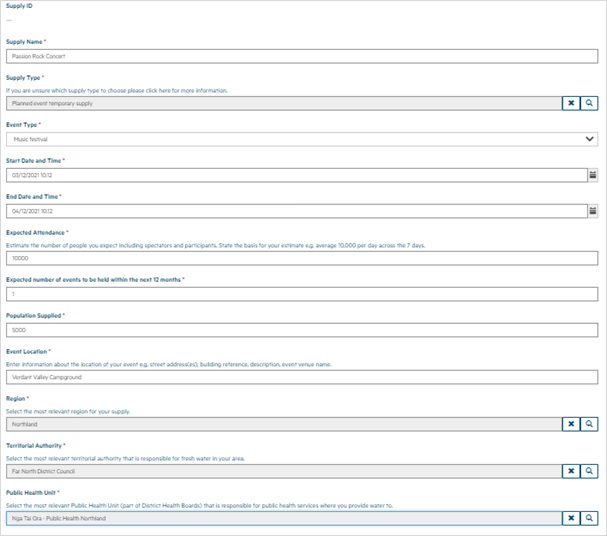
The Supply Details section of the registration form records the following data:
Field |
Explanation |
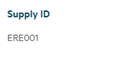
| Supply ID |
This is the unique identifier of the supply. Where the supply is new, the system will generate a new ID by taking the first three characters of the supply name and then appending the next three digit number which is available for that prefix. For example, if the supply is named Erewhon the prefix will be ERE. If there's already an ERE001 but not an ERE002, the latter will be assigned as the Supply ID. |
| Supply Name Mandatory field |
Describes the name of the event the water supply is for. |
| Supply Type Mandatory field |
Choose Planned event temporary supply from the following:
|
| Event Type Mandatory field |
Select the type of event from those listed. If you choose Other, you'll be required to enter a description for the type of event. |
| Start Date and Time Mandatory field |
Click on the calendar icon at the end of the field and select the date on which the event is due to start. Once the date is selected, the date and time will be populated into this field. The time can be adjusted by editing the field. The date can be adjusted by clicking on the calendar icon again. The start date for the event cannot be in the past. |
| End Date and Time Mandatory field |
Click on the calendar icon at the end of the field and select the date on which the event is due to finish. Once you've selected the date you can select the time by clicking on the clock icon at the bottom of the pop up screen. Once the date is selected, the date and time will be populated into this field and can be adjusted by clicking on the calendar icon again. The end date for the event can't be prior to the start date |
| Expected Attendance Mandatory field |
Enter the total number of people expected to attend the event. |
| Expected Number of Events to be Held withing the Next 12 Months Mandatory field |
Enter the expected number of times this event, at this location, will take place within the next 12 months. The maximum number of events in a 12-month period is 52. |
| Population Supplied Mandatory field |
Enter the total number of people expected to have access to drinking water at the event. It may differ from the total number of attendees. For example, total attendance might be 10,000 but drinking water from your supply is only serving those camping, which is likely to be a smaller number. |
| Event location Mandatory field |
Enter information about the location of the event. This could be a specific address, the name of an event venue, the name of a building etc. |
| Region Mandatory field |
Select the region in which your event will take place. We'll also use this information to determine the regional council for your event. |
| Territorial Authority Mandatory field |
Select the territorial authority within whose boundaries your event will take place. If there's more than one, choose the territorial authority within whose boundaries your event will primarily take place. The list of territorial authorities is filtered to include only those within the region you've selected. |
| Public Health Unit Mandatory field |
Select the public health unit that looks after the area in which your event will take place. |
Supply relationships
In this section you can provide details of one or more:
- organisations that have a relationship with your supply
- individuals that have a relationship with your supply.
When creating a supply relationship with an organisation you can and, in the case of an Owner are required to, add an associated contact record for the person who is the Key Contact.
You must list all Owners and Operators of the supply and you can also list other organisations and individuals (e.g. agents) associated with the supply. You'll need to provide information for at least one Owner. You can indicate that each organisation or individual has more than one role, e.g. Owner and Operator or Owner and Trustee. If the list of relationship types doesn’t include the role you’re looking for, select Other and enter the role name (e.g. Event Organiser) in the free text field.
Your supply record must list a Registration Contact and Overall Supply Contact. The Registration Contact is the person we'll contact for anything to do with the supply registration.
If you administer (or will administer in future) a group of supplies (e.g. a series of different events that require temporary supplies, or the same event over several years, each of which is a separate supply) or administer other types of supplies in addition to planned event temporary supplies, all of those supplies will form part of a supply group.
As a Supply Group Administrator you're able to invite other users to set up their own Hinekōrako user account and access one or more of the supplies you administer (and that they have a supply relationship with).
As a Supply Administrator, your access to supplies is restricted to those you have a supply relationship with and the users you can manage are only those who have a supply relationship with one or more of the same supplies. In addition, any role you assign to them will only allow them access the supplies they have a supply relationship with.
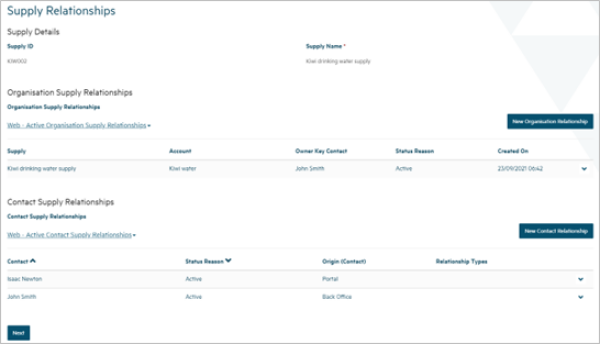
Organisation relationship
When you add or update an organisation relationship, you're able to record the following data:
Field |
Explanation |
| Relationship Type Mandatory field |
Select one or more roles the organisation has in relation to the supply from:
The organisation does not need to be the Owner or Operator of the whole supply. If they're an Owner or Operator of part of the supply, you should include them here. We do not capture relationships at a supply component level. If there are complex relationships you should upload a document explaining those relationships on the final details screen. When Other is selected, please use the free text field to describe the nature of the relationship. |
| Organisation Mandatory field |
This is the organisation the relationship is with. If a record of the organisation has already been created for your supplies, you can find and select that organisation by:
Once you've chosen the organisation, the details of the organisation will be displayed. If you're editing an existing organisation relationship or have selected an existing organisation, you can choose to edit the organisation details. If a record of the organisation does not exist, you can create one by clicking Create Organisation. See the section below for guidance on the data you can capture about an organisation. |
| Owner Key Contact Mandatory field |
This is a mandatory field if the relationship types include Supply Owner. This is the person within the organisation who'll be our key contact for liaison about the supply. If a record of the individual has already been created for your supplies, you can find and select that person by:
If a record of the individual doesn't exist you can create one by clicking Create Contact. See the section below for guidance on the data you can capture about an individual. |
Empty organisation supply relationship form
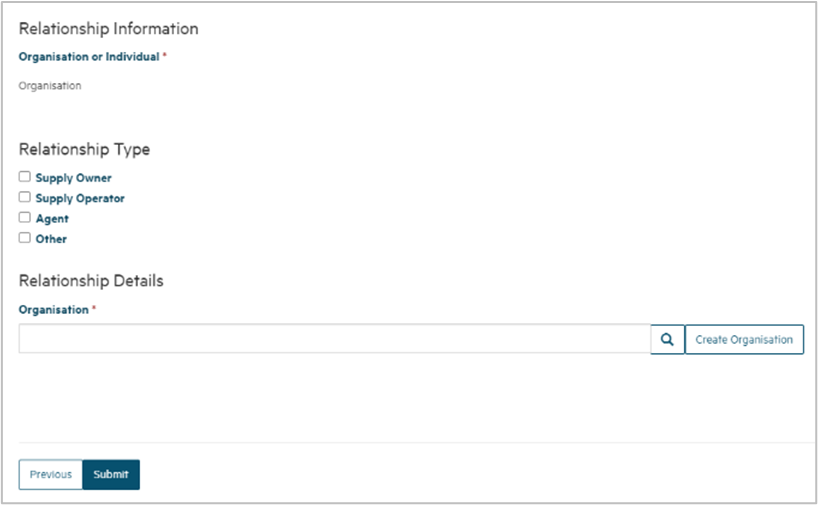
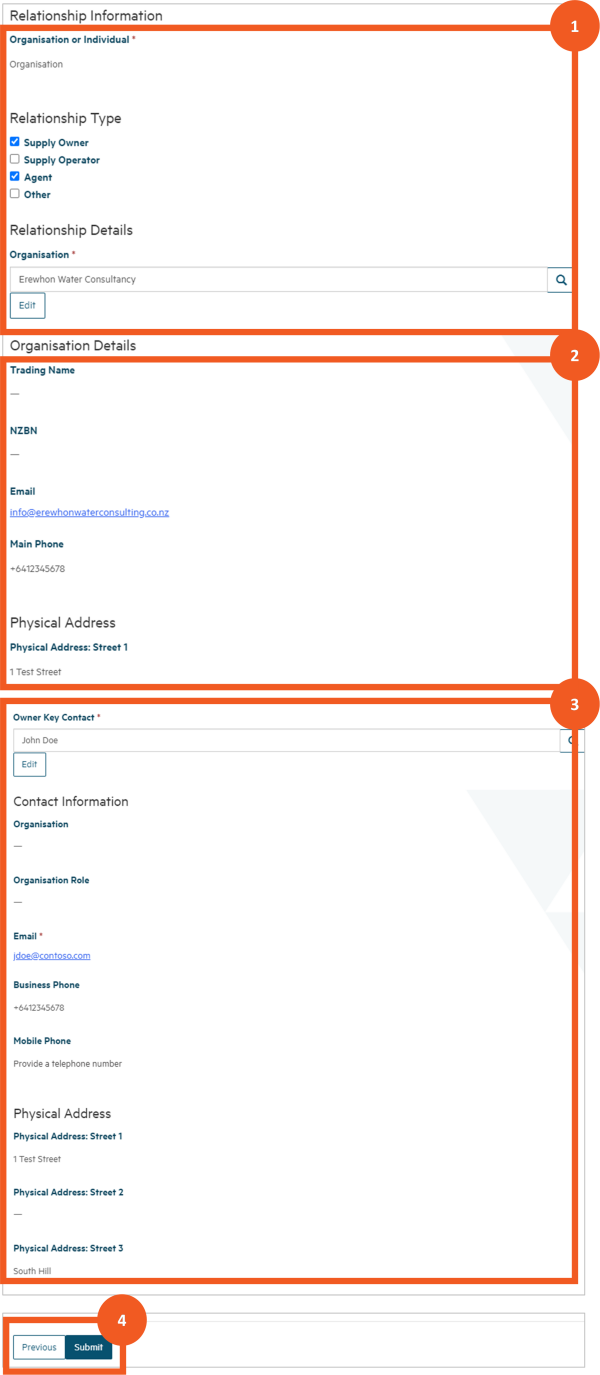
Populated organisation supply relationship form
Showing:
- the relationship details that have been entered
- some of the read only details of the organisation, with the option to edit those details
- some of the read only details of the Key Contact individual (because, in this example, the organisation is a Supply Owner)
- the option to submit the new or edited relationship or return to the previous screen without saving.
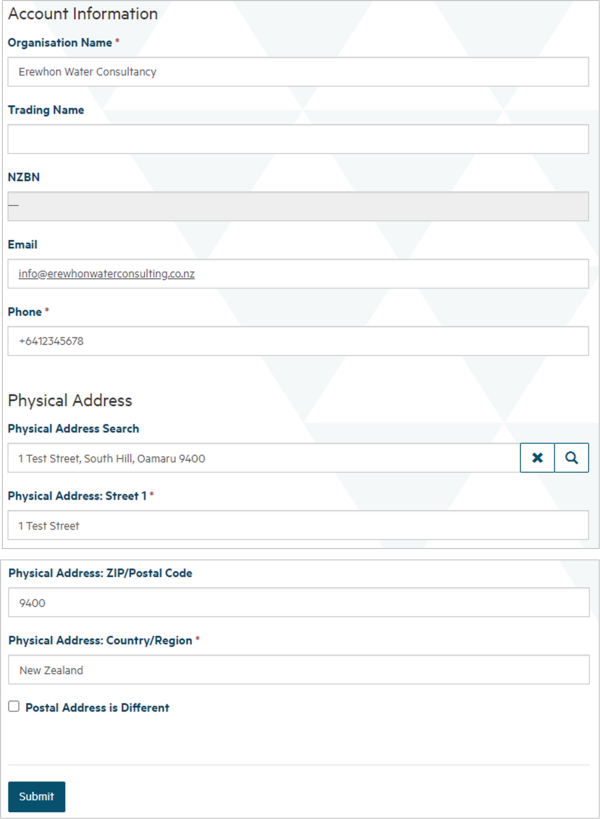
Organisation
When you create or edit an organisation, you're able to record:
Field |
Explanation |
| Organisation Name Mandatory field |
See the Organisation Name field in the list of field types below, including an explanation of the NZBN look up. |
| Trading Name Optional field |
Automatically populated if you select an organisation from the NZBN look up. It can also be manually entered. |
| NZBN Read only field |
Automatically populated if you select an organisation from the NZBN look up. |
| Email Optional field |
The general email address of the organisation. |
| Phone Number Mandatory field |
Must start with + followed by the country code (e.g. +64 for New Zealand). |
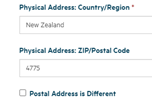
| Physical Address Search Mandatory field |
See Address Search in the list of field types below, including an explanation of the NZ Post address database look up. |
| Physical Address Fields Some fields are mandatory |
Some fields are mandatory. Automatically populated if you select an address from the Physical Address Search look up results. |
| Postal Address is Different Optional field |
Click on this if the postal address is different from the physical address. When clicked, Postal Address fields appear. |
| Postal Address Search Mandatory field |
This is a mandatory field if Postal Address is Different is checked. See the Address Search field in the list of field types below, including an explanation of the NZ Post address database look up. |
| Postal Address Fields Some fields are mandatory |
Some fields are mandatory. Automatically populated if you select an address from the Postal Address Search look up results. |
Individual relationship
When you create or edit a relationship with an individual person, you're able to record the following data:
Field |
Explanation |
| Relationship Type Mandatory field |
Select one or more roles the person has in relation to the supply:
When Other is selected, you'll need to describe the type of relationship. |
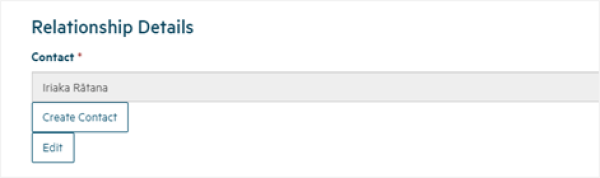
| Contact |
The name of the individual who has the relationship with the supply. If a record of the person has already been created for your supplies, you can find and select that person by:
If a record of the person doesn't exist you can create one by clicking Create Contact. You can edit the contact details of an individual who already has a relationship with the supply by clicking Edit. See the section below for information on the data you can capture for an individual. |
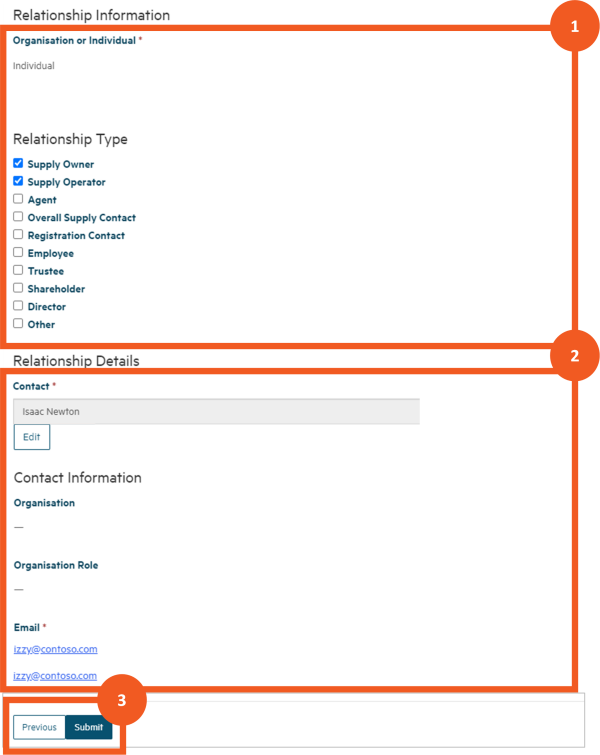
Populated individual supply relationship form
Showing:
- the relationship details that have been entered
- some of the read only details of the individual the relationship is with, and the option to edit those details
- the option to submit the new or edited relationship or return to the previous screen without saving.
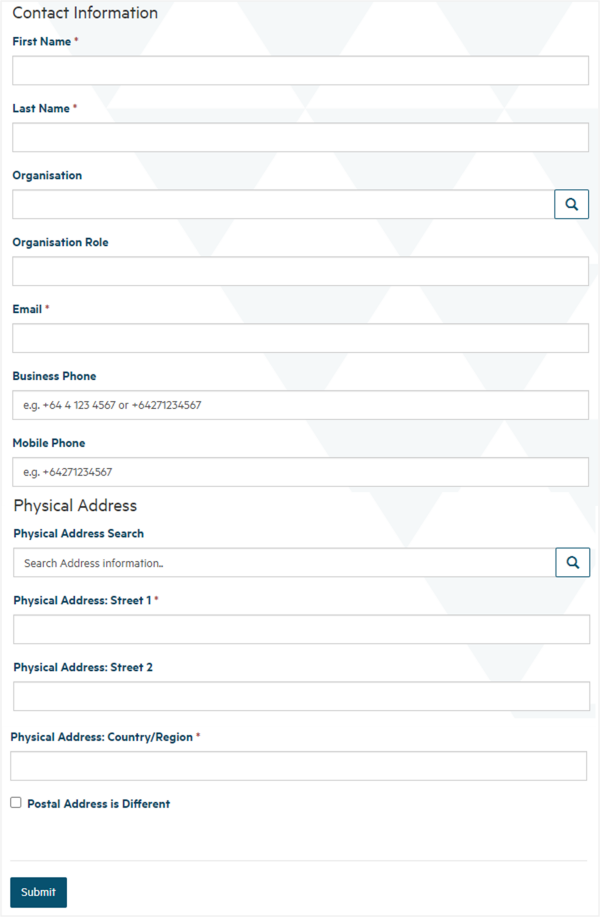
Individual
When you create or edit a record of an individual who has a relationship with a supply, you're able to record the following data:
Field |
Explanation |
| First Name Mandatory field |
The first name of the person. |
| Last Name Mandatory field |
The last name of the person. |
| Organisation Name Optional field |
If the person is part of an organisation and that organisation has a relationship with the supply, you can find and select that organisation by:
|
| Organisation role Optional field |
The role the contact has within the organisation. |
| Email Mandatory field |
The individual's business email address. |
| Business Phone Mandatory field |
It's mandatory to provide either a business phone number or mobile number (see next field). The number must start with + followed by the country (e.g. +64 for New Zealand). |
| Mobile phone Mandatory field |
It's mandatory to provide either a mobile phone number or business number (see previous field). The number must start with + followed by the country (e.g. +64 for New Zealand). |
| Physical Address Search Mandatory field |
See the Address Search field in the list of field types below, including an explanation of the NZ Post address database look up. |
| Physical Address Fields Some fields are mandatory |
Automatically populated if you select an address from the Physical Address Search look up results. |
| Postal Address is Different Optional field |
Click on this if the postal address is different from the physical address. Clicking will reveal the Postal Address fields. |
Final details
In this section you can upload one or more documents that relate to your supply registration.
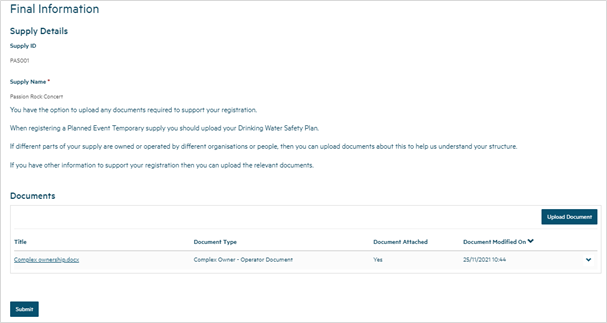
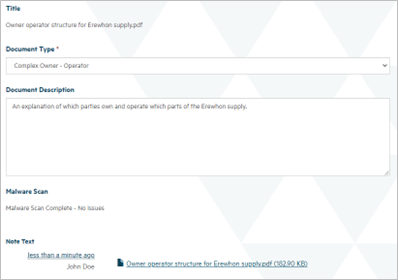
Document upload
When you upload a document, you'll be prompted for the following information:
Field |
Explanation |
| Document Type Mandatory field |
Select from one of the following:
|
| Document Description Optional field |
You can provide a description of the file to help us understand what's in it and how it relates to your supply. |
| Attach a File |
Clicking Choose File will allow you to browse your folders to find the file you wish to upload. Some file types are not allowed for security reasons. The maximum file size is 125Mb. |
| Malware Scan |
Read only field that appears once the file is uploaded. It reports the status of the virus scan performed when the file is uploaded. |
List of field types
Field Type |
Explanation |
| Free text field |
This is a simple field in which you can type text to record data:
|
| Read only field |
These are fields that are displayed for your information only. You don't need to (and cannot) update them:
|
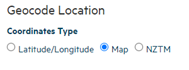
| Fields in which there are a limited number of options and you can pick one of them |
The options are usually all displayed on the screen, and you select one by clicking on the circle next to it:
|
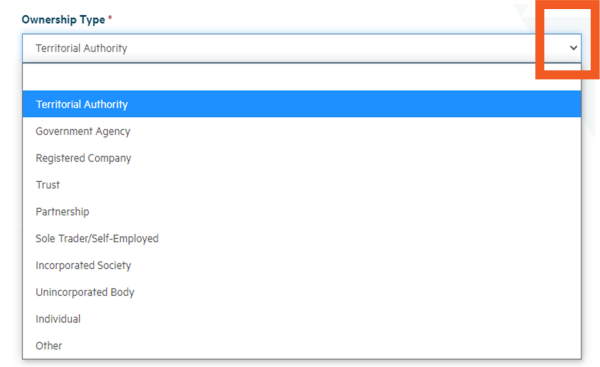
| Fields in which there are many options to choose from and you can pick one of them |
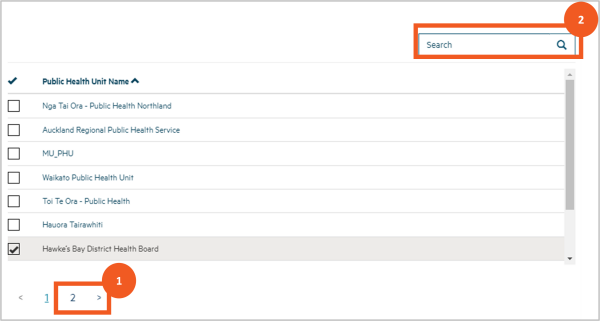
There are two ways Hinekōrako enables you to make your choice, depending on how it stores the options. Sometimes you can click on the down arrow at the end of the field to open a drop down list of options to choose from:
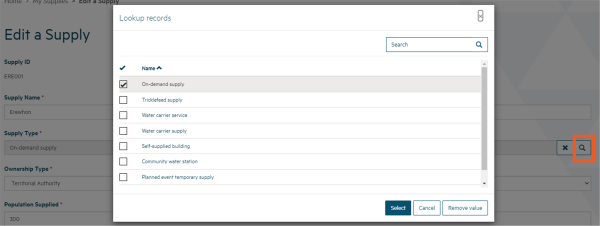
Sometimes you can click on the magnifying glass, which will open a pop-up screen listing the options to choose from:
Select the option you want by ticking the box next to it and then clicking Select. Sometimes this list is long and is broken across pages. You can:
|
| Fields in which you can select one or more options |
Below the field title there will be a series of checkboxes, which you can click on to select one or more of the options:
|
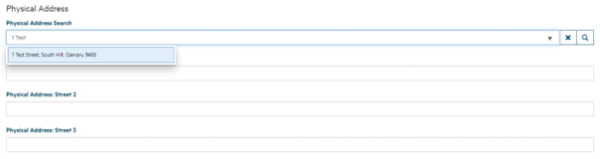
| Address search |
Whenever you're asked to record an address, a Physical Address Search field allows you to start typing the address and Hinekōrako will look up the database of NZ Post addresses as you type, giving you a list of addresses it has found. When your address appears in the list you can click on it to populate the address fields:
If your address isn't found, you can enter it in the fields yourself. Sometimes we'll ask you for the postal address as well as the physical address. By default we'll assume they are the same, but if they are not you can click the Postal Address is Different checkbox.
If you click the checkbox, Postal Address fields will appear, including a Postal Address Search box you can use to find your address in the NZ Post database. |
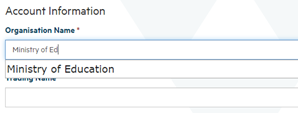
| Organisation name |
If you're creating a new record of an organisation, when you start typing in the Organisation Name field, Hinekōrako will start looking up the NZ Business Number register and display a list of organisations on that register that match the text you have entered.
If you select the organisation from the dropdown list, the Organisation Name, Trading Name and NZBN fields will be populated automatically. If the organisation isn't NZBN registered, you can complete recording in the Organisation Name field by continuing to type and then entering the Trading Name (if relevant) manually. |


Temporary drinking water safety plan
You’ll need to complete a temporary drinking water safety plan using this templateoutbound before we can progress your application.
We’ve put together these guidelines to help you prepare your plan.
It’s important to ensure the people planning, constructing and operating the temporary drinking water supply have suitable skills, knowledge and experience to supply safe drinking water. Your temporary drinking water safety plan should be completed or reviewed by an experienced person before it is submitted.
Your temporary drinking water safety plan will need to address the steps you have taken to ensure that the temporary drinking water supply for the event will not have a negative impact on the source of the water (e.g. contamination by chemicals or changing the flow of water). You may need to carry out source water quality monitoring and include the results with your application.
Processing your application
We’ll aim to process your application within 20 working days.
However, the processing time will depend on the complexity of your proposed water supply. We therefore recommend that you submit your application and temporary drinking water safety plan at least 40 working days before the event. That will ensure we have sufficient time to engage with you and obtain further information if needed and advise you of our decision. It will also give you time to make alternative arrangements if your application can’t proceed or is unsuccessful.
How we decide
We need to be satisfied that drinking water will, if supplied in accordance with your temporary drinking water safety plan and any registration conditions, be safe and comply with the Drinking Water Standardsoutbound.
We may attach conditions to your registration, such as:
- source water and drinking water testing and reporting requirements
- minimum treatment requirements for drinking water (e.g. for filtration, disinfection, residual disinfection)
- water quality monitoring with acceptable levels for specified determinands (e.g. freely available chlorine residual, pH, turbidity) and reporting requirements
- an obligation to immediately notify us of any incidents or issues that may result in drinking water being unsafe, non-compliant with the drinking water standards, or insufficient
- requirements on the training, experience and skills of people working on the water supply for the planned event
- a post-event report that includes water quality monitoring results, information on any conditions that have not been met, incidents or notifications, and any complaints about the water.
Once approved, please ensure the registration record is updated if any information provided in your application changes prior to the event. Any changes to the water supply may result in changes to the conditions of registration.
Fees
There is an initial fee of $1,300.00 + GST to cover the estimated costs of processing your application.
We’ll invoice you this amount after we have made our decision and notified you of it. We’ll send the invoice to the billing address provided in your application form.
You can either pay on the invoice or via internet banking to the Water Services Authority – Taumata Arowai account number 03-0566-0225575-000 with the following information:
- Reference field: the unique identifier from the email
- Code field: name of your event
This information will help us confirm the payment is for your application so the assessment process can begin.
Please note that the application fee is non-refundable if the application doesn’t proceed or is declined following assessment.
If the application fee doesn’t cover the estimated processing costs:
- we’ll advise you of the estimated final charges
- you’ll be asked to confirm you accept the estimated charges
- once you’ve accepted the estimated charges, the assessment will begin
- we’ll email you and provide an invoice once the decision has been made.
If you don’t accept the estimated charges, please let us know you’ll be withdrawing your application. You will then receive a full refund.
The estimated final charge may be revised to:
- reflect changed circumstances
- correct errors for incidental cost charges
- more accurately reflect the amount likely to be payable for any other charges (i.e. assessment or expert advice charges).
We’ll advise you if these situations arise.
The regulations set a cap on the charge for incidental costs. However, there is no cap for assessment and expert advice charges. The estimate is an indication of the final charge.
One application for multiple events
You can apply to register temporary drinking water supplies for multiple events within a 12-month period – provided the same information applies to all events, including the location/premises, the number of people expected to attend, the water supply arrangements and the event organiser.
A single registration for multiple planned events can only be made if the events take place within a 12-month period from the date of your submission.
You’ll need to advise us if any information you provided in the application form changes after approval is provided. You can do this by updating the registration record – as soon as possible and at least 20 days prior to the next planned event.
We may attach conditions if multiple events are approved on one application. For example, we may require specific testing and reporting of results during each event.
This webpage is intended as a guideline and summarises legal requirements but does not address every requirement under the Water Services Act. It is not intended to be definitive and is not legal advice. Drinking water suppliers are responsible for understanding and complying with their legislative duties. The Authority may review and revise this page over time. If you are using a printed copy, please check the website to make sure it is up to date.